3 yellow modules are connected with bees filling 2 out of 3

View A Beehive Up Close With This 3D Printed Hive

Bees are incredible insects that live and die for their hive, producing rich honey in complicated hive structures. The problem is as the average beekeeper, you wouldn’t see much of these intricate structures without disturbing the hive. So why not 3D print an observation hive? With [Teddy Hatcher]’s 3D printing creativity, that is exactly what he did.

A yellow 3D printed hexagonal panel

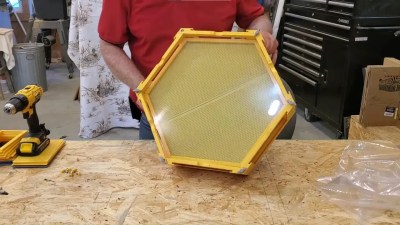
Hexagonal sections allow for viewing of entire panels of hexagonal cells, growing new workers, and storing the rich syrup we all enjoy. Each module has two cell panels, giving depth to the hive for heat/humidity gradients. The rear of a module has a plywood backing and an acrylic front for ample viewing. [Teddy] uses three modules plus a Flow Hive for a single colony, enough room for more bees than we here at Hackaday would ever consider letting in the front door.

As with many 3D printed projects involving food or animals, the question remains about health down the line. Plastic can bio-accumulate in hives, which is a valid concern for anyone wanting to add the honey to their morning coffee. On the other hand, the printed plastic is not what honey is added to, nor what the actual cell panels are made from. When considering the collected honey, this is collected from the connected Flow Hive rather than anything directly in contact with 3D printed plastic.

Beehives might not always need a fancy 3D printed enclosure; the standard wooden crates seem to work just fine for most, but there’s a time and place for some bio-ingenuity. Conditions in a hive might vary creating problems for your honey production, so you better check out this monitoring system dedicated to just that!

Continue reading “View A Beehive Up Close With This 3D Printed Hive”

IR Point And Shoot Has A Raspberry Heart In A 35mm Body

Photography is great, but sometimes it can get boring just reusing the same wavelengths over and over again. There are other options, though and when [Malcolm Wilson] decided he wanted to explore them, he decided to build a (near) IR camera. 

The IR images are almost ethereal.
Image : Malcom Wilson.

The housing is an old Yashica Electro 35 — apparently this model was prone to electrical issues, and there are a lot of broken camera bodies floating around– which hides a Pi NoIR Camera v3. That camera module, paired with an IR pass filter, makes for infrared photography like the old Yashica used to do with special film. The camera module is plugged into a Pi Zero 2 W, and it’s powered by a PiSugar battery. There’s a tiny (0.91″) OLED display, but it’s only for status messages. The viewfinder is 100% optical, as the designers of this camera intended. Point, shoot, shoot again.

There’s something pure in that experience; we sometimes find stopping to look at previews pulls one out of the creative zone of actually taking pictures. This camera won’t let you do that, though of course you do get to skip on developing photos. [Malcom] has the Pi set up to connect to his Wifi when he gets home, and he grabs the RAW (he is a photographer, after all) image files via SSH.  Follow the link above to [Malcom]’s substack, and you’ll get some design details and his python code.

The Raspberry Pi Foundation’s NoIR camera shows up on these pages from time to time, though rarely so artistically. We’re more likely to see it spying on reptiles, or make magic wands work.  So we are quite grateful to [Malcom] for the tip, via Petapixel. Yes, photographers and artists of all stripes are welcome to use the tips line to tell us about their work.

Follow the links in this article for more images like this.
Image: Malcom Wilson
Turbo engine mockup

3D Printer Turbo-Charges A Vintage Vehicle

[Ryan] of [Fat Lip Collective] has been on a streak of using 3D printing for his car mod projects. From spark plug adapters to exhaust pipes to dash panels, his CAD skills and additive manufacturing tech have played a number of roles in his process.

Most recently, [Ryan] has embarked on a mission to equip an ’80s-era Toyota KE70 Corolla with a turbo engine. The main question there being how to fit the engine back into the car once he’s inserted a salvaged turbo into the exhaust line.

There is a non-trivial amount of stuff that needs to be packed in with the rest of the engine and finding a working configuration that doesn’t get in the way of anything else requires some trial and error. Furthermore, the alignment of the many twisting and turning pieces of schedule 40 pipe that will direct gasses where they need to go needs to be pretty precise.

Juggling all of this would be tedious, time consuming, and error prone if it were not for [Ryan’s] mighty 3D printer. He printed a set of the different elbows and reducers modeled on the schedule 40 pipe that he would likely be using. He added degree markers for easy reference later and flat sections at the ends of each piece so they could be bolted to each other. With this kit of parts in hand, he was able to mock up different arrangements, re-configuring them as he considered the position of other nearby components.

Continue reading “3D Printer Turbo-Charges A Vintage Vehicle”

Hackaday Podcast Episode 327: A Ploopy Knob, Rube-Goldberg Book Scanner, Hard Drives And Power Grids Oscillating Out Of Control

It’s Independence Day here in the USA, but if you’re not a fan of fireworks and hot dogs, Elliot and Dan’s rundown of the best hacks of the week is certainly something to celebrate. Rest easy, because nothing exploded, not even the pneumatic standing desk that [Matthias] tore into, nor the electroplated 3D prints that [H3NDRIK] took a blowtorch to. We both really loved the Ploopiest knob you’ve ever seen, which would be even Ploopier in anodized aluminum, as well as an automatic book scanner that takes its job very seriously. We looked into the mysteries of the Smith chart, another couple of fantastic student projects out of Cornell, the pros and cons of service loops, and what happened when the lights went out in Spain last Spring. And what does Janet Jackson have against laptops anyway?


Continue reading “Hackaday Podcast Episode 327: A Ploopy Knob, Rube-Goldberg Book Scanner, Hard Drives And Power Grids Oscillating Out Of Control”

Blowtorching Electroplated 3D Prints For Good Reason

What if you electroplated a plastic 3D print, and then melted off the plastic to leave just the metal behind? [HEN3DRIK] has been experimenting with just such a process, with some impressive results.

For this work, [HEN3DRIK] prints objects in a special PVB “casting filament” which has some useful properties. It can be smoothed with isopropanol, and it’s also intended to be burnt off when used in casting processes. Once the prints come off the printer, [HEN3DRIK] runs a vapor polishing process to improve the surface finish, and then coats the print with copper paint to make the plastic conductive on the surface. From there, the parts are electroplated with copper to create a shiny metallic surface approximately 240 micrometers thick. The final step was to blowtorch out the casting filament to leave behind just a metal shell. The only problem is that all the fire tends to leave an ugly oxide layer on the copper parts, so there’s some finishing work to be done to get them looking shiny again.

We’ve featured [HEN3DRIK]’s work before, particularly involving his creation of electroplated 3D prints with mirror finishes. That might be a great place to start your research if you’re interested in this new work. Video after the break.

Continue reading “Blowtorching Electroplated 3D Prints For Good Reason”

Turbine Blower 3D Prints Every Part, Including Triple Planetary Gears

There was a time when print-in-place moving parts were a curiosity, but [Tomek] shows that things are now at a point where a hand-cranked turbine blower with integrated planetary gears can be entirely 3D printed. Some assembly is needed, but there is no added hardware beyond the printed parts. The blower is capable of decent airflow and can probably be optimized even further. Have a look at it work in the video below.

Every piece being 3D printed brings a few advantages. Prefer the hand crank on the other side? Simply mirror everything. Want a bigger version? Just scale everything up. Because all of the fasteners are printed as well as the parts, there’s no worry about external hardware no longer fitting oversized holes after scaling things up (scaling down might run into issues with tolerances, but if you manage an extra-small version, we’d love to hear about it).

There are a few good tips that are worth keeping in mind when it comes to print-in-place assemblies with moving parts. First, changing the seam location for each layer to ‘Random’ helps make moving parts smoother. This helps prevent the formation of a seam line, which can act as a little speed bump that gets in the way of smooth movement.

The other thing that helps is lubrication. A plastic-safe lubricant like PTFE-based Super Lube is a handy thing to have around the workshop and does wonders for smoothing out the action of 3D-printed moving parts. And we can attest that rubbing candle wax on mating surfaces works pretty well in a pinch.

One downside is that the blower is noisy in operation. 3D printed gears (and even printed bearings) can be effective, but do contribute to a distinct lack of silence compared to their purpose-built versions.

Still, a device like this is a sign of how far 3D printing has come, and how it enables projects that would otherwise remain an idea in a notebook. We do love 3D-printed gears.

Continue reading “Turbine Blower 3D Prints Every Part, Including Triple Planetary Gears”