A Simple Laser Harp MIDI Instrument

Craig Lindley is a technical author and a prolific maker of things. This simple project was his first attempt to create a laser harp MIDI device. While on vacation, Craig saw a laser harp with only three strings and decided to improve upon it by expanding it to twelve strings. The principle of operation is straightforward: twelve cheap diode laser modules aim a beam towards an LDR, which changes resistance if the light level changes when the beam is interrupted.

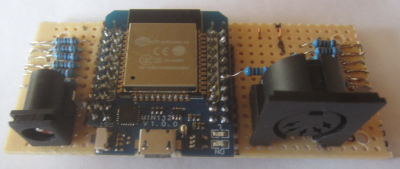
The controller is a simple piece of perf board, with a Wemos D1 mini ESP32 module flanked by some passives, a barrel socket for power, and the usual DIN connector for connecting the MIDI instrument. Using the ESP32 is a smart choice, removing all the need for configuration and user indication from the physical domain and pushing it onto a rarely-needed webpage. After a false start, attempting to use a triangular frame arrangement, [Craig] settled upon a simple linear arrangement of beams held within a laser-cut wooden box frame. Since these laser modules are quite small, some aluminium rod was machined to make some simple housings to push them into, making them easier to mount in the frame and keeping them nicely aligned with their corresponding LDR.
Sadly, the magnetic attachment method [Craig] used to keep the LDRs in place and aligned with the laser didn’t work as expected, so it was necessary to reach for the hot glue. We’ve all done that!

An interesting addition was using an M5 stack Unit-Synth module for those times when a proper MIDI synthesiser was unavailable. Making this luggable was smart, as people are always fascinated with laser harps. That simple internal synth makes travelling to shows and events a little easier.

Laser harps are nothing new here; we have covered plenty over the years. Like this nice build, which is more a piece of art than an instrument, one which looks just like a real harp and sounds like one, too, due to the use of the Karplus-Strong algorithm to mimic string vibrations.

Four Steppers Make A Four-Voice MIDI Instrument

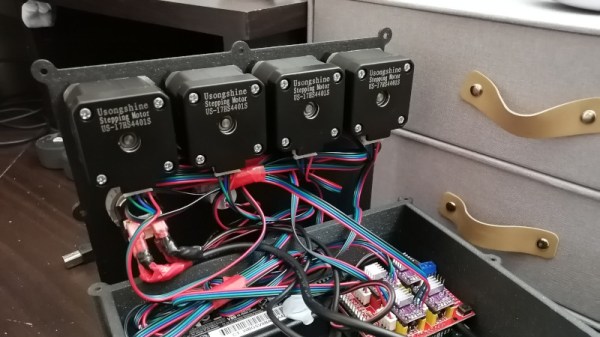
Any owner of a budget 3D printer will tell you that they can be pretty noisy devices, due to their combinations of stepper motors and drives chosen for cost rather than quiet. But what if the noise were an asset, could the annoying stepper sound be used as a musical instrument? It’s a question [David Scholten] has answered with the Stepper Synth, a device that takes an Arduino Uno and four stepper motors to create a four-voice MIDI synthesiser.

Hardware-wise it’s as simple as you’d expect, a box with four stepper motors each with a red 3D-printed flag on its shaft to show rotation. Underneath there is the Arduino, plus a robot control shield and a set of stepper driver boards. On the software side it uses MIDI-over-serial, so as a Windows user his instructions for the host are for that operating system only. The Arduino makes use of the Arduino MIDI library, and he shares tips on disabling the unused motors to stop overheating.

You can hear it in action in the video below the break, and we’re surprised to say it doesn’t sound too bad. There’s something almost reminiscent of a church organ in there somewhere, it would be interesting to refine it with an acoustic enclosure of some kind.

This isn’t the first such instrument we’ve brought you, for a particularly impressive example take a look at the Floppotron.

Continue reading “Four Steppers Make A Four-Voice MIDI Instrument”

Forgotten Rock Band Drum Controller As A MIDI Instrument

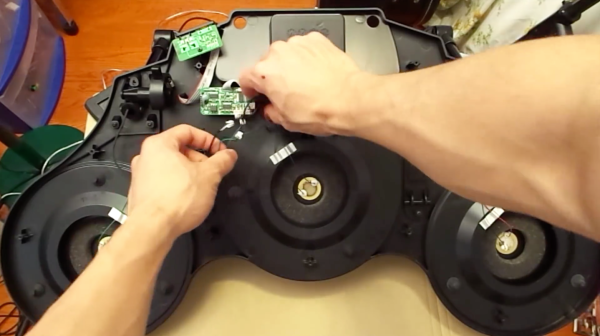
Happen to have an old Rock Band drum controller collecting dust in your living room? If you also have a spare Arduino and don’t mind parting with that plastic college memento then you’ve got the bulk of what could potentially be your new percussive MIDI instrument. In his project video [Evan Kale] outlines the steps necessary to turn that unloved plastic into a capable instrument for recording.

The whole process as outlined by [Evan] in under seven minutes. This looks like a great weekend endeavor for those of us just starting out with MIDI. After cracking the back of the Guitar Hero drum kit controller open, the main board within is easily replaced with a standard sized Ardunio (which matches the present mounting holes exactly). About 4:50 into the video [Evan] explains how to add a basic perf-board shield over the Arduino which connects the piezo sensors in each of the drum pads to the analog pins of the micro-controller. The MIDI jack that comes built into the back of the kit can also be reused as MIDI out when wired to the Arduino’s serial out pin. By adjusting [Evan’s] example code you can dial in the instrument’s feedback to match the intensity of each hit.

The video with all of the details is after the jump. Or you can check out a MIDI hack that goes the other way and uses a drum kit as a Guitar Hero or Rock Band controller instead

Continue reading “Forgotten Rock Band Drum Controller As A MIDI Instrument”

Guitar Hero As An Instrument Or Midi Controller

[youtube=http://www.youtube.com/watch?v=azfgasnWtW0]

[Robert] wrote a program using Max/MSP that lets him make music with his guitar hero controller. There’s another video after the break where he walks through the various features but here’s the gist of it. This works on Mac and Windows and allows a sort of ‘live play’ or midi mapping mode. In the midi mode each key can be configured to do your bidding. His example uses the pick bar to scroll through different samples and the green button the play them or the red button to stop.

The live mode us much more involved. In the software you choose the type of scale and the key you’d like to play in. This makes up for the controller’s lack of enough frets to make it a chromatic instrument and these settings can be adjust from the controller. There is an up-pick offset that makes the upward movement of the pick bar a different note than the downward movement. The motion control can also be used as an input. He demonstrates pitch bending and cutoff using that method.

This looks like a lot of fun. He needs to team up with [Joran] to add drums to the mix, forming a much more creative rock band than you can buy in the store.

Continue reading “Guitar Hero As An Instrument Or Midi Controller”

A C-shaped wooden frame is shown surrounding a circular tongue drum. The wooden frame holds eight black adjustable arms, at the ends of which are mounted solenoids, positioned just above the surface of the drum.

Giving A Drum MIDI Input With Lots Of Solenoids

As far as giving mechanical instruments electronic control goes, drums are probably the best candidate for conversion; learning to play them is challenging and loud for a human, but they’re a straightforward matter for a microcontroller. [Jeremy Cook]’s latest project takes this approach by using an Arduino Opta to play a tongue drum.

[Jeremy]’s design far the drum controller was inspired by the ring-shaped arrangement of the Cray 2 supercomputer. A laser-cut MDF frame forms a C-shape around the tongue drum, and holds eight camera mount friction arms. Each friction arm holds a solenoid above a different point on the drum head, making it easy to position them. A few supports were 3D-printed, and some sections of PVC tubing form pivots to close the ring frame. [Jeremy] found that the the bare metal tips of the solenoids made a harsh sound against the drum, so he covered the tips of six solenoids with plastic caps, while the other two uncoated tips provide an auditory contrast.

The Arduino Opta is an open-source programmable logic controller normally intended for industrial automation. Here, its silent solid-state relays drive the solenoids, as [Jeremy]’s done before in an earlier experiment. The Opta is programmed to accept MIDI input, which [Jeremy] provided from two of the MIDI controllers which we’ve seen him build previously. He was able to get it working in time for the 2024 Orlando Maker Faire, which was the major time constraint.

Of course, for a project like this you need a MIDI controller, and we’ve previously seen [Jeremy] convert a kalimba into such a controller. We’ve seen this kind of drum machine at least once before, but it’s more common to see a purely electronic implementation.

A black PCB is shown, with an Arduino Nano mounted in the bottom left corner. The rest of the space on the PCB is used up by ten DIP integrated circuits and a few resistors and diodes. Several black and red wires connect different parts of the PCB.

Meowsic Keyboard MIDI Adapter Aims For Purrfection

Both small children and cats have a certain tendency to make loud noises at inopportune times, but what if there were a way to combine these auditory effects? This seems to have been the reasoning behind the creation of the Meowsic keyboard, a children’s keyboard that renders notes as cats’ meows. [Steve Gilissen], an appreciator of unusual electronic instruments, discovered that while there had been projects that turned the Meowsic keyboard into a MIDI output device, no one had yet added MIDI input to it, which of course spurred the creation of his Meowsic MIDI adapter.

The switches in the keys of the original keyboard form a matrix of rows and columns, so that creating a connection between a particular row and column plays a certain note. [Steve]’s plan was to have a microcontroller read MIDI input, then connect the appropriate row and column to play the desired note. The first step was to use a small length of wire to connect rows and columns, thus manually mapping connections to notes. After this tedious step, he designed a PCB that hosts an Arduino Nano to accept input, two MCP23017 GPIO expanders to give it enough outputs, and CD4066BE CMOS switches to trigger the connections.
Continue reading “Meowsic Keyboard MIDI Adapter Aims For Purrfection”

A Parts Bin MIDI Controller In 24 Hours

Part of the reason MIDI has hung on as a standard in the musical world for so long is that it is incredibly versatile. Sure, standard instruments like pianos and drums can be interfaced with a computer fairly easily using this standard, but essentially anything can be converted to a MIDI instrument with the right wiring and a little bit of coding. [Jeremy] needed to build a MIDI controller in a single day, and with just a few off-the-shelf parts he was able to piece together a musical instrument from his parts bin.

The build is housed in an off-brand protective case from a favorite American discount tool store, but the more unique part of the project is the choice to use arcade buttons as the instrument’s inputs. [Jeremy] tied eight of these buttons to an Arduino Uno to provide a full octave’s worth of notes, and before you jump to the comments to explain that there are 12 notes in an octave, he also added a button to the side of the case to bend any note when pressed simultaneously. An emergency stop button serves as a master on/off switch and a MIDI dongle on the other side serves as the interface point to a computer.

After a slight bit of debugging, the interface is up and running within [Jeremy]’s required 24-hour window. He’s eventually planning to use it to control a custom MIDI-enabled drum kit, but for now it was fun to play around with it in some other ways. He’s also posted the project code on a GitHub page. And, if this looks a bit familiar, this was not [Jeremy]’s first MIDI project. He was also the creator of one of the smallest MIDI interfaces we’ve ever seen.

Continue reading “A Parts Bin MIDI Controller In 24 Hours”