The lovely thing about the x86 architecture is its decades of backwards compatibility, which makes it possible to run 1990s operating systems on modern-day hardware, with relatively few obstacles in the way. Recently [Yeo Kheng Meng] did just that with Windows 98 SE on a 2020 ThinkPad P12s Gen 1, booting it alongside Windows 11 and Linux from the same NVMe drive.
Naturally, after previously getting MS-DOS 6.22 from 1994 running on a 2020 ThinkPad X13, the step to doing the same with Windows 98 SE wasn’t that large. The main obstacles that you face come in the form of UEFI and hardware driver support.
Both ThinkPad laptops have in common that they support UEFI-CSM mode, also known as ‘classical BIOS’, as UEFI boot wasn’t even a glimmer yet in some drunk engineer’s eye when Win98 was released. After this everything is about getting as many hardware drivers scrounged together as possible.
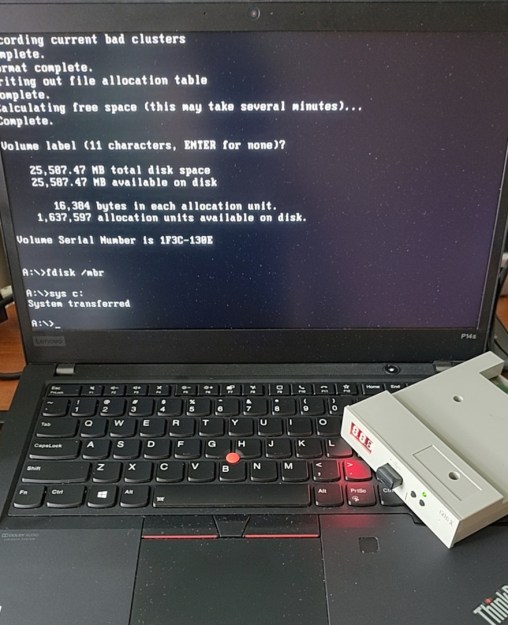 [Yeo] ended up having to bodge on a USB 2.0 expansion card via a Thunderbolt dock as Win98 doesn’t have xHCI (USB 3.0) support. With that issue successfully bodged around using a veritable tower of adapters, installing Windows 98 was as easy as nuking Secure Boot in the BIOS, enabling UEFI-CSM along with Thunderbolt BIOS assist mode and disable Kernel DMA protection.
Because UEFI-CSM implementations tend to be buggy, the CREGFIX DOS driver was used to smooth things over. Another issue is the same that we chuckled about back in the day, as Windows 98 cannot address more than 512 MB of RAM by default. Fortunately patches by [Rudolph Loew] helped to fix this and some other smaller issues.
Unfortunately neither Intel nor NVIDIA have released Win98 drivers for quite some time, so there’s no graphics acceleration beyond basic VESA support and the SoftGPU driver. Disk access goes via the BIOS too rather than using an NVMe driver, so it’s not as zippy as it could be, but for Win9x it’s quite usable.
Finally ACPI wasn’t recognized by Win98, but it’s only fair to blame that on the complete flaming train wreck that is ACPI rather than anything to do with Windows. This particular issue was worked around by configuring the BIOS to support S3 power state and with that making Win98 happy again.
It’s honestly quite a shame that UEFI-CSM is largely ignored by new systems, as it makes installing even Windows 7 basically impossible, and thus creating probably the largest split within the x86 ecosystem since the arrival of AMD64/x86_64.