Build A Tablet Out Of Your Framework Motherboard

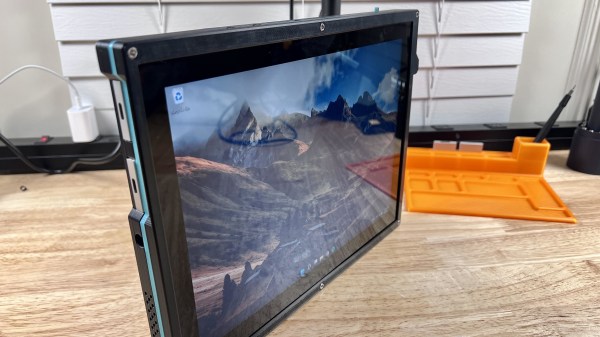
The Framework laptop project is known for quite a few hacker-friendly aspects. For example, they encourage you to reuse its motherboard as a single-board computer – making it into a viable option for your own x86-powered projects. They have published a set of CAD files for that, and people have been working on their own Framework motherboard-based creations ever since; our hacker, [whatthefilament], has already built a few projects around these motherboards. Today, he’s showing us the high-effort design that is the FrameTablet – a 15″ device packing an i5 processor, all in a fully 3D printed chassis. The cool part is – thanks to his instructions, you can build one yourself!

This tablet sports a FullHD touchscreen IPS display and shows some well-thought-out component mounting, using heat-set inserts and screws, increasing such a build’s mechanical longevity. You lose one of the expansion card slots to the USB-C-connected display, but it’s a worthwhile tradeoff, and the touchscreen functionality works wonders in Windows. [whatthefilament] has also published a desk holder and a wall mount to accompany this design – if it’s a bit too large for you to hold in some situations, you can mount it in a more friendly, hands-free way. This is a solid and surprisingly practical tablet, and unlike the Raspberry Pi tablet builds we’ve seen, its x86 heart packs enough power to let you do things like CAD on the go.

With STLs and STEPs available, his build is a decent option for when you’ll want to replace your Framework’s motherboard with a new, upgraded one. You might’ve already noticed a few high-effort projects with these motherboards on our pages – perhaps, this transparent shell handheld with a mech keyboard and trackball, or this personal terminal with a futuristic-looking round display. This project is part of the “send 100 motherboards to hackers” initiative that Framework organized a few months ago, and we can’t say it hasn’t been working out for them!

Homemade CAT Scan Shouldn’t Scan Cats

[Pyrotechnical] thought about buying a CAT scanner and found out they cost millions of dollars. So he decided to build one for about $200 using a salvage X-ray tube and some other miscellaneous parts. A scintillating detector provides the image for pick up with a camera phone. The control? An Arduino, what else? You can watch the video below, but due to plenty of NSFW language, you might want to put your headphones on if you don’t want to shock anyone.

Of course, you need to be careful when working with energetic X-rays. To keep away from the X-ray source, [Pyrotechnical] used a Roku remote and an IR sensor to control the device from afar. The electronics is pretty easy. You just have to rotate a turntable and trigger the camera while lighting up the X-ray tube.

Continue reading “Homemade CAT Scan Shouldn’t Scan Cats”

CT Scans Help Reverse Engineer Mystery Module

The degree to which computed tomography has been a boon to medical science is hard to overstate. CT scans give doctors a look inside the body that gives far more information about the spatial relationship of structures than a plain X-ray can. And as it turns out, CT scans are pretty handy for reverse engineering mystery electronic modules, too.

The fact that the mystery module in question is from Apollo-era test hardware leaves little room for surprise that [Ken Shirriff] is the person behind this fascinating little project. You’ll recall that [Ken] recently radiographically reverse engineered a pluggable module of unknown nature, using plain X-ray images taken at different angles to determine that the undocumented Motorola module was stuffed full of discrete components that formed part of a square wave to sine wave converter.

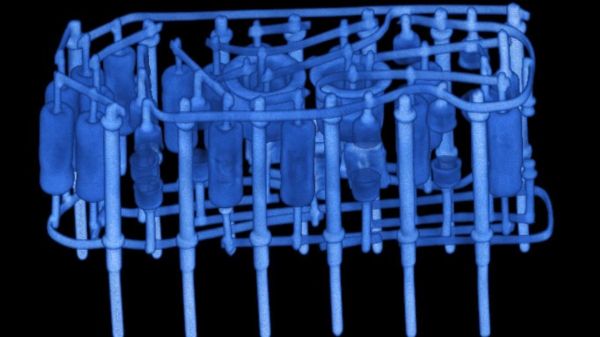
The module for this project, a flip-flop from Motorola and in the same form factor, went into an industrial CT scanner from an outfit called Lumafield, where X-rays were taken from multiple angles. The images were reassembled into a three-dimensional view by the scanner’s software, which gave a stunningly clear view of the components embedded within the module’s epoxy body. The cordwood construction method is obvious, and it’s pretty easy to tell what each component is. The transistors are obvious, as are the capacitors and diodes. The resistors were a little more subtle, though — careful examination revealed that some are carbon composition, while others are carbon film. It’s even possible to pick out which diodes are Zeners.

The CT scan data, along with some more traditional probing for component values, let [Ken] reverse engineer the whole circuit, which turned out to be a little different than a regular J-K flip-flop. Getting a non-destructive look inside feels a little like sitting alongside the engineers who originally built these things, which is pretty cool.

Want Faster Extrusion But Don’t Have A Volcano? Nuts!

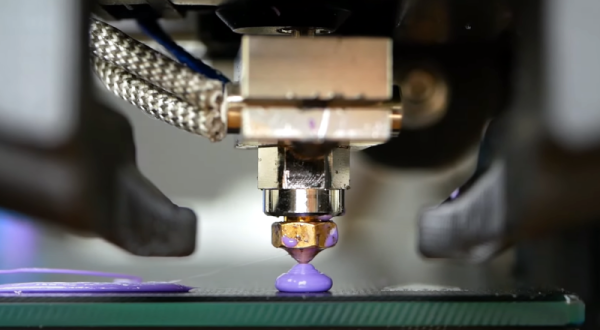
A lot of people want to print faster. Maybe they don’t like to wait, or they need to print a lot of things. Maybe it is just human nature to want to push things to go faster. The problem is, if you move filament too fast it may not have time to melt inside the hot end. To combat that, some people install a “volcano” — a larger heat block that takes a special longer nozzle. The melt zone is longer so there is more time for the filament to liquefy before shooting out of the nozzle. This is also a problem if you are using a very large nozzle size. But what if you don’t have one of these special hot ends? According to [Stefan], you can use a normal hotend with a volcano-style nozzle just by adding some common nuts. You can see the explanation in the video, below.

The idea came from a few commercial offerings that allow converting between different-sized melt zones. Some of these use the same idea. But, if you are familiar with [Stefan’s] videos, you know he tested the results thoroughly. The tests reveal that a standard V6-style hotend can handle rates of just over 9.8mm/second. with a 0.4mm nozzle at 210C and is usable beyond that. A true volcano hotend. starts deviating from the ideal at about 15mm/second and, also, is usable at even higher rates. But what about just using a long nozzle in a regular block with or without the nuts?

Continue reading “Want Faster Extrusion But Don’t Have A Volcano? Nuts!”

Photo of the MCH2022 badge's screen, showing the "Hack me if you can" app's start splashscreen, saying "Service is accessible on IP ADDRESS : 1337"

MCH2022 Badge CTF Solved, With Plenty To Learn From

Among all the things you could find at MCH2022, there were a few CTFs (Capture The Flag exercises) – in particular, every badge contained an application that you couldĀ  try and break into – only two teams have cracked this one! [dojoe] was part of one of them, and he has composed an extensive reverse-engineering story for us – complete with Ghidra disassembly of Xtensa code, remote code execution attempts, ROP gadget creation, and no detail left aside.

There was a catch: badges handed out to the participants didn’t contain the actual flag. You had to develop an exploit using your personal badge that only contained a placeholder flag, then go to the badge tent and apply your exploit over the network to one of the few badges with the real flag on them. The app in question turned out to be an echo server – sending back everything it received; notably, certain messages made it crash. One man’s crashes are another man’s exploit possibilities, and after a few hacking sessions, [dojoe]’s team got their well-deserved place on the scoreboard.

If you always thought that firmware reverse-engineering sounds cool, and you also happen to own a MCH2022 badge, you should try and follow the intricately documented steps of [dojoe]’s writeup. Even for people with little low-level programming experience, repeating this hack is realistic thanks to his extensive explanations, and you will leave with way more reverse-engineering experience than you had before.

The MCH2022 badge is a featureful creation of intricate engineering, with the ESP32 portion only being part of the badge – we’re eager to hear about what you’ve accomplished or are about to accomplish given everything it has to offer!

Laptoppin’ Like 1975

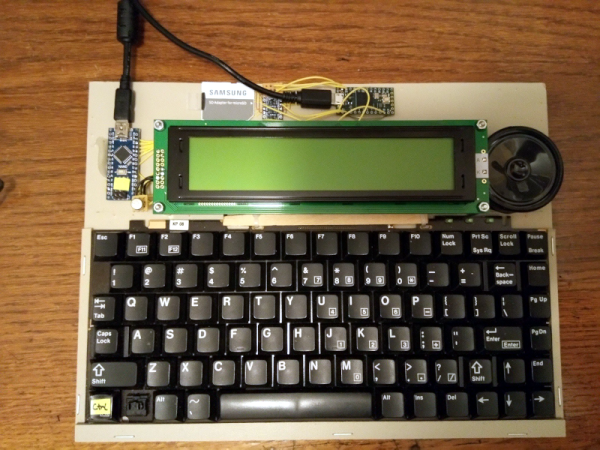
When we first saw the PZ1 laptop — a 6502 laptop-style computer with a small display and 512K of RAM — we couldn’t help but think of the old AIM 65 computer from Rockwell, although that only had 1K of memory. The other thing the AIM didn’t have was an ancillary microcontroller to help out that is way more powerful than the main processor.

There are actually several versions of the PZ1 and you can find some very detailed information over on Hackaday.io and GitHub. Recently, [Adam] release version 2.0 and tested some PC boards that are working well.

Continue reading “Laptoppin’ Like 1975”

Compare PDFs Visually

Sometimes a problem seems hard, but the right insight can make it easy. If you were asked to write a program to compare two PDF files and show the differences, how hard do you think that would be? If you are [serhack], you’ll make it much easier than you might guess.

Of course, sometimes making something simple depends on making simplifying assumptions. If you are expecting a “diff-like” utility that shows insertion and deletions, that’s not what’s going on here. Instead, you’ll see an image of the PDF with changes highlighted with a red box. This is easy because the program uses available utilities to render the PDFs as images and then simply compares pixels in the resulting images, drawing red boxes over the parts that don’t match.

Continue reading “Compare PDFs Visually”