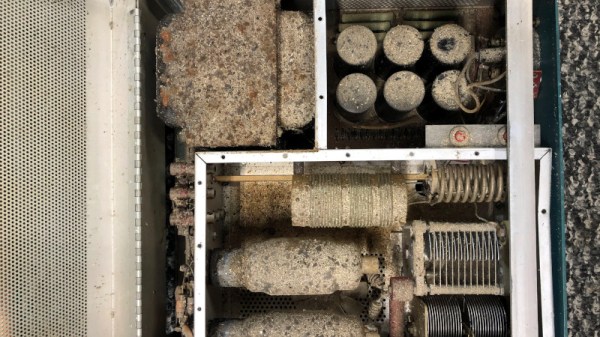
This Week In Security: OpenSSL Fizzle, Java XML, And Nothing As It Seems

The security world held our collective breaths early this week for the big OpenSSL vulnerability announcement. Turns out it’s two separate issues, both related to punycode handling, and they’ve been downgraded to high severity instead of critical. Punycode, by the way, is the system for using non-ASCII Unicode characters in domain names. The first vulnerability, CVE-2022-3602, is a buffer overflow that writes four arbitrary bytes to the stack. Notably, the vulnerable code is only run after a certificate’s chain is verified. A malicious certificate would need to be either properly signed by a Certificate Authority, or manually trusted without a valid signature.

A couple sources have worked out the details of this vulnerability. It’s an off-by-one error in a loop, where the buffer length is checked earlier in the loop than the length variable is incremented. Because of the logic slip, the loop can potentially run one too many times. That loop processes the Unicode characters, encoded at the end of the punycode string, and injects them in the proper place, sliding the rest of the string over a byte in memory as a result. If the total output length is 513 characters, that’s a single character overflow. A Unicode character takes up four bytes, so there’s your four-byte overflow. Continue reading “This Week In Security: OpenSSL Fizzle, Java XML, And Nothing As It Seems”

Thin Client And Smartphone Step In For 3D Printer’s Raspberry Pi And Touchscreen

It’s no secret that Raspberry Pi’s are a little hard to come by these days. Unless you had the foresight to stock up before the supply dried up — and if you did, we want to talk to you — chances are good that you’ve got a fair number of projects that use the ubiquitous SBC on indefinite hold. And maybe that’s got you thinking about alternatives to the Pi.

That’s apparently what was on [Crimson Repair]’s mind lately, the result being the discovery that an old thin client PC makes a dandy stand-in for a Raspberry Pi, at least in some cases. The video below is on the long side, true, But it’s chock full of command-by-command instructions for getting a Dell Wyse 3040, a thin client that can be found on the secondary market for $25 or so, up and running as a Klipper alternative for a 3D printer. These machines, which usually see use in point-of-sale applications and the like, sport a 1.4-GHz Intel Atom processor and a couple of gigs of RAM, and the form factor is just right for tucking into the base of an Ender 3.

Getting one up and running is a matter of getting a Debian image onto a USB key and configuring the thin client to boot from USB. After that it’s a simple matter of installing Klipper and wiring up a buck converter to power the machine. It’s not exactly rocket surgery, but why muddle through the process when someone has already been down the path ahead of you? And if you want to take it further, the second video below walks you through all the steps needed to add a touchscreen using an old Android phone. With a 3D printed bracket, the whole thing is a nicely complete printer control solution.

Continue reading “Thin Client And Smartphone Step In For 3D Printer’s Raspberry Pi And Touchscreen”

A blue cabinet. Inside, along the front and back are wooden sawteeth holding a cleat. On the cleat sits the shelf itself.

Adjusting Shelves Like It’s 1899

In most modern homes, any adjustable shelves or cabinets have metal shelf pins set inside conveniently spaced holes. Before the accoutrements of modern life, like easily replicated metal parts, you may have found a sawtooth shelf doing the same job with just wood.

The system comprises three parts: a series of “sawteeth” running up and down the front and back edge of a cabinet, a cleat to sit between the teeth, and a shelf with notched corners that can then be set down on the cleats on either side.

While not as convenient as running a drill through a shelf pin jig, this method has a certain charm and sturdiness that isn’t present in more modern methods of making adjustable shelves. We can see this being particularly useful for restoration projects of homes from the 19th Century or earlier where you want some of those aforementioned accoutrements without things looking too anachronistic.

If you want some shelving that’s decidedly more 21st Century, check out this MP3 Player Shelf or this Smart Shelf with Serious Functionality.

Walnut Case Sets This Custom Arduino-Powered RPN Calculator Apart From The Crowd

How many of us have an everyday tool that’s truly unique? Likely not many of us; take a look around your desk and turn out your pockets, but more often than not, what you’ll find is that everything you have is something that pretty much everyone else on the planet could have bought too. But not so if you’ve got this beautiful custom RPN calculator in a wooden case.

This one comes to us from [Shinsaku Hiura], who generally dazzles us with unique mechanical clocks and displays. This calculator solves a more practical problem — the dearth of RPN calculators on the market with the correct keyboard feel, specifically with the large keys and light touch he desired. Appropriately, the build started with a numeric keypad, which once liberated of its USB interface was reverse-engineered to figure out how the matrix was wired. Next up, a custom PCB to connect the keypad to an Arduino and a 20×4 LCD display was milled up, while a test case was designed and printed to check fitment. The final case was milled from a block of solid walnut and fitted with an acrylic window, for a sharp look with clean lines and pleasing colors.

As for the calculator itself, the demo below shows it going through its paces. The code is clever because it leverages the minimal number of keys available by hiding all the scientific and engineering functions behind a “secret silver key” that was once the equals key and obviously not needed in RPN. Hats off to [Shinsaku] for a handsome and unique addition to his desk.

Continue reading “Walnut Case Sets This Custom Arduino-Powered RPN Calculator Apart From The Crowd”

PSU charging an externally connected supercapacitor bank that's powering the phone. There's a current clamp on one of the wires to measure charging current, and a multimeter measuring the charging voltage.

Just How Fast Could You Charge An IPhone?

An iPhone 8, now a relatively cheap model, can charge its battery fully in two hours’ time. There’s hardly ever a need for faster charging, but it’s fair to ask – how much faster could it really go? [Scotty Allen] from [Strange Parts], back after a hiatus, is back to stretching the limits of what a regular iPhone can do, and decides to start off with an exploration of battery technologies.

What people commonly encounter is that charging speed depends on the charger involved, but even one hundred chargers in parallel won’t speed up this iPhone’s charging rate, so what’s up? First off, the phone’s charger chip and the battery’s BMS will both limit charging current, so for experiment purposes, those had to be bypassed. First attempt was using a hefty DC power supply with the original cell, and, unsatisfied with the lack of fire and still relatively slow charging, [Scotty] decides to up the ante.
Continue reading “Just How Fast Could You Charge An IPhone?”

A personal computer drive bay with a glowing LED display

Turbo Button Pays Charming Homage To Early Personal Computers

The PC turbo button and LED clock speed display were common features on early personal computers. Wanting to add a little retro chic to his modern battle-station, [Matthew Frost] assembled a charming and functional homage to the turbo button control panel.

In days past, this automotive nomenclature implied a performance boost when activated. Instead, ‘turbo mode’ would clock your x86 processor at its rated speed. Disabling ‘turbo’ would throttle the CPU, often all the way down to 4.77MHz. Inherited from the original IBM PC, some early computer programs relied on this specific clock speed, and would otherwise run too fast (or not at all) on faster hardware. PC marketing teams and engineers alike stopped including the turbo button and glowing clock speed numbers around the Pentium era.

This modern re-imagining of the turbo button uses an Arduino microcontroller, seven-segment display and tactile switches to emulate the look and feel of the original hardware. Instead of directly adjusting the CPU clock speed, hitting turbo switches between balanced and high-performance Windows power plans. The seven-segment display measures this clock speed in GHz to two decimal places. We’ll admit that it’s pretty satisfying to see those numbers inch higher when switching to turbo.

The rightmost button switches between measuring CPU speed, GPU utilization, network load and memory utilization, which improves on its original inspiration. The tubular key lock, also a common sight on early PCs, enables and disables networking for the entire system, which is great for keeping the kids off the ‘net (at least until they figure out how to remove the 5.25″ drive bay from the system and hot-wire the network adapter with a paperclip).

There are more details on the GitHub page, in case you want to build your own. This project could look especially fetching in PC sleeper builds, where new components are ‘hidden’ in old case hardware. And if this has made you feel nostalgic at all, you may want to hear our thoughts on why it’s all about the Pentiums.

Continue reading “Turbo Button Pays Charming Homage To Early Personal Computers”

Screenshot from the video showing comparisons between diffused light pictures at different brightnesses and diffusers applied

LED Diffusers Confusing? Organize A Practical Contest

We all want a nice and shiny LED strip that doesn’t actually look like it consists of individual LEDs – a bar of uniform light is just that much more attractive. There’s all kinds of diffusion options available out there, but they can be confusing – sometimes you’d just like to know, which one is better? If there’s one thing that could easily settle this, it’s a practical test, and that’s what [The Hook Up] has devised for us to learn from.

First off, he talks about LED strips available – between 30, 60 and 144 LED per meter variations, the latter is going to be easier to diffuse than the former. From there, there’s a few different kinds of diffuser covers and aluminum profiles you can get, and [The Hook Up] pairs them in combinations, filming them from a distance and giving us concise visuals of how each combination works at different duty cycles, as well as making brightness measurements every now and then to evaluate losses of different diffuser layers. He proposes a simple rule – when picking a diffuser, distance between the LEDs and the diffuser has to be larger than the between-LED distance, and experiments confirm that. In the end, one of the takeaways is that the differences between 60LED/m and 144LED/m strips are not significant enough that they can’t be compensated for with a decent diffuser.

Continue reading “LED Diffusers Confusing? Organize A Practical Contest”