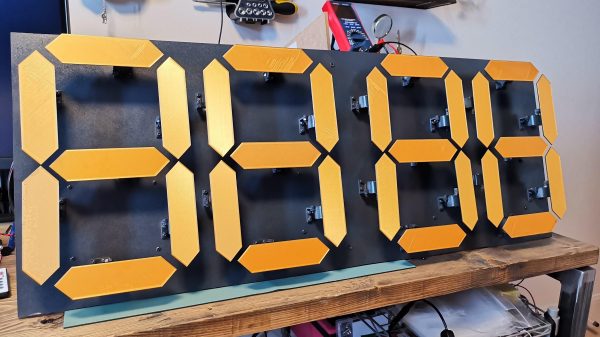
A Simple Serial Display

Often with more “modern” complex protocols involving handshaking, token exchanges, and all the other hoops and whistles accompanying them, we forget how useful and powerful serial can be. In what might be a wonderful tribute to that, [Davide Gironi] created a simple AVR-powered 16-digit serial display.

It can display two numbers, and that’s it. A MAX7219 drives the display, and the brains are an ATmega8. It’s straightforward to send new values: a start byte, a CRC, the data to display, and an end byte. A CP2102 provides a UART to USB interface to connect to a host. An EEPROM helps it remember the last numbers shown. It supports positive, negative, and floating-point numbers.

This is a beautiful example of doing one thing and doing it well. The design is simple and allows it to be used for anything. You can show the current stock market price, the time for the next two trains for your commute, or whatever else you can think of. [Davide] included a schematic, code, and a 3d printed enclosure.

Perhaps the idea could be combined with a clever design for a single-motor seven-segment display.

Continue reading “A Simple Serial Display”

A personal computer drive bay with a glowing LED display

Turbo Button Pays Charming Homage To Early Personal Computers

The PC turbo button and LED clock speed display were common features on early personal computers. Wanting to add a little retro chic to his modern battle-station, [Matthew Frost] assembled a charming and functional homage to the turbo button control panel.

In days past, this automotive nomenclature implied a performance boost when activated. Instead, ‘turbo mode’ would clock your x86 processor at its rated speed. Disabling ‘turbo’ would throttle the CPU, often all the way down to 4.77MHz. Inherited from the original IBM PC, some early computer programs relied on this specific clock speed, and would otherwise run too fast (or not at all) on faster hardware. PC marketing teams and engineers alike stopped including the turbo button and glowing clock speed numbers around the Pentium era.

This modern re-imagining of the turbo button uses an Arduino microcontroller, seven-segment display and tactile switches to emulate the look and feel of the original hardware. Instead of directly adjusting the CPU clock speed, hitting turbo switches between balanced and high-performance Windows power plans. The seven-segment display measures this clock speed in GHz to two decimal places. We’ll admit that it’s pretty satisfying to see those numbers inch higher when switching to turbo.

The rightmost button switches between measuring CPU speed, GPU utilization, network load and memory utilization, which improves on its original inspiration. The tubular key lock, also a common sight on early PCs, enables and disables networking for the entire system, which is great for keeping the kids off the ‘net (at least until they figure out how to remove the 5.25″ drive bay from the system and hot-wire the network adapter with a paperclip).

There are more details on the GitHub page, in case you want to build your own. This project could look especially fetching in PC sleeper builds, where new components are ‘hidden’ in old case hardware. And if this has made you feel nostalgic at all, you may want to hear our thoughts on why it’s all about the Pentiums.

Continue reading “Turbo Button Pays Charming Homage To Early Personal Computers”

An electromechanical wall clock on a workbench, showing "8888"

Silent Stepper Motors Make Electromechanical Clock Fit For A Living Room

Large mechanical seven-segment displays have a certain presence that you just don’t get in electronic screens. Part of this comes from the rather satisfying click-click-clack sound they make at every transition. Unfortunately, such a noise quickly becomes annoying in your living room; [David McDaid] therefore designed a silent electromechanical seven-segment clock that has all the presence of a mechanical display without the accompanying sound.

As [David] describes in a very comprehensive blog post, the key to this silent operation is to use stepper motors instead of servos, and to drive them using a TMC2208 stepper motor driver. This chip has a unique method of regulating the current that does not introduce mechanical vibrations inside the motor. A drawback compared to servos is the number of control wires required: with four wires going to each motor, cable management becomes a bit of an issue when you try to assemble four seven-segment displays.

Continue reading “Silent Stepper Motors Make Electromechanical Clock Fit For A Living Room”

Three-Dimensional Design Yields Compact Seven-Segment Hex Displays

Computers, from the simplest to the most complex, aren’t very useful if they can’t provide feedback to a user. Whether that interface takes the form of a monitor, a speaker, or a simple LED, there’s almost always some kind of output. One of the most ubiquitous is the ever-present seven-segment display. They’re small, they’re easy to use, and, perhaps most important, they’re cheap.

While the displays themselves are relatively compact, they often require some sort of driver circuitry — something that translates a digit into voltage at the correct pins. These drivers can take up valuable space, especially on a breadboard, and can sometimes make using seven-segment displays cumbersome. Thankfully, [John Lonergan] has a great solution: driver boards that sit completely beneath the displays. His dual seven-segment hex display project was born out of necessity — he needed it for the breadboard CPU SPAM-1, which was getting a bit too bulky. Each module is two seven-segment displays atop a small PCB. Beneath the displays lives an 8-bit PIC microcontroller, which acts as a driver for both of the displays.

It’s so easy to restrict ourselves to thinking in two dimensions when working on electronic design — even designing multilayer PCBs often feels like working on several, distinct two-dimensional areas rather than one three-dimensional one. The concept of stacking components to save space, while fairly straightforward to implement, is a great example of the kind of problem-solving we love to see here at Hackaday. Of course, if you like the idea of 3D circuit design, you have to check out some of these incredible circuit sculptures we’ve featured in the past.

Continue reading “Three-Dimensional Design Yields Compact Seven-Segment Hex Displays”

Incandescent 7-Segment Displays Are Awesome

When we think of 7-segment displays as the ubiquitous LED devices that sprung into popularity in the 1970s. However, numbers have existed for a lot longer than that, and people have wanted to know what the numbers are for quite some time, too. Thus, a variety of technologies were used prior to the LED – such as these magnificent incandescent 7-segment displays shown off by [Fran Blanche].

The displays are basic in concept, but we imagine a little frustrating in execution. Electronics was tougher back in the days when valves needed huge voltages and even a basic numerical display drew a load of current. Built to industrial-grade specifications, they’re complete with a big heatsinking enclosure and rugged gold-plated connectors. [Fran] surmises that due to the likely military applications of such hardware, the filaments in the bulbs were likely built in such a way as to essentially last indefinitely. The glow of the individual segments has a unique look versus their LED siblings; free of hotspots and the usual tapered shape on each segment. Instead, the numerals are pleasingly slab-sided for a familiar-but-not-quite aesthetic.

[Fran] demonstrates the display running with a CD4511B BCD-to-7-segment decoder, hooked up with a bunch of 3904 power transistors to get the chip working with filament bulbs instead of LEDs. It’s a little fussy, but the displays run great with the hardware sorted.

We’d love to see these used on a very heavy ridiculous watch; nixies aren’t the only game in town after all. If you do happen to make one, be sure to let us know. Video after the break.

Continue reading “Incandescent 7-Segment Displays Are Awesome”

Huge Seven Segment Display Made From Broken Glass

A staple of consumer devices for decades, seven segment displays are arguably one of the most recognizable electronic components out there. So it’s probably no surprise they’re cheap and easy to source for our own projects. But that doesn’t mean there isn’t room for personal interpretation.

[MacCraiger] wanted to build a wall clock with the classic seven segment LED look, only his idea was to make it slightly larger than average. With RGB LED strips standing in for individual LEDs, scaling up the concept isn’t really a problem on a technical level; the tricky part is diffusing that many LEDs and achieving the orderly look of a real seven segment display.

All those segments perfectly cut out of a sheet of plywood come courtesy of a CNC router. Once the rectangles had been cut out, [MacCraiger] had to fill them with something that could soften up the light coming from the LEDs mounted behind them. He decided to break up a bunch of glass bottles into small chunks, lay them inside the segments, and then seal them in with a layer of clear epoxy. The final look is unique, almost as though the segments are blocks of ice.

At first glance the use of a Raspberry Pi Zero to control the LED strips might seem overkill, but as it turns out, [MacCraiger] has actually added in quite a bit of extra functionality. The purists might say it still could have been done with an ESP8266, but being able to toss some Python scripts on the Linux computer inside your clock certainly has its appeal.

The big feature is interoperability with Amazon’s Alexa. Once he tells the digital home assistant to set an alarm, the clock will switch over to a countdown display complete with digits that change color as the timer nears zero. He’s also written some code that slowly shifts the colors of the digits towards red as the month progresses, a great way to visualize at a glance how close you are to blowing past that end of the month deadline.

We’ve seen something of a run on custom multi-segment displays recently. Just last month we saw a clock that used some incredible 25-segment LED displays, complete with their own unique take on the on epoxy-filled diffusers.

Continue reading “Huge Seven Segment Display Made From Broken Glass”

Preserving Historic NASA Display Technology

When [Patrick Hickey] spent a tidy sum on eBay to purchase a pair of seven-segment displays used in the Launch Control Center at Kennedy Space Center during the Apollo program, he could have just put them up on a shelf. It’s certainly what most people would have done. Instead, he’s decided to study and document their design with the hope of eventually creating 3D replicas of these unique pieces of NASA history.

With a half century now separating us from the Moon landing, it’s more important than ever to preserve the incredible technology that NASA used during mankind’s greatest adventure. Legitimate Apollo-era hardware is fairly scarce on the open market, and certainly not cheap. As [Patrick] explains on the Hackaday.io page for this project, being able to 3D print accurate replicas of these displays is perhaps the best way we can be sure they won’t be lost to history.

But more than that, he also wants others to be able to see them in operation and perhaps even use them in their own projects. So that means coming up with modern electronics that stand-in for the 60s era hardware which originally powered them.

Since [Patrick] doesn’t have access to whatever (likely incandescent) lighting source these displays used originally, his electronics are strictly functional rather than being an attempt at a historic recreation. But we have to say, the effect looks fantastic regardless.

Currently, [Patrick] is putting most of his efforts on the smaller of the two displays that he calls “Type A”. The chunk of milled aluminum with integrated cooling fins has a relatively simple shape that should lend itself to replication through 3D scanning or even just a pair of calipers. He’s also put together a proof of concept for how he intends to light the display with 5mm LEDs on a carefully trimmed bit of protoboard, which he plans on eventually refining to reduce the number of wires used.

One aspect he’s still a little unsure of is how best to replicate the front mask. It appears to be made of etched metal with an integrated fiberglass diffuser, and while he’s already come up with a few possible ways to create a similar front panel for his 3D printed version, he’s certainly open to suggestions from the community.

This isn’t the first time we’ve seen a dedicated individual use 3D printing to recreate a rare and expensive object. While the purists will say that an extruded plastic version doesn’t compare to the real thing, we think it’s certainly better than letting technology like this fade into obscurity.