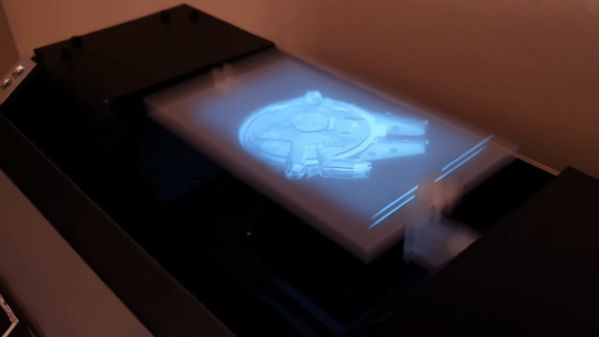
Your Own Engineering Workstation, With Mame

There are some things that leave indelible impressions in your memory. One of those things, for me, was a technical presentation in 1980 I attended — by calling in a lot of favors — a presentation by HP at what is now the Stennis Space Center. I was a student and it took a few phone calls to wrangle an invite but I wound up in a state-of-the-art conference room with a bunch of NASA engineers watching HP tell us about all their latest and greatest. Not that I could afford any of it, mind you. What really caught my imagination that day was the HP9845C, a color graphics computer with a roughly $40,000 price tag. That was twice the average US salary for 1980. Now, of course, you have a much better computer — or, rather, you probably have several much better computers including your phone. But if you want to relive those days, you can actually recreate the HP9845C’s 1980-vintage graphics glory using, of all things, a game emulator.

The Machine

The HP9845C with a Colorful Soft Key Display

Keep in mind that the IBM PC was nearly two years away at this point and, even then, wouldn’t hold a candle to the HP9845C. Like many machines of its era, it ran BASIC natively — in fact, it used special microcode to run BASIC programs relatively quickly on its 16-bit 5.7 MHz CPU. The 560 x 455 pixel graphics system had its own CPU and you could max it out with a decadent 1.5 MB of RAM. (But not, alas, for $40,000 which got you — I think –128K or so.)

The widespread use of the computer mouse was still in the future, so the HP had that wonderful light pen. Mass storage was also no problem — there was a 217 kB tape drive and while earlier models had a second drive and a thermal printer optional, these were included in the color “C” model. Like HP calculators, you could slot in different ROMs for different purposes. There were other options such as a digitizer and even floppy discs.

Continue reading “Your Own Engineering Workstation, With Mame”

Google Quantum, Virtually

Want to try a big quantum computer but don’t have the cash? Google wants to up your simulation game with their “Quantum Virtual Machine” that you can use for free.

On the face of it, it sounds like marketing-speak for just another quantum simulator. But if you read the post, it sounds like it attempts to model effects from a real Sycamore processor including qubit decay and dephasing along with gate and readout errors. This forms what Google calls “processor-like” output, meaning it is as imperfect as a real quantum computer.

If you need more qubits than Google is willing to support, there are ways to add more computing using external compute nodes. Even if you have access to a real machine of sufficient size, this is handy because you don’t have to wait in a queue for time on a machine. You can work out a lot of issues before going to the real computer.

This couldn’t help but remind us of the old days when you had to bring your cards to the central computer location and wait your turn only to find out you’d made a stupid spelling mistake that cost you an hour of wait time. In those days, we’d “desk check” a program carefully before submitting it. This system would allow a similar process where you test your basic logic flow on a virtual machine before suffering the wait time for a real computer to run it.

Of course, if you really need a quantum computer, the simulation is probably too slow to be practical. But at least this might help you work out the kinks on smaller problems before tackling the whole enchilada. What will you do with a quantum computer? Tell us in the comments.

Google, of course, likes its own language, Cirq. If you want a leg up on general concepts with a friendly simulator, try our series.

DIY Retrograde Clock Is 3D Printed

Retrograde clocks are unique, in that they eschew the normal fully-circular movement for the hands. Instead, the hands merely sweep out a segment of a circular arc, before jumping back to their start position to begin again. They’re pretty rare to find, but [Jamie Matthews] decided he had to have one. Thusly, he elected to build his own!

For his build, [Jamie] started with a regular off-the-shelf clock movement you might find in any hobbyist clock build. From there, he affixed his own witches’ brew of racks and gears to the output in order to create the desired semi-circular mechanism. The arcane mechanism enables the clock to tell time over roughly a 180-degree arc.

It’s relatively simple to make one of your own, too. The parts are all readily 3D printable, with [Jamie] reporting it took less than 8 meters of filament to produce the geartrain for his build. You can even print the clock face if you don’t want to CNC cut it out of acrylic.

Overall, it’s a fun look at an often-forgotten part of our horological history. Desktop 3D printing really does enable the creation of some exciting, different clock designs. Video after the break.

Continue reading “DIY Retrograde Clock Is 3D Printed”

Tiny Arcade Uses Tiny CRT

Restoring vintage electronics is a difficult hobby to tackle. Even the most practical builds often have to use some form of modern technology to work properly, or many different versions of the machine need to be disassembled to get a single working version. Either way, in the end someone will be deeply hurt by the destruction of anything antique, except perhaps with [Marco]’s recent tiny arcade with a unique CRT display.

The CRT is a now-obsolete technology, but Arcade and MAME purists often seek them out because of the rounded screen and vintage feel these devices have when compared to modern LCD or LED displays. For a build this small, though, [Marco] couldn’t just use parts from an old TV set as there wouldn’t be clearance in the back of the cabinet. An outdated video conferencing system turned out to have just the part he needed, though. It has a CRT mounted perpendicularly to a curved screen in order to reduce the depth needed dramatically.

The final build uses a tiny Namco system meant to plug into the RCA jack on a standard TV, but put in a custom case that makes it look like an antique video game cabinet. It’s an interesting build that doesn’t destroy any valuable antique electronics, while still maintaining a classic arcade feel. If you’re building a larger arcade cabinet which will still satisfy the purists out there, make sure you’re using a CRT with the right kind of control system.

Continue reading “Tiny Arcade Uses Tiny CRT”

Probing CAN Bus For EV Battery Info

The widespread adoption of the CAN bus (and OBD-II) in automobiles was largely a way of standardizing the maintenance of increasingly complicated engines and their needs to meet modern emissions standards. While that might sound a little dry on the surface, the existence and standardization of this communications bus in essentially all passenger vehicles for three decades has led to some interesting side effects, like it’s usage in this project to display some extra information about an electric car’s battery.

There’s not a ton of information about it, but it’s a great proof-of-concept of some of the things CAN opens up in vehicles. The build is based on a Citroën C-Zero (which is essentially just a re-badged Mitsubishi i-MiEV) and uses the information on the CAN bus to display specific information about the state of charge of the battery that isn’t otherwise shown on the car’s displays. It also includes a build of a new secondary display specifically for this purpose, and the build is sleek enough that it looks like a standard part of the car.

While there are certainly other (perhaps simpler) ways of interfacing with a CAN bus, this one uses off-the-shelf electronics like Arduino-compatible microcontrollers, is permanently installed, and has a custom case that we really like. If you’re just starting to sniff around your own vehicle’s CAN bus, there are some excellent tools available to check out.

Thanks to [James] for the tip!

Continue reading “Probing CAN Bus For EV Battery Info”

Simple Universal Modem Helps Save And Load Data From Tape

Back in the early days of the home computer revolution, data was commonly saved on tape. Even better, those tapes would make an almighty racket if you played them on a stereo, because the data was stored in an audio format.  The Simple Universal Modem from [Anders Nielsen] is built to work in a similar way, turning data into audio and vice versa.

The project consists of a circuit for modulating data into audio, and demodulating audio back into data. It’s “universal” because [Anders] has designed it to be as format-agnostic as possible. It doesn’t matter whether you want to store data on a digital voice recorder, a cassette deck, or an old reel-to-reel. This build should work fairly well on all of them!

On the modulation side of things, it’s designed to be as analog-friendly as possible. Rather than just spitting out rough square waves, it modulates them into nice smooth sine waves with fewer harmonics. On the demodulation side, it’s got an LM393 comparator which can read data on tape and spit out a clean square wave for easy decoding by digital circuitry.

If you find yourself trying to recover old data off tapes, or writing to them for a retrocomputing project, this build might be just what you need. [Anders] even goes as far as demonstrating its use with an old reel-to-reel deck in a helpful YouTube video.

There really were some weird ways of storing data way back when. Just ask IBM. Video after the break.

Continue reading “Simple Universal Modem Helps Save And Load Data From Tape”

You Can Build A Giant 7-Segment Display Of Your Very Own

Sometimes you need to display a number nice and large, making it easily readable at a good distance. [Lewis] has just the thing for that: a big expandable 7-segment display.

The build is modular, allowing it to be extended from 2 to 10 digits and beyond. The digits themselves are made of 3D-printed parts assembled onto acrylic. These can then be ganged up in a wooden frame for displaying larger numbers with more digits. Individual elements are lit by addressable LEDs, and the project can be built using an Arduino Nano or an ESP8266 for control. The latter opens up possibilities for controlling the screen over WiFi, which could prove useful.

[Lewis] has built his own version for a local swim club, where it will be used as a laptimer. Other applications could be as a scoreboard in various sports, or to confuse your neighbours by displaying random numbers in your front yard.

We’ve seen a similar build from [Ivan Miranda] that served well as a workshop clock, too. Video after the break.

Continue reading “You Can Build A Giant 7-Segment Display Of Your Very Own”