Automate The Freight: The Convenience Store That Comes To Your Door

For as popular as they became during the COVID-19 lockdowns, grocery delivery services like InstaCart rely on a basic assumption to work: that customers know exactly what they want when they order. Once that hurdle is overcome, the transaction is simple — the driver accepts the job, drives to the store to pick up the order, and takes it to the customer. It requires the use of a fair amount of technology to coordinate everything, but by and large it works, and customers are generally willing to pay for the convenience.

But what if you could cut out that step where the driver goes to pick up your order? What if instead of paying someone to pick and pack your order and bring it to your front step, you just ordered up the whole store instead? That’s the idea behind Robomart, which seeks to deploy a fleet of mobile stores for when the convenience store isn’t quite convenient enough.  And the way the company is choosing to roll out its service, not to mention the business model itself, may hold key lessons for other delivery automation platforms.

Continue reading “Automate The Freight: The Convenience Store That Comes To Your Door”

Raspberry Pi Simulates The Real Analog TV Experience

If you’ve laid hands on a retro analog TV, have the restoration bug, and you plan to make the final project at least somewhat period-correct, you face a bit of a conundrum: what are you going to watch? Sure, you can serve up just about any content digitally these days, but some programs just don’t feel right on an old TV. And even if you do get suitably retro programming, streaming isn’t quite the same as the experience of tuning your way through the somewhat meager selections as we did back in the analog days.

But don’t worry — this Raspberry Pi TV simulator can make your streaming experience just like the analog TV experience of yore. It comes to us from [Rodrigo], who found a slightly abused 5″ black-and-white portable TV that was just right for the modification. The battery compartment underneath the set made the perfect place to mount a Pi, which takes care of streaming a variety of old movies and shorts. The position of the original tuning potentiometer is read by an Arduino, which tells the Pi which “channel” you’re currently tuned to.

Composite video is fed from the Pi’s output right into the TV’s video input, and the image quality is just about what you’d expect. But for our money, the thing that really sells this is the use of a relay to switch the TV’s tuner back into the circuit for a short bit between channel changes. This gives a realistic burst of static and snow, just like we endured in the old days. Hats off to [Rodrigo] for capturing everything that was awful about TV back in the day — Mesa of Lost Women, indeed! — but still managing to make it look good.

Continue reading “Raspberry Pi Simulates The Real Analog TV Experience”

PS5 Goes On Slim-Fast

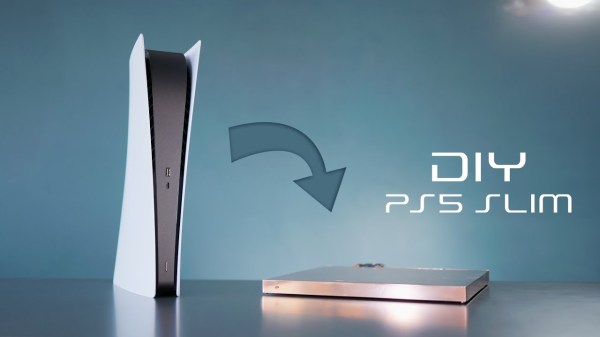
For the past few decades, most console makers have first come out with a large flagship model, and then a few years later, released a smaller, more compact slim edition. Not content to wait for it, [Matt] at DIY Perks made his own PS5 Slim, and the results are awe-inspiring.

Generally, slim editions are made by lowering the TDP of the chip under the hood. A lower power draw means less cooling is needed, a smaller power supply can be used, and a design that is overall easier to manage. Unfortunately, [Matt] had none of these benefits and instead had to contend with the full 180 W that the AMD CPU inside the PlayStation can draw.

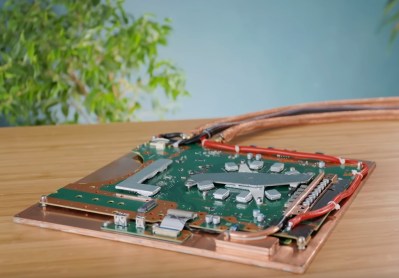
Taking apart the console left him with the main board that was quite thick as it had heat pipes on both sides. His first thought was water cooling as it can rapidly move the heat needed, but even with right-angle fittings, it didn’t fit within the ambitious thickness goal he had set for himself of less than 2 cm (about 3/4″). To do that, [Matt] had to fabricate a copper water block from three sheets of copper. The first one connects to the motherboard via standoffs and has cut-outs for various connectors and parts. The middle layer has a channel through which water can flow, and the last layer seals it together.

With the three layers together, he soldered them in a toaster oven repurposed as a reflow oven. Cleverly, he used silicone grease to prevent solder from getting into areas he didn’t want, like the fins in the CPU block. Luckily, the grease dissolved in alcohol, and after flushing the chamber, he had a solid copper, water-tight, custom loop.  However, on his road to glory, [Matt] ran into a snag. He accidentally covered the intake vent on the radiator, and the PS5 overheated, killing it. With a fried mainboard and a project almost on the cusp of completion, he resorted to using the PS5 he had received for B-roll.

Last-minute motherboard swap aside, the final project is gorgeous. The polished exterior and sheer thinness of it are striking. [Matt] has already disguised his PS5 before and after this, we’re not quite sure where he could possibly take it next. But we’re excited to find out.

Continue reading “PS5 Goes On Slim-Fast”

This Arduino Pen Plotter Is Built For Speed

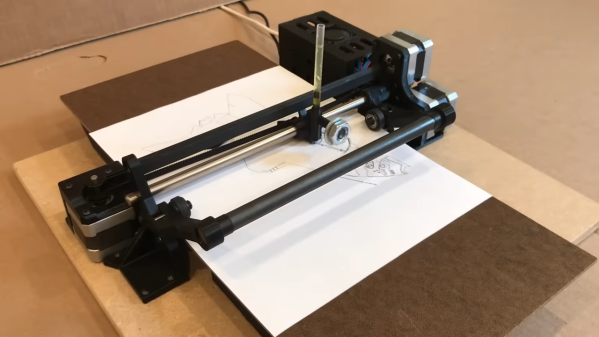
We see a lot of simple pen plotter projects around here, and while we appreciate them one and all, most of them are a little on the slow side. That’s OK — a glacial pace is sometimes all that’s needed, as long as it gets the job done. But there’s nothing wrong with putting the pedal to the metal, so to speak. And that’s exactly what this super-fast Arduino-based plotter is all about.

As the story goes, [IV Projects] felt the need for speed after building an earlier pen plotter project that worked, but failed to excite. With the additional goal of keeping the plotter easy to build with cheap parts, the design centers on a “grit roller drive” for the Y-axis — the one that actually moves the paper back and forth. And move it does, using Dremel tool sanding drums on a lightweight shaft to maximize acceleration. In fact, all the moving parts are kept as lightweight as possible, and the results really show — the three steppers really sing when this plotter is in action.

There are some really clever details in [IV Projects]’ design. We particularly like the way the pen lift mechanism works, and the surprise appearance of a clothespin spring as a belt tensioner was a real treat. Judging by the pile of rejected prototype parts, it took quite a bit of work to get this design right. If you’d like to build your own, STLs are available for the printed parts.

If you’re interested in what the other end of the speed scale looks like, check out this bare-minimum pen plotter.

Continue reading “This Arduino Pen Plotter Is Built For Speed”

Your Own IBM Mainframe (or Vax, Or Cray…) The Easy Way

If you want the classic experience of working with an IBM mainframe or another classic computer like a DEC VAX, you have a few choices. You could spend a lot of money trying to find one, transport it, and refurbish it. But, of course, most of us will settle for an emulator. While there are great emulators out there, most of the time you aren’t interested in running just the bare machine — you want the operating systems, the compilers, and the other software that made these machines so interesting. Running your three lines of machine code isn’t as much fun as playing hunt the wumpus or compiling some Fortran IV code. Unfortunately, finding copies of all this old software can be daunting. But thanks to the efforts of [Rattydave], you can do it with no problems at all. The secret? Pre-built docker images that have everything you need in one place.

Continue reading “Your Own IBM Mainframe (or Vax, Or Cray…) The Easy Way”

Hackaday Links Column Banner

Hackaday Links: June 19, 2022

The James Webb Space Telescope has had a long and sometimes painful journey from its earliest conception to its ultimate arrival at Lagrange point L2 and subsequent commissioning. Except for the buttery-smooth launch and deployment sequence, things rarely went well for the telescope, which suffered just about every imaginable bureaucratic, scientific, and engineering indignity during its development. But now it’s time to see what this thing can do — almost. NASA has announced that July 12 will be “Image Release Day,” which will serve as Webb’s public debut. The relative radio silence from NASA on Webb since the mirror alignment was completed — apart from the recent micrometeoroid collision, of course — suggests the space agency has been busy with “first light” projects. So there’s good reason to hope that the first released images from Webb will be pretty spectacular. The images will drop at 10:30 AM EDT, so mark your calendars and prepare to be wowed. Hopefully.

Continue reading “Hackaday Links: June 19, 2022”

Tips For Winding Durable Coils With Nice, Flat Sides

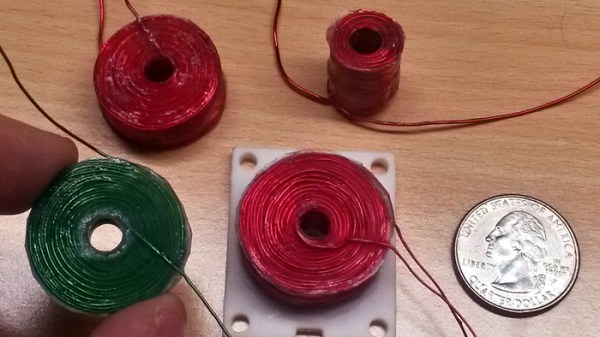
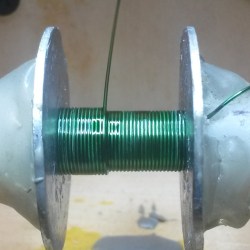
[Drew Pilcher] needed durable, custom-wound coils with no core, and perfectly flat sides. Coils can be wound by hand, of course, but reliably creating perfect coils with thin wire and lots of layers requires some additional help. Happily, [Drew] shares his method for doing exactly that. Perhaps coming as no surprise, the key to repeatable, high-quality coils is good preparation and tools.

The most important part is the ability to rotate a spool for winding without having to take one’s hands off the workpiece. To accomplish this, a cheap, no-name power drill and foot pedal (made from the harvested trigger unit of the drill) forms the basis of [Drew]’s DIY winder. To make coils with precision, one must also count the number of turns. Thankfully, there is a simple solution for this; [Drew] used a cheap digital turn counter from Amazon. This economical device uses a magnet and sensor, so [Drew] simply stuck the magnet on the side of the drill’s chuck.

Careful winding and a liberal application of CA glue helps ensure good results.

The spool is what the wire gets wound around to form the coil, and it will need to be removed from the coil afterwards. To accomplish this, [Drew] uses a brass shaft, metal washers, and some plastic spacers. A light coating of grease on the spool surfaces helps ensure things come apart properly in the end.

To actually make the coil, [Drew] recommends some means of magnification, and a supply of CA glue. Wind the wire as cleanly and closely as possible, and apply CA glue during the process to secure things. It takes some practice, but really clean windings are possible if done correctly.

For thick coils with a lot of layers, the CA glue will hold things together well enough, but for smaller coils [Drew] likes to give them a final coating of two-part epoxy. After things are completely set, the spool is disassembled and the inner core is pushed out as gently as possible.

The result? A tightly-wound, durable coil with perfectly flat sides. It’s exactly the thing [Drew] needs for his upcoming coil gun project. How’s that work, you wonder? You can see the basics covered right here.