This Arduino Pen Plotter Is Built For Speed

We see a lot of simple pen plotter projects around here, and while we appreciate them one and all, most of them are a little on the slow side. That’s OK — a glacial pace is sometimes all that’s needed, as long as it gets the job done. But there’s nothing wrong with putting the pedal to the metal, so to speak. And that’s exactly what this super-fast Arduino-based plotter is all about.

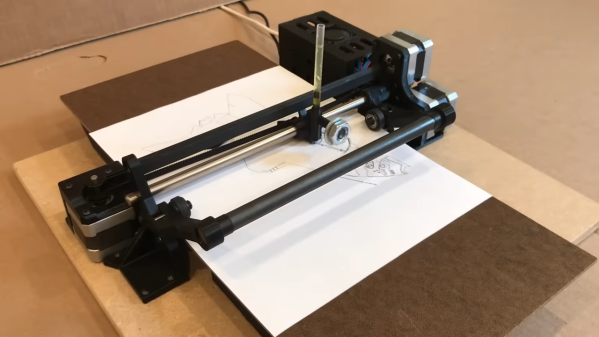
As the story goes, [IV Projects] felt the need for speed after building an earlier pen plotter project that worked, but failed to excite. With the additional goal of keeping the plotter easy to build with cheap parts, the design centers on a “grit roller drive” for the Y-axis — the one that actually moves the paper back and forth. And move it does, using Dremel tool sanding drums on a lightweight shaft to maximize acceleration. In fact, all the moving parts are kept as lightweight as possible, and the results really show — the three steppers really sing when this plotter is in action.

There are some really clever details in [IV Projects]’ design. We particularly like the way the pen lift mechanism works, and the surprise appearance of a clothespin spring as a belt tensioner was a real treat. Judging by the pile of rejected prototype parts, it took quite a bit of work to get this design right. If you’d like to build your own, STLs are available for the printed parts.

If you’re interested in what the other end of the speed scale looks like, check out this bare-minimum pen plotter.

Continue reading “This Arduino Pen Plotter Is Built For Speed”

Your Own IBM Mainframe (or Vax, Or Cray…) The Easy Way

If you want the classic experience of working with an IBM mainframe or another classic computer like a DEC VAX, you have a few choices. You could spend a lot of money trying to find one, transport it, and refurbish it. But, of course, most of us will settle for an emulator. While there are great emulators out there, most of the time you aren’t interested in running just the bare machine — you want the operating systems, the compilers, and the other software that made these machines so interesting. Running your three lines of machine code isn’t as much fun as playing hunt the wumpus or compiling some Fortran IV code. Unfortunately, finding copies of all this old software can be daunting. But thanks to the efforts of [Rattydave], you can do it with no problems at all. The secret? Pre-built docker images that have everything you need in one place.

Continue reading “Your Own IBM Mainframe (or Vax, Or Cray…) The Easy Way”

Hackaday Links Column Banner

Hackaday Links: June 19, 2022

The James Webb Space Telescope has had a long and sometimes painful journey from its earliest conception to its ultimate arrival at Lagrange point L2 and subsequent commissioning. Except for the buttery-smooth launch and deployment sequence, things rarely went well for the telescope, which suffered just about every imaginable bureaucratic, scientific, and engineering indignity during its development. But now it’s time to see what this thing can do — almost. NASA has announced that July 12 will be “Image Release Day,” which will serve as Webb’s public debut. The relative radio silence from NASA on Webb since the mirror alignment was completed — apart from the recent micrometeoroid collision, of course — suggests the space agency has been busy with “first light” projects. So there’s good reason to hope that the first released images from Webb will be pretty spectacular. The images will drop at 10:30 AM EDT, so mark your calendars and prepare to be wowed. Hopefully.

Continue reading “Hackaday Links: June 19, 2022”

Tips For Winding Durable Coils With Nice, Flat Sides

[Drew Pilcher] needed durable, custom-wound coils with no core, and perfectly flat sides. Coils can be wound by hand, of course, but reliably creating perfect coils with thin wire and lots of layers requires some additional help. Happily, [Drew] shares his method for doing exactly that. Perhaps coming as no surprise, the key to repeatable, high-quality coils is good preparation and tools.

The most important part is the ability to rotate a spool for winding without having to take one’s hands off the workpiece. To accomplish this, a cheap, no-name power drill and foot pedal (made from the harvested trigger unit of the drill) forms the basis of [Drew]’s DIY winder. To make coils with precision, one must also count the number of turns. Thankfully, there is a simple solution for this; [Drew] used a cheap digital turn counter from Amazon. This economical device uses a magnet and sensor, so [Drew] simply stuck the magnet on the side of the drill’s chuck.

Careful winding and a liberal application of CA glue helps ensure good results.

The spool is what the wire gets wound around to form the coil, and it will need to be removed from the coil afterwards. To accomplish this, [Drew] uses a brass shaft, metal washers, and some plastic spacers. A light coating of grease on the spool surfaces helps ensure things come apart properly in the end.

To actually make the coil, [Drew] recommends some means of magnification, and a supply of CA glue. Wind the wire as cleanly and closely as possible, and apply CA glue during the process to secure things. It takes some practice, but really clean windings are possible if done correctly.

For thick coils with a lot of layers, the CA glue will hold things together well enough, but for smaller coils [Drew] likes to give them a final coating of two-part epoxy. After things are completely set, the spool is disassembled and the inner core is pushed out as gently as possible.

The result? A tightly-wound, durable coil with perfectly flat sides. It’s exactly the thing [Drew] needs for his upcoming coil gun project. How’s that work, you wonder? You can see the basics covered right here.

Screenshot of the OpenAsar config window, showing a few of the configuration options

OpenAsar Tweaks Discord’s Frontend, Improves Performance And Privacy

Not all hacking happens on hardware — every now and then, we ought to hack our software-based tools, too. [Ducko] tells us about a partially open-source rewrite of Discord’s Electron-based frontend. Web apps can be hard to tinker with, which is why such projects are to be appreciated. Now, this isn’t a reverse-engineering of Discord’s API or an alternative client per se, but it does offer a hopeful perspective on what the Discord client ought to do for us.

First of all, the client loads noticeably faster, not unlike the famous GTA Online speedup (which was also a user-driven improvement), with channel and server switching made less laggy —  and the Linux updater was de-cruft-ified as well. [Ducko] tells us how she got rid of the numerous NPM dependencies of the original code – it turned out that most of the dependencies could be easily replaced with Node.JS native APIs or Linux binaries like unzip.  Apart from much-appreciated performance improvements, there are also options like telemetry bypass, and customization mechanisms for your own theming. You won’t get Discord on your Apple ][ just yet, but the native client will be a bit friendlier towards you.

While Discord is ultimately a proprietary platform, we do it see used in cool hacks every now and then, like this tea mug temperature-tracking coaster. Would you like to code your own Discord bot? We wrote a walk-through for that. Last but not least, if you like what we wrote and you happen to also use Discord, you should check out the Hackaday Discord server!

Can A Drone Push A Bike?

It sounds like a rhetorical question that a Midwestern engineer might ask, something on the order of ‘can you fix this bad PCB spin?’ [Tom Stanton] sets out to answer the title question and ends up building a working e-bike with a drone motor.

You might be thinking, a motor is a motor; what’s the big deal? But a drone motor and a regular e-bike motor are made for very different purposes. Drone motors spin at 30,000 RPM, and an e-bike hub motor typically does around 200-300 RPM while being much larger. Additionally, a drone motor goes in short spurts with a large fan blowing right on it, and an e-bike motor can run almost continuously.

The first step was to use gears and pulleys to reduce the RPM on the motor to provide more torque. A little bit of CAD and 3D printing later, [Tom] had a setup ready to try. However, the motor quickly burned out. With a slightly bigger motor and more gear reduction, version 2 performed remarkably well. After the race between a proper e-bike and the drone bike, the coils were almost melted.

If you’re thinking about making your bike electric, we have some advice. We’ll throw in a second piece of advice for free: use a larger motor than the drone motor, even though it technically works. Video after the break.

Continue reading “Can A Drone Push A Bike?”

Diagram of the LTC protocol, showing the difference between 1 bits and 0 bits - both transmitted using one up and one down pulse, but with '1' bit pulses being half as short.

Animate Arcane Protocols With Interrupt-Backed Bitbanging

We often take our “SoftwareSerial” libraries for granted, and don’t investigate what goes on under the hood — until they fail us, at least. Would you like to learn how to harness the power of interrupt-driven bitbanging? [Jim Mack] teaches us how to make our protocol implementations fly using the LTC protocol as a springboard.

LTC (Linear/[Longitudinal] TimeCode) is a widely-used and beautifully-crafted protocol that tends to fly under our radar, and is one that hackers could learn plenty from. It’s used for synchronization of audio/video devices during media production and playback. LTC’s signal is almost digital but not quite: it doesn’t need a clock, and it has no polarity. Additionally, it mimics an audio signal really well, you can decode it at any playback speed, and many other benefits and quirks that [Jim] outlines. You do need to maintain the timings, though, and [Jim]’s article shows us how to keep them right while not inconveniencing your primary tasks.

Continue reading “Animate Arcane Protocols With Interrupt-Backed Bitbanging”