CP/M On An Eight Line Display

How many lines do you need on a CP/M terminal? More is usually better, of course, but the MicroOffice RoadRunner managed with an 8-row, 80-column LCD screen. That may sound anemic, but in 1983, it was high-tech, as was the RoadRunner, and [Tech Time Traveller] tells us about them in a recent video you can see below.

The intro to the video shows some really strange old laptops before it gets to the RoadRunner. The machine used a Z80 work-alike CPU and a form of CP/M with some organizer functions. The machine didn’t have floppies or other disk storage, but did have four cartridge slots that could hold more memory, a spreadsheet, BASIC, or a text editor. The memory cartridges were static RAM with battery backup, so they retained data when you pulled them from the slot. Assuming the battery didn’t die.
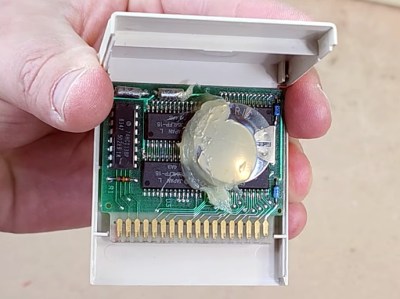
Inside a RoadRunner cartridge.

Unfortunately, this particular machine suffered some shipping damage. In addition to the cartridges, it also had a removable battery and modem. At around the eight-minute mark, the case comes off, and inside are — surprise — more internal cartridges.

While MicroOffice isn’t a household name today, it was founded by a former Exxon executive and tapped a CEO and investor from Timex. It was funded by the likes of Olivetti. The computer rolled out in late 1983 and lived until Telxon bought MicroOffice in 1985.

Attempts to run Zork were not fruitful. There really wasn’t enough memory, and file transfer was a bit wonky. If you want a modern Z80 laptop, we know of one with 16 cores. As clunky as the RoadRunner looks, it still beats the old suitcase computers.

Continue reading “CP/M On An Eight Line Display”

Tweeze Your Way To Soldering Success!

Soldering, for those of us who spend a lot of time at an electronics bench, is just one of those skills we have, in the way that a blacksmith can weld or a tailor can cut clothing. We have an uncommon skill with hot metal and can manipulate the tiniest of parts, and incidentally our chopstick skills aren’t that bad as a consequence, either.

But even the best with a soldering iron can find useful tips from an expert, and that’s where [Mr SolderFix] comes in. His channel is chock-full of soldering advice, and in his latest video he takes a look at tweezers. They’re a part of the solderer’s standard kit and we all have several pairs, but it’s fair to say that we don’t always have the right pair to hand.

It was refreshing to hear him confirm that a good pair of tweezers, once a certain quality threshold has been met, need not necessarily be the most expensive set. We’ve certainly seen expensive tweezers with suspiciously bendy ends, and have found random AliExpress purchases which have stood the test of time. He also makes the point about which situations a set of tweezers with serrated heads might be more useful, and he demonstrates with a crystal oscillator.

As with photography though, we’d observe that sometimes the best set of tweezers to rectify a mishap are the ones in your hand. If you’re interested in more from [Mr SolderFix], we’ve featured his work more than once in the past. When he showed us how to lift SMD pins, for example.

A Google Pixel 7 with a detachable Bluetooth keyboard.

BlueBerry Is A Smartphone-Agnostic Keyboard Firmware

If you’re anything like us, you really, really miss having a physical keyboard on your phone. Well, cry no more, because [Joe LiTrenta] has made it possible for any modern smartphone whatsoever to have a detachable, physical keyboard and mouse at the ready. [Joe] calls this creation the BlueBerry.

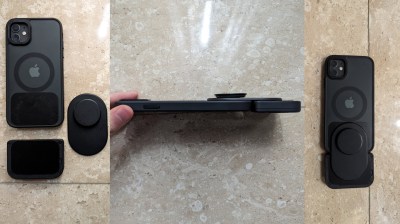
A couple of metal plates and a mag-safe pop socket connect a Bluetooth keyboard to a Google Pixel 7. The keyboard/mouse combo in question is a little BlackBerry Bluetooth number from ZitaoTech which is available on Tindie, ready to go in a 3D printed case. What [Joe] has done is to create a custom ZMK-based firmware that allows the keyboard be device-agnostic.

In order to easily mount the keyboard to the phone and make it detachable, [Joe] used adhesive-backed metal mounting plates on both the phone and the keyboard, and a mag-safe pop socket to connect the two. The firmware makes use of layers so everything is easily accessible.

Check out the demo video after the break, which shows the board connected to a Google Pixel 7. It makes the phone comically long, but having a physical keyboard again is serious business, so who’s laughing now? We’d love to see a keyboard that attaches to the broad side of the phone, so someone get on that. Please?

Do you have a PinePhone? There’s an extremely cute keyboard for that.

Continue reading “BlueBerry Is A Smartphone-Agnostic Keyboard Firmware”

The Impossible Repair: Ribbon Cables

It’s a problem that faces many a piece of older equipment that ribbon cables of the type used on membrane keyboards start to fail as they become older. These cables are extremely difficult to repair as they can’t be soldered to, and since they are usually custom to the device in question. All is not lost, though, as [Spare Time Repair] shows us with the cable on a Honeywell heating controller broken by a user attempting to remove the battery with a screwdriver.

The whole process can be seen in the video below the break, and it involves the use of a vinyl cutter to cut the pattern of tracks in aluminium tape stuck on a sheet of acetate. This makes a new piece of ribbon cable, however it’s still a step short of being part of the circuit. His challenge is to make a clip tight enough to attach it to the intact part of the broken cable and maintain contact, then to hope that the new piece of cable bent back on itself can make enough contact for the device to work.

At the end of it all, he has a working Honeywell controller, though as he points out, it’s a device he has little interest in. Instead, this opens a window on an extremely useful technique that should be of relevance far beyond the world of heating. There’s one machine close to home for us that could use this technique, for example.

Continue reading “The Impossible Repair: Ribbon Cables”

A DIY split-flap clock in red, black, and white.

Split-Flap Clock Uses Magnets Everywhere

While split-flap alarm clocks once adorned heavy wood nightstands in strong numbers, today the displays are most commonly found in train stations and airports. Hey, at least they’re still around, right? Like many of us, [The Wrench] has always wanted to make one for themselves, but they actually got around to doing it.

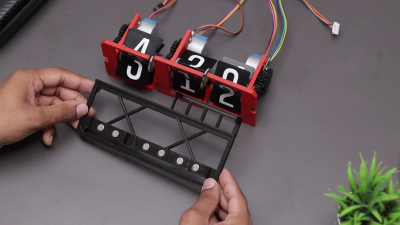
A DIY split-flap clock and its magnetic base.This doesn’t seem like a beginner-friendly project, but [The Wrench] says they were a novice in 3D design and so used Tinkercad to design all the parts. After so many failures, they settled on a design for each unit that uses a spool to attach the flaps, which is turned by a stepper motor.

A small neodymium magnet embedded in the primary gear and a Hall effect sensor determine where the stepper motor is, and in turn, which number is displayed. Everything is handled by an Arduino Nano on a custom PCB.

Aside from the sleek, minimalist look, our favorite part is that [The Wrench] used even more magnets to connect each display segment to the base. You may have noticed that there are only three segments, because the hours are handled by a single display that has flaps for 10, 11, and 12. This makes things simpler and gives the clock an interesting look. Be sure to check out the build video after the break.

Want to build a more complicated clock? Try suspending sand digits in the air with persistence of vision.

Continue reading “Split-Flap Clock Uses Magnets Everywhere”

DIY Bimetallic Strip Dings For Teatime

Do you like your cup of tea to be cooled down to exactly 54 C, have a love for machining, and possess more than a little bit of a mad inventor bent? If so, then you have a lot in common with [Chronova Engineering]. In this video, we see him making a fully mechanical chime-ringing tea-temperature indicator – something we’d be tempted to do in silicon, but that’s admittedly pedestrian in comparison.

The (long) video starts off with making a DIY bimetallic strip out of titanium and brass, which it pretty fun. After some math, it is tested in a cup of hot water to ballpark the deflection. Fast-forward through twenty minutes of machining, and you get to the reveal: a tippy cup that drops a bearing onto a bell when the deflection backs off enough to indicate that the set temperature has been reached. Rube Goldberg would have been proud.

OK, so this is bonkers enough. But would you believe a bimetallic strip can be used as a voltage regulator? How many other wacky uses for this niche tech do you know?

Thanks [Itay] for the tip!

The 3D Printed Computer Space Takes Shape

A few weeks ago we brought you news of a project to recreate the flowing lines of the first computerised arcade game, Computer Space, as a full-size 3D printed replica. We left the project with all the parts put together to make a complete but unfinished shell that was very recognizable as a Computer Space cabinet but had neither finishing nor internals. Now we’re very pleased to bring you the conclusion of the project, as it moves from unfinished 3D print to playable cabinet.

The video below the break is a journey of print finishing to a very high standard with that lustrous blue glitter resin, but oddly it’s most interesting to find out about the manufacturing quirks of the original. How the rear door was imprecisely cut from plywood and fixed on with gate hinges, how the ventilation holes differ from cabinet to cabinet, and how the collection vessel for those quarters was an old tin. The monitor is a newer broadcast CRT in this version and the electronics are naturally  modern, but if you didn’t know, you’d be hard pressed to spot that you weren’t playing the real thing.

Finally we see the gameplay which is admittedly frustrating, and a little bit of punditry as to why this wasn’t the commercial success of the following Pong. It’s a fascinating look at the early computer game industry.

Have a look at our coverage of the first episode of this project.

Continue reading “The 3D Printed Computer Space Takes Shape”