The IBM 5100, image from December 1975 issue of BYTE.

Bringing APL To The Masses: The History Of The IBM 5100

The 1970s was a somewhat awkward phase for the computer industry — as hulking, room-sized mainframes became ever smaller and the concept of home and portable computers more capable than a basic calculator began to gain traction. Amidst all of this, two interpreted programming languages saw themselves being used the most: BASIC and APL, with the latter being IBM’s programming language of choice for its mainframes. The advantages of being able to run APL on a single-user, portable system, eventually led to the IBM 5100. Its story is succinctly summarized by [Bradford Morgan White] in a recent article.

The IBM PALM processor.

Although probably not well-known to the average computer use, APL (A Programming Language) is a multi-dimensional array-based language that uses a range of special graphic symbols that are often imprinted on the keyboard for ease of entry.

It excels at concisely describing complex functions, such as the example provided on the APL Wikipedia entry for picking 6 pseudo-random, non-repeating integers between 1 and 40 and sorting them in ascending order:

x[x6?40]

Part of what made it possible to bring the power of APL processing to a portable system like the IBM 5100 was the IBM PALM processor, which implemented an emulator in microcode to allow e.g. running System/360 APL code on a 5100, as well as BASIC.

Despite [Bradford]’s claim that the 5100 was not a commercial success, it’s important to remember the target market. With a price tag of tens of thousands of (inflation-adjusted 2023) dollars, it bridged the gap between a multi-user mainframe with APL and far less capable single-user systems that generally only managed BASIC. This is reflected in that the Commodore SuperPET supported APL, and the 5100 was followed by the 5110 and 5120 systems, and that today you can download GNU APL which implements the ISO/IEC 13751:2001 (APL2) standard.

We’ve previously looked at the Canadian-made MCM/70, another portable APL machine that embodied the cyberdeck aesthetic before William Gibson even gave it a name.

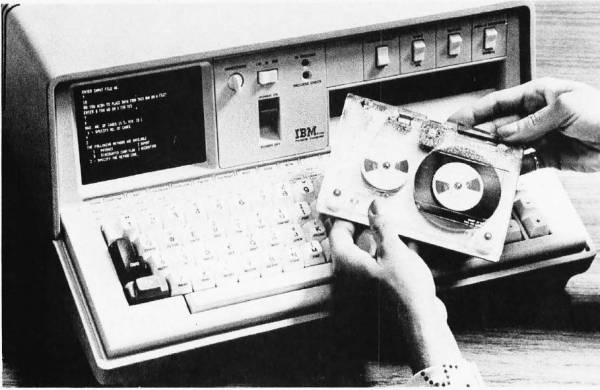
Top image: The IBM 5100, image from December 1975 issue of BYTE.

Thanks to [Stephen Walters] for the tip.

Bus Sniffing The Model 5150 For Better Emulation

At the risk of stating the obvious, a PC is more than just its processor. And if you want to accurately emulate what’s going on inside the CPU, you’d do well to pay attention to the rest of the machine, as [GloriousCow] shows us by bus-sniffing the original IBM Model 5150.

A little background is perhaps in order. Earlier this year, [GloriousCow] revealed MartyPC, the cycle-accurate 8088 emulator written entirely in Rust. A cycle-accurate emulation of the original IBM PC is perhaps a bit overkill, unless of course you need to run something like Area 5150, a demo that stretches what’s possible with the original PC architecture but is notoriously finicky about what hardware it runs on.

Getting Area 5150 running on an emulator wasn’t enough for [GloriousCow], though, so a deep dive into exactly what’s happening on the bus of an original IBM Model 5150 was in order. After toying with and wisely dismissing several homebrew logic analyzer solutions, a DSLogic U3Pro32 logic analyzer was drafted into the project.

Fitting the probes for the 32-channel instrument could have been a problem except for the rarely populated socket for the 8087 floating-point coprocessor on the motherboard. A custom adapter gave access to most of the interesting lines, including address and data buses, while a few more signals, like the CGA sync lines, were tapped directly off the video card.

Capturing one second of operation yielded a whopping 1.48 GB CSV file, but a little massaging with Python trimmed the file considerably. That’s when the real fun began, strangely enough in Excel, which [GloriousCow] used as an ad hoc but quite effective visualization tool, thanks to the clever use of custom formatting. We especially like the column that shows low-to-high transitions as a square wave — going down the column, sure, but still really useful.

The whole thing is a powerful toolkit for exploring the action on the bus during the execution of Area 5150, only part of which [GloriousCow] has undertaken as yet. We’ll be eagerly awaiting the next steps on this one — maybe it’ll even help get the demo running as well as 8088MPH on a modded Book8088.

FPGA Runs IBM 5151 MDA Display

When it comes to driving a display, you can do all kinds of fancy tricks with microcontrollers to get an image up. Really, though, FPGAs are the weapon of choice for playing with these kinds of signals. [Ted Fried] put one to great work driving an ancient IBM 5151 MDA display, and shared his results on Hackaday.io.

The build relies on a Digilent Arty Z7-20 SOC FPGA development board, which has a beefy 600 MHz ARM processor on board. It also packs 500 MB of DRAM—more than enough for storing pixel data for an ancient display.

To drive the old display, [Ted] whipped up a state machine on the FPGA. It’s tasked with fetching display data from RAM and creating the appropriate timings for the MDA display interface. The images are stored directly in an array in C code running on the ARM core. From there, they are copied into the FPGA’s RAM for trucking out to the display. The 720×350 images are stored as 1 bit per pixel, and are created by converting the original JPEGs into single-bit bitmaps in GIMP, before final conversion into a C code array via utility of [Ted’s] own design.

If you’ve ever wanted to display your images in resplendent amber or green, then this could be the project for you. It’s also just a great way to learn about using FPGAs and interfacing with alternative display technologies. If you’ve been whipping up your own retro display hacks, don’t hesitate to drop us a line.

Hacking A €15 8051-Based Portable Soldering Iron With Custom Firmware

With soldering irons being so incredibly useful, and coming on the heels of the success of a range of portable, all-in-one soldering irons from the likes of Waveshare and Pine64, it’s little wonder that you can get such devices for as little as 10 – 15 Euro from websites like AliExpress. Making for both a great impulse buy and reverse-engineering target, [Aaron Christophel] got his mittens on one and set to work on figuring out its secrets.

The results are covered in a brief video, as well as a Twitter thread, where this T12 soldering iron’s guts are splayed around and reprogrammed in all their glory. Despite the MCU on the PCB having had its markings removed, some prodding and poking around revealed it to be an STC8H3K62S2, an 8051-based MCU running at a blistering 11 MHz. As a supported PlaformIO target, reprogramming the MCU wasn’t too complicated after wiring up a USB-TTL serial adapter.

Completing this initial foray into these cheap T12 soldering irons is the GitHub repository, which contains the pin-outs, wiring diagrams and further information. Although [Aaron] indicates that he’ll likely not pursuing further development, the mixed responses by people to the overall quality of the firmware on the as-purchased T12 may inspire others to give it a shake.

Continue reading “Hacking A €15 8051-Based Portable Soldering Iron With Custom Firmware”

Nokia 5110 Gets Android Stowaway And A Keyboard

Even though Nokia is largely an afterthought in the phone market now, there was a time when their products represented the state-of-the-art in mobile devices. Some of the their handsets even featured slide-out keyboards and the ability to sent emails; largely unheard of for a device from the late 90s. [befinitiv] was a kid back then and couldn’t afford one of these revolutionary devices, so he built his own modern version that still looks and feels like the original.

To do this he borrowed the case and structure of a Nokia 5110 phone, but modified it to hold a small Android device in the old battery compartment along with a tiny Bluetooth keyboard (which was also built from scratch by [befinitiv]) that connects to the Android phone to mimic the old slide-out style. This isn’t just a case mod, though. He also reverse-engineered the original PCB of the phone and included a Bluetooth module there as well, which allows the phone’s screen and keypad to work mostly as originally intended.

This project goes pretty far to scratch the 90s phone nostalgia itch while still being largely usable as a real phone in the modern world. Assuming you aren’t too hung up on the literal phone aspect, the Notkia project is also an impressive effort to bring new life to these old handsets.

Continue reading “Nokia 5110 Gets Android Stowaway And A Keyboard”

The 512 Gigabyte Floppy Disk

There are times when a technology goes almost overnight as if in a puff of smoke, and others when they fade away gradually over time to the point at which their passing is barely noticed. So it is with removable media, while we still have the occasional USB flash disk or SD card , they do not come anywhere near the floppies, Zip disks, and CD-ROMs of the past in their numbers or ubiquity. If the floppy disk is just a save icon to you there’s still the chance to experience their retro charm though, courtesy of [Franklinstein]. He’s made a 3.5″ floppy disk that eschews 720 k, 1.44 M, or even 2.88 Mb, and goes all the way with a claimed 512 Gb capacity. We’re sure we can’t remember these from back in the day!

Of course as we can see in the video below he’s achieved neither an astounding feat of data compression nor a bleeding-edge method of storing bits in individual iron oxide molecules. Instead the floppy hinges open, and there’s a holder for micro SD cards where the disk itself would be. It’s a bit of fun, and we have to agree with him that it makes a very handy holder for micro SDs that can carry that much data. This sets us wondering though, whether it would be possible to somehow multiplex 14 micro SDs to a microcontroller on a PCB that could fit in a floppy shell. Perhaps an ESP32 could be a slow file server through a web interface?

He makes the point that 512 Gb of floppies would comfortably exceed the height of the tallest buildings were they stacked together, so at the very least this represents a space saving. If you’re looking for something slightly more functional and don’t mind modifying the drive, there’s always this classic approach to marrying a floppy with an SD card.

Continue reading “The 512 Gigabyte Floppy Disk”

An Illuminating Look At A Wolf 5151 Light Source

While originally designed to put light where the sun don’t shine for medical purposes, [Nava Whiteford] says the Wolf 5151 Xenon endoscopic light source also works well for microscopy and general optical experiments, especially since you can get them fairly cheap on the second hand market. His cost just $50 USD, which is a steal when you consider a replacement for its 300 watt Olympus-made bulb will run you about 200 bucks alone.

That said, [Nava] recently moved on to a more compact light source, and figured that was a good enough excuse to crack open the Wolf 5151 and see what makes it tick. In this particular post he’s just looking at the optical side of things, which is arguably the most interesting aspect of the device. Helpfully, the whole assembly is mounted to its own sled of sorts that can be pulled from the light source for a closer examination.

A Steampunk dimmer switch.

Beyond that expensive bulb we mentioned earlier, there’s a thick piece of what appears to be standard plate glass being used as an IR and UV filter. [Nava] suspects this component is responsible for keeping the rest of the optics from overheating, which is backed up by the fact that the metal plate its mounted to appears to feature a K-type thermocouple to keep an eye on its operating temperature. Forward of that is a unique aspheric lens that features a rough spot to presumably scatter the light at the center of the beam.

Our vote for the most fascinating component has to go to the Neutral Density (ND) filter, which is used to control the intensity of the light. In a more pedestrian light source you could just dim the bulb, but in this case, the Wolf 5151 uses a metal disk with an array of holes drilled into it. By rotating the disc with a DC motor, the lens can be variably occluded to reduce the amount of light that reaches the aperture, which connects to the fiber cable.

While it’s perhaps no surprise the build quality of this medical gear is considerably beyond the commercial gadgets most of us get to play with, it still doesn’t hold a candle (no pun intended) to the laser module pulled from a Tornado jet fighter.