3D Scanner For Tiny Objects Uses Blu-Ray Parts

There’s plenty of different methods to build a 3D scanner, with photogrammetry being a particularly accessible way to do it. This involves taking a series of photos from different angles to build up the geometry of the model. If you want to do this with something small, instead of a camera, just substitute a microscope! [NoseLace’s] LadyBug does just that.

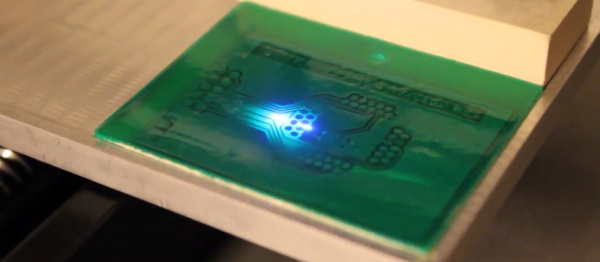
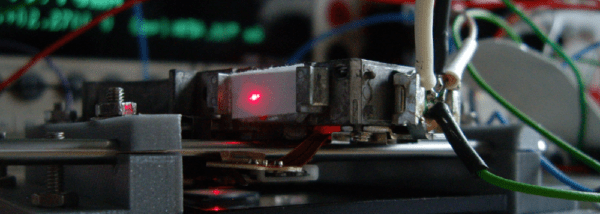
It’s a 3D scanner built in a very hacker fashion. The X-Y stage that moves the sample is from a KES-400a Blu-Ray drive, salvged from the original “fat” Playstation 3. The Z axis is then created using the linear stepper motor from the optical pickup of the same drive. A rotary stepper motor is added on to the Z-axis to allow the sample to be rotated. It’s all combined with a basic USB microscope to take the images, and a Raspberry Pi which handles running all the stepper motors with some add-on driver boards.

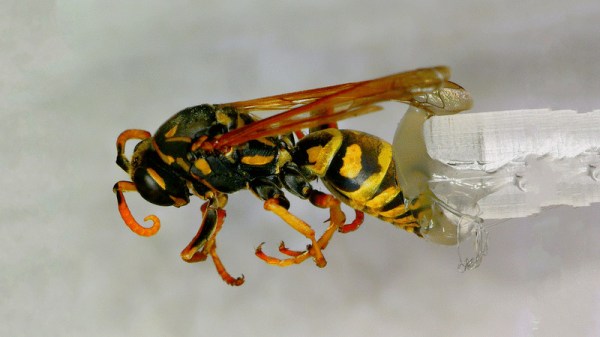
[NoseLace] uses the device to create 3D models of insects, but it would work just as well with other small objects. The benefit of this approach is that it creates both the 3D model and the requisite texture, too. There’s plenty of open-source tools available if you’d like to try it for yourself. Video after the break.

Continue reading “3D Scanner For Tiny Objects Uses Blu-Ray Parts”

Laser Exposing PCBs With A Blu-Ray Laser

For those of us whose introduction to PCB making came decades ago and who share fond memories of permanent markers and crêpe paper sticky tape, the array of techniques available to PCB artists of today seem nothing short of magical. Toner transfer and peroxide etchant mixtures might seem run-of-the-mill to many readers, but even they are streets ahead of their predecessors from times past.

Photographic exposure of  etch-resist coating has traditionally been performed with a UV lamp through a sheet of acetate film, but there is no reason why that should be the only way it can be performed. There have been plenty of projects using lasers or LEDs to draw a PCB design onto the coating as a raster, and a rather nice example from [Terje Io] using a Blu-Ray laser diode is the subject of the video below the break.

The diode is mounted on a gantry with a THK KR33 linear actuator that he tells us was unsuitable for his CNC mill due to backlash. This gives a claimed 1200 dpi resolution, over a 100 mm x 160 mm exposure area. Software is provided in a GitHub repository, taking a PNG image exported through a PDF printer. And since it’s got a UV laser, it can be used in a second pass to process UV-responsive soldermask film. ([Terje] cheats and uses a separate CNC mill to drill out the holes.) The result looks great.

Continue reading “Laser Exposing PCBs With A Blu-Ray Laser”

Hackaday Prize Entry: Microscopy With Blu-ray

Confocal microscopy is an imaging technique that provides higher resolution micrographs than that of traditional optical microscopy. Confocal microscopes attain this higher resolution from an image sensor behind a pinhole. By eliminating out of focus light, and by scanning the specimen back and forth under the microscope, a very high resolution image may be produced. This technique has applications ranging from life sciences to semiconductor work. For this year’s Hackaday Prize, [andreas.betz] is building a confocal microscope using little more than a Blu-ray drive read head.

[andreas]’ build uses a standard Playstation 3 Blu-ray drive mechanism. The read head for this mechanism is well documented, but [andreas] still has to drive the laser and the voice coils for this machine to do anything. With the Blu-ray drive working, only the optics remained.

Just this last week, [andreas] imaged the die of a transistor with a resolution of about 680nm. An inductor was also imaged, showing a track separation of about 10um. This is approaching the limits of optical microscopy, and the apparatus is simple enough for anyone to replicate.

As a feat of technical ingenuity, this is a great project. It’s one of the best we’ve seen for the Citizen Science portion of the Hackaday Prize, and can’t wait to see what other images [andreas] can make with this machine.

The HackadayPrize2016 is Sponsored by:

Reverse Engineering A Blu-ray Drive For Laser Graffiti

There’s a whole lot of interesting mechanics, optics, and electronics inside a Blu-ray drive, and [scanlime] a.k.a. [Micah Scott] thinks those bits can be reused for some interesting project. [Micah] is reverse engineering one of these drives, with the goal of turning it into a source of cheap, open source holograms and laser installations – something these devices were never meant to do. This means reverse engineering the 3 CPUs inside an external Blu-ray drive, making sense of the firmware, and making this drive do whatever [Micah] wants.

When the idea of reverse engineering a Blu-ray drive struck [Micah], she hopped on Amazon and found the most popular drive out there. It turns out, this is an excellent drive to reverse engineer – there are multiple firmware updates for this drive, an excellent source for the raw data that would be required to reverse engineer it.

[Micah]’s first effort to reverse engineer the drive seems a little bit odd; she turned the firmware image into a black and white graphic. Figuring out exactly what’s happening in the firmware with that is a fool’s errand, but by looking at the pure black and pure white parts of the graphic, [Micah] was able guess where the bootloader was, and how the firmware image is segmented. In other parts of the code, [Micah] saw thing vertical lines she recognized as ARM code. In another section, thin horizontal black bands revealed code for an 8051. These lines are only a product of how each architecture accesses code, and really only something [Micah] recognizes from doing this a few times before.

The current state of the project is a backdoor that is able to upload new firmware to the drive. It’s in no way a complete project; only the memory for the ARM processor is running new code, and [Micah] still has no idea what’s going on inside some of the other chips. Still, it’s a start, and the beginning of an open source firmware for a Blu-ray drive.

While [Micah] want’s to use these Blu-ray drives for laser graffiti, there are a number of other slightly more useful reasons for the build. With a DVD drive, you can hold a red blood cell in suspension, or use the laser inside to make graphene. Video below.

Continue reading “Reverse Engineering A Blu-ray Drive For Laser Graffiti”

Blu-ray CNC Looks Great For Branding And Engraving

[Nav] got the bug for a tiny little laser cutter. He pulled off the build, and has just finished the second rendition which makes some nice improvements. He’s was hoping for a laser cutter, but we think this really shines when it comes to branding objects like the scrap wood seen above.

This joins a long line of optical drive parts builds. For instance, we saw this plotter that used the lens sleds from some CD-ROM drives. You may think that [Nav] doesn’t need to worry about the Z axis since this is a laser but you’d be wrong. The focal point of the light needs to hit at the right place to cut efficiently, and this is often the trouble with laser cutters. As material is burned away the laser becomes less efficient if you don’t adjust the lens for vertical position. That’s why we think it’s best as an engraver, but the original build writeup for his cutter does show some success cutting letters in dark paper.

Check out a clip of this design being burnt into the wood after the break.

Continue reading “Blu-ray CNC Looks Great For Branding And Engraving”

Blu-ray Laser Plotter Writes On Glow-in-the-dark Screen

This laser display is persistent thanks to a glow-in-the-dark screen. [Daniel] built it using a Blu-ray laser diode. As the laser dot traverses the screen, it charges the phosphors in the glow material, which stay charged long enough to show a full image.

The laser head is simple enough, two servo motors allow for X and Y axis control. A Micro Maestro 6-channel USB servo controller from Pololu drives the motors, and switches the diode on and off. This board offers .NET control, which [Daniel] uses to feed the graphics data to the unit. Check out the video demonstration below the fold to see a few different images being plotted. It’s shot using a night-vision camera so that you can really see where the laser dot is on the display. It takes time to charge the glow material so speeding up the plotting process could actually reduce the persistent image quality.

This is yet another project that makes you use those geometry and trigonometry skills.

Continue reading “Blu-ray Laser Plotter Writes On Glow-in-the-dark Screen”

Blu-Ray Laser Keychain

blu-ray-laser

[Jay] hacked a Blu-Ray laser diode into a keychain enclosure. He found a heavy brass keychain light from Lowe’s and stuffed the diode and a larger battery inside. The existing batteries weren’t powerful enough, so he drilled out the endcap to fit a 200mAh 3.6v lithium battery inside. He also modded the power button to only momentarily turn on the diode. With the larger battery, the laser can run for about an hour between charges. In addition to a Blu-Ray lasers, he also has versions with a 200mW red diode.

Related: Laser projector zippo