3D Print Glass With A Laser Cutter

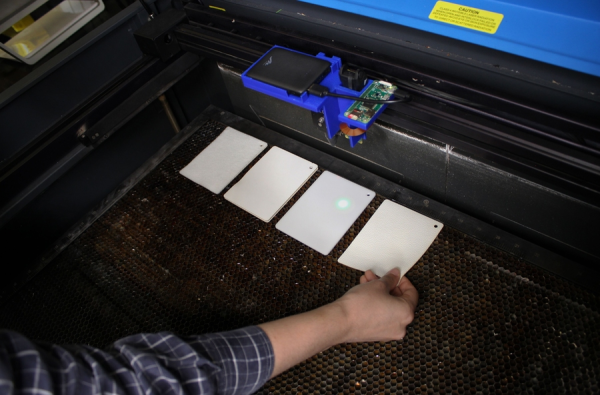
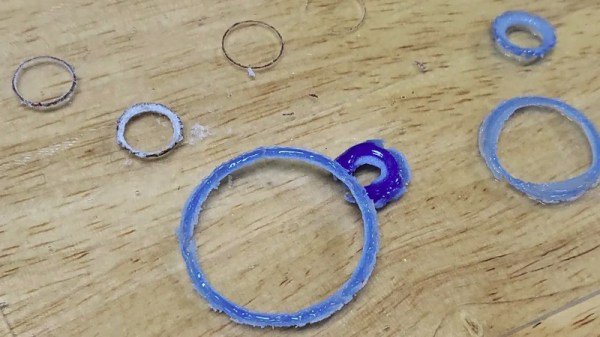
We’re all familiar with FDM 3D printing, and some of the more well-heeled or adventurous among us may even have taken a faltering step into the world of SLA printers. But for most of us there’s a step further in 3D printing that remains beyond our reach. SLS, or Selective Laser Sintering, creates prints from powder by melting it layer by layer using a laser, and has the advantage of opening up more useful materials than the polymer stock of the other methods. It’s not entirely unreachable though, as [Kenneth Hawthorn] shows us by using a laser cutter to produce SLS prints from powdered glass.

He evolved the technique of repeated fast passes with the laser to gradually melt more glass together as opposed to slower passes. He achieved a resolution as low as 0.1 mm, though he found a better glass color when the laser was less tightly focused. It raises the concern that glass powder is abrasive and thus a threat to any mechanism, thus he’s being extremely careful with the fan settings.

This may not be quite in the league of an SLS printer costing thousands of dollars, but it’s a technique that bears more investigation and could no doubt be refined for more custom fused glass creations. He tells us he was inspired by a previous Hackaday post about sintering sand, and of course we’d like to remind readers of a 3D printer that did the same job with the power of the sun.

Squares of sample materials placed on the laser bed awaiting the sensing head

Smart Laser Cutter Ad-on Detects Material Optically

Come on now, admit it. You’ve done it. We’ve done it. You know — you were really sure that sheet of plastic stock you found lying around the hackerspace was acrylic right? You dialled in the settings, loaded the design, set the focus and pushed the little green ‘start’ button. Lots of black smoke, fire, and general badness ensued as you lunged for the red ‘stop’ button, before lifting the lid to work out how you’re going to clean this one up.

That was not acrylic. That was polycarbonate.

What you need is the latest gadget from MIT: SensiCut: A smart laser cutter system that detects different materials automatically.

The technique makes use of so-called ‘speckle imaging’ where a material illuminated by a laser will produce a unique pattern of reflected spots, or speckles into a camera. By training a deep neural model with a large set of samples, it was found possible to detect up to 30 types of material with 98% accuracy.

The pre-baked model runs on a Raspberry PI zero with an off-the-shelf camera all powered from a power bank. This allows the whole assembly to simply drop onto an existing laser cutter head, with no wiring needed.

Even if you’re a seasoned laser cutter user, with a well-controlled stock pile, the peace-of-mind this could give would definitely be worth the effort. A more detailed description and more videos may be found by reading the full paper. Here’s hoping they release the system as open source, one day in the not-to-distant future. If not, then, you know what to do :)

Continue reading “Smart Laser Cutter Ad-on Detects Material Optically”

Scratch-Built CO2 Laser Tube Kicks Off A Laser Cutter Build

When we see a CO2 laser cutter build around these parts, chances are pretty good that the focus will be on the mechatronics end, and that the actual laser will be purchased. So when we see a laser cutter project that starts with scratch-building the laser tube, we take notice.

[Cranktown City]’s build style is refreshingly informal, but there’s a lot going on with this build that’s worth looking at — although it’s perhaps best to ignore the sourcing of glass tubing by cutting the ends off of an old fluorescent tube; there’s no mention of what became of the mercury vapor or liquid therein, but we’ll just assume it was disposed of safely. We’ll further assume that stealing nitrogen for the lasing gas mix from car tires was just prank, but we did like the rough-and-ready volumetric method for estimating the gas mix.

The video below shows the whole process of building and testing the tube. Initial tests were disappointing, but with a lot of tweaking and the addition of a much bigger neon sign transformer to power the tube, the familiar bluish-purple plasma made an appearance. Further fiddling with the mirrors revealed the least little bit of laser output — nowhere near enough to start cutting, but certainly on the path to the ultimate goal of building a laser cutter.

We appreciate [Cranktown City]’s unique approach to his builds; you may recall his abuse-powered drill bit index that we recently covered. We’re interested to see where this laser build goes, and we’ll be sure to keep you posted.

Continue reading “Scratch-Built CO2 Laser Tube Kicks Off A Laser Cutter Build”

Hackaday Podcast 107: FTDI Plays Music, LED Dimming Ain’t Easy, Measuring Poop Calories, And Sketchy Laser Cutters

Hackaday editors Mike Szczys and Elliot Williams gab about all of the geeky things. We had a delightful time watching NASA bring Perseverance down to the Red planet. In Kristina’s words, we pour one out for Fry’s Electronics. And then we jump into a parade of excellent hacks with a magnetic bearing for crooked ball screws, a science-based poop-burning experiment, and the music hack only microcontroller enthusiasts could love as an FTDI cable is plugged directly into a speaker. Smart circuit design is used to hack a dimmer into non-dimmable LED fixtures, and an octet of living clams are the early warning sensors for water pollution.

Take a look at the links below if you want to follow along, and as always, tell us what you think about this episode in the comments!

Direct download (~60 MB)

Places to follow Hackaday podcasts:

Continue reading “Hackaday Podcast 107: FTDI Plays Music, LED Dimming Ain’t Easy, Measuring Poop Calories, And Sketchy Laser Cutters”

Hands On With The Ortur Laser Cutter

I couldn’t write very much without a computer. Early in my career, I wrote with a typewriter. Unless you are pretty close to perfect — I’m not — it is very frustrating to make edits on typewritten stuff. The equivalent in the real world, for me, has been 3D printers and CNC machines. I can visualize a lot of things that I’m not careful enough to build with normal tools. Despite my 7th-grade shop teacher’s best efforts, everything I did turned out to be a toothpick or a number 7. But I can get my ideas into CAD and from there the machines do the rest. That’s why I was excited to get a laser cutter this past Christmas. You might wonder why I’d need a laser cutter if I have the other tools. Then again, if you read Hackaday, you probably don’t need me to explain why you need a new gadget. I’ve had my eye on a laser for a good long time, but recent developments made it more attractive. I thought I’d share with you some of what I’ve found getting started with the Ortur laser cutter. The cutter is easy to put together and costs somewhere in the $200-$400 range depending on what you get with it. I thought I’d take some time to share what I’ve learned about it.

Why a Laser?

If you haven’t had experience with a laser cutter or engraver before, you might think it is a very specific instrument. Sure, the Ortur is good at engraving some things (but not all things). It can cut some things, too, but not as many things as a big serious laser cutter. However, creative people find lots of ways to use cutting and engraving to produce things you might not expect.

Continue reading “Hands On With The Ortur Laser Cutter”

3D Printer? Laser Cutter? CNC? Yes, Please

Most of us have, or, would like to have a 3D printer, a laser engraver, and a CNC machine. However, if you think about it naively, these machines are not too different. You need some way to move in the XY plane and, usually, on the Z axis, as well.

Sure, people mount extruders on CNCs, or even lasers or Dremel tools on 3D printers. However, each machine has its own peculiarities. CNCs need rigidity. 3D printers should be fast. Laser engravers and CNCs don’t typically need much Z motion. So common sense would tell you that it would be tough to make a machine to do all three functions work well in each use case. [Stefan] thought that, too, until he got his hands on a Snapmaker 2.0.

As you can see in the video below, the machine uses different tool heads for each function. The motion system stays the same and, curiously, there are three identical linear motion modules, one for each axis.

Continue reading “3D Printer? Laser Cutter? CNC? Yes, Please”

3D Finger Joints For Your Laser Cutter

A laser cutter is an incredibly useful tool and they are often found in maker spaces all over. They’re quite good at creating large two-dimensional objects and by cutting multiple flat shapes that connect together you can assemble a three-dimensional object. This is easier when creating something like a box with regular 90-degree angles but quickly becomes quite tricky when you are trying to construct any sort of irregular surface. [Tuomas Lukka] set out to create a dollhouse for his daughter using the laser cutter at his local hackerspace and the idea of creating all the joints manually was discouraging.

The solution that he landed on was writing a python script called Plycutter that can take in an STL file and output a series of DXF files needed by the cutter. It does the hard work of deciding how to cut out all those oddball joints.

At its core, the system is just a 3D slicer like you’d find for a 3D printer, but not all the slices are horizontal. Things get tricky if more than two pieces meet. [Tuomas] ran into a few issues along the way with floating-point round-off and after a few rewrites, he had a fantastic system that reliably produced great results. The dollhouse was constructed much to his daughter’s delight.

All the code for Plycutter is on GitHub. We’ve seen a similar technique that adds slots, finger-joints, and t-slots to boxes, but Plycutter really offers some unique capabilities.