A Practical Discrete 386

There are some chips that no matter how much the industry moves away from them still remain, exerting a hold decades after the ranges they once sat alongside have left the building. Such a chip is the 386, not the 80386 microprocessor you were expecting but the LM386, a small 8-pin DIP audio amplifier that’s as old as the Ark. the ‘386 can still be found in places where a small loudspeaker needs to be powered from a battery. SolderSmoke listener [Dave] undertook an interesting exercise with the LM386, reproducing it from discrete components. It’s a handy small discrete audio amplifier if you want one, but it’s also an interesting exercise in understanding analogue circuits even if you don’t work with them every day.

A basic circuit can be found in the LM386 data sheet (PDF), but as is always the case with such things it contains some simplifications. The discrete circuit has a few differences in the biasing arrangements particularly when it comes to replacing a pair of diodes with a transistor, and to make up for not being on the same chip it requires that the biasing transistors must be thermally coupled. Circuit configurations such as this one were once commonplace but have been replaced first by linear ICs such as the LM386 and more recently by IC-based switching amplifiers. It’s thus instructive to take a look at it and gain some understanding. If you’d like to know more, it’s a chip we’ve covered in detail.

Active Signal Tracer Probe Has AGC

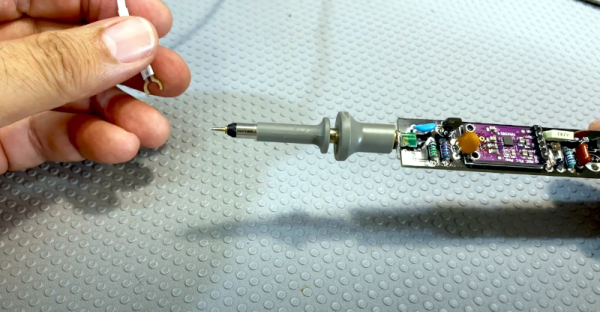
[Electronics Old and New] has a new version of one of his old projects. The original project was an active probe. He took what he learned building that probe and put it into a new probe design. He also added automatic gain control or AGC. You can see a video explanation of the design below. The probe is essentially a high-impedance input using a JFET that can amplify audio or demodulated RF signals, which is a handy device to have when troubleshooting radios.

The audio amplifier is a simple LM386 circuit. The real work is in the input stage and the new AGC circuit. Honestly, we’ve used the amplifier by itself for a similar function, although the raw input impedance of the chip is only about 50K and is less in many circuits that use a pot on the input. Having a JFET buffer and an RF demodulating diode is certainly handy. You’d think the AGC block would be in the audio stage. However, the design uses it ahead of the detector which is great as long as the amplifier can handle the RF frequency you are interested in. In this case, we think he’s mostly working on old tube AM radios, so the max signal is probably in the neighborhood of 1 MHz.

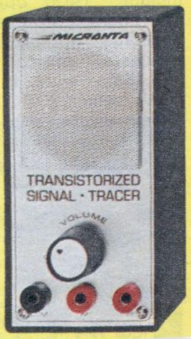
A similar device was a Radio Shack staple for many years

The module is made to amplify an electret microphone using a MAX9814 which has AGC. The module had a microphone that came off for this project. The datasheet doesn’t mention an upper frequency limit, but a similar Maxim part mentions its gain is greater than 5 at 600 kHz, so for the kind of signals this is probably used for, it should work well. We wondered if you could use the module and dispense with the JFET input. The chip probably has a pretty high input impedance, but the datasheet doesn’t give a great indication.

For years we used a signal tracer from Radio Shack which — if we could still find it — now has an LM386 inside of it after the original electronics failed decades ago. In those days, fixing an AM radio involved either using a device like this to find where you did and didn’t have a signal or injecting signals at different points in the radio. Two sides of the same coin. For example, if you could hear a signal at the volume control — that indicated the RF stages were good and you had a problem on the audio side. Conversely, if you injected a signal at the volume control, not hearing would mean the same thing. Once you knew if the problem was in the RF or AF side, you’d split that part roughly in half and repeat the operation until you were down to one bad stage. Of course, you could use signal generators and scopes, but in those days you weren’t as likely to have those.

Heathkit, of course, had their own version. It even had on of those amazing magic eye tubes.

Continue reading “Active Signal Tracer Probe Has AGC”

Cute Oscilloscope Uses LEDs For Display

Oscilloscopes were once commonly called CROs, for the fact that they relied on cathode ray tubes for display. Since then, technology has moved quickly, and oscilloscopes these days almost entirely rely on modern screens like LCDs. However, [lonesoulsurfer] went a different route with this fun DIY build, creating an oscilloscope with a low-resolution LED display.

Yes, the signals are shown on a 10×10 matrix made up of red LEDs. The individual pixels look nicely diffused and chunky thanks to the fact that [lonesoulsurfer] was able to source square 5mm LEDs for the build. The whole project only uses four ICs – a decade counter and a LM3914 LED driver to run the display, a 555 timer for clock input, and an LM386 op-amp for amplifying incoming signals.

With a mic fitted onboard, the oscilloscope can act as a simple music visualizer, or be used with a probe to investigate actual circuits. It may not be of great enough resolution or precision for fine work, but it’ll at least tell you if your microcontroller’s clock is running properly if you’re scratching your head about the function of a simple project.

We’ve seen some great DIY oscilloscopes over the years, like this neat Arduino-based build. Video after the break.

Continue reading “Cute Oscilloscope Uses LEDs For Display”

Halloween Build: Exquisite Ray Gun Has Sound Effects

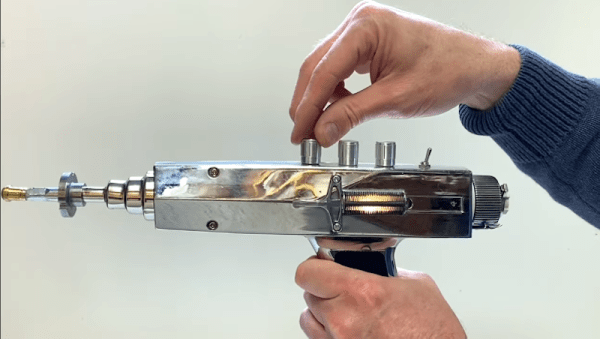
When we first saw [lonesoulsurfer’s] ray gun, we thought it looked oddly familiar. Sure, it looks like a vintage ray gun you might see in a dozen 1950-era movies or TV shows. But still, there was something oddly familiar about it. Turns out, the core piece of it is an old-fashioned timing light used when doing a car tune-up.

This is no unobtrusive Star Trek phaser. It looks substantial and has a cool sound generator that not only gives it something to do but also sports cool control knobs out the top of the gun. The design files for the sound circuit are in a Google drive folder if you want to recreate the build.

Continue reading “Halloween Build: Exquisite Ray Gun Has Sound Effects”

Dub Siren, a 555-powered synthesizer

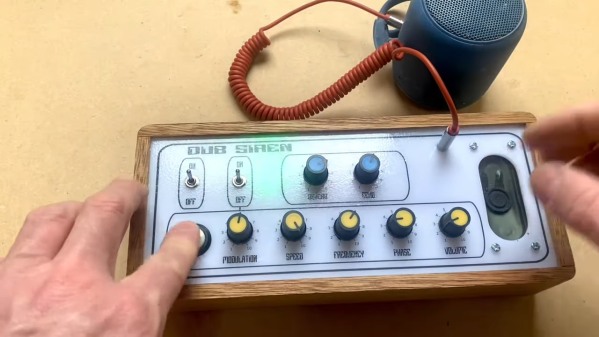
Classic Chip Line-Up Powers This Fun Dub Siren Synth

There’s a certain elite set of chips that fall into the “cold, dead hands” category, and they tend to be parts that have proven their worth over decades, not years. Chief among these is the ubiquitous 555 timer chip, which nearly 50 years after its release still finds its way into the strangest places. Add in other silicon stalwarts like the 741 op-amp and the LM386 audio amp, and you’ve got a Hall of Fame lineup for almost any project.

That’s exactly the complement of chips that powers this fun little dub siren. As [lonesoulsurfer] explains, dub sirens started out as actual sirens from police cars and the like that were used as part of musical performances. The ear-splitting versions were eventually replaced with sampled or synthesized siren effects for recording studio and DJ use, which leads us to the current project. The video below starts with a demo, and it’s hard to believe that the diversity of sounds this box produces comes from just a pair of 555s coupled by a 741 buffer. Five pots on the main PCB control the effects, while a second commercial reverb module — modified to support echo effects too — adds depth and presence. I built-in speaker and a nice-looking wood enclosure complete the build, which honestly sounds better than any 555-based synth has a right to.

Interested in more about the chips behind this build? We’ve talked about the 555 and how it came to be, taken a look inside the 741, and gotten a lesson in LM386 loyalty.

Continue reading “Classic Chip Line-Up Powers This Fun Dub Siren Synth”

The Retro Shield, an Arduino Proto Shield for making many different circuits.

Retro Shield Replaces Springs With Jumpers, Includes Blinkenlights!

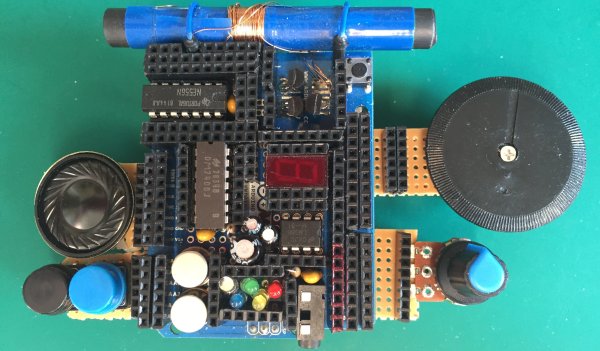
Is it an AM radio? Yes. It is a 555 LED flashing circuit? Yep. How about a hex counter with a 7 segment display? That too. Five different colored LED’s to satisfy your need for blinkenlights? Even that! What is this magical contraption? Is it one of those old school 30-in-1 or 50-in-1 “Science Fair” kits with the jumper wires and the springs? Almost!

When [grandalf]’s friend showed them a project where a 555 timer was installed on an Arduino shield, they realized two things: This whole “could have done that with a 555 timer” meme is a lot of fun, and “I’ve got an old 556 chip, I wonder if I can build one?” The answer is yes, and so much more.

Starting with the 556 timer, and inspired by the old spring-and-jumper kits of the past, [grandalf]’s “556 on a Proto Shield” project evolved into a creation they call the Retro Shield. Snowballing like so many hacker projects, it now includes several built in circuits and components. Breadboard jumpers are used to connect components through strategically placed pin headers, of which there are quite a few!

To make it all fit, some parts were substituted with more compact pieces such as an LM386 instead of an LM380.  The AM radio portion is supplied by an all-in-one radio chip, the ZN414. With the scope creep picking up steam, [grandalf] eventually added so called sidecars- bits of board that contain controls and a speaker hanging off the side of the Proto Shield.

It is not mentioned if the Retro Shield integrates with the Arduino or not. All the same, the Retro Shield has been used to pick up local AM stations, blink LED’s and amplify audio with the LM386. Like [grandalf] we’re sure that the Retro Shield can be used for much more. We hope that [grandalf] expands on the concept and inspires future hackers to answer the question “I wonder what happens if I try this.” 

If you haven’t set eyes on one of the all-in-one kits, check out this 200-in-1 kit teardown and review. And of course, if you have your own hacked up projects to share, be sure to let us know through the Tip Line!

Impromptu Metal Detector Built From The Junk Bin

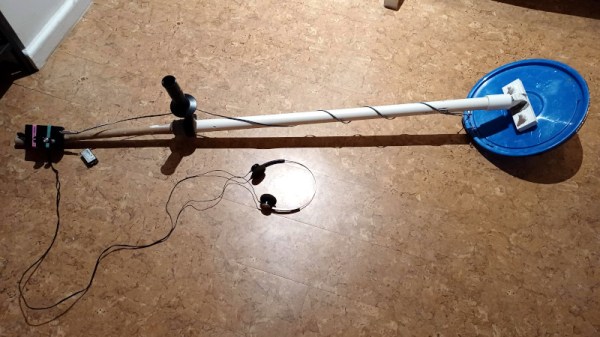
Have you ever found yourself suddenly in need of finding a small metal object hidden in the woods? No? Well, neither have we. But we can’t say the same thing for [zaphod], who’s family was hoping to settle a dispute by finding the surveyor stakes that marked the corners of their property. It was a perfect job for a metal detector, but since they didn’t own one, a serviceable unit had to be assembled from literal garbage.

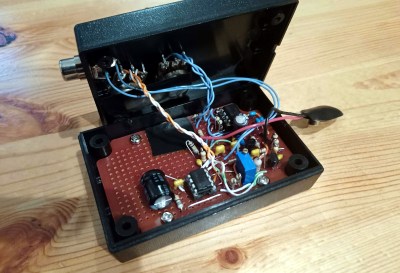
To start with, [zaphod] had to research how a metal detector actually works. After reviewing the pros and cons of various approaches, the decision was made to go with a beat frequency oscillator (BFO) circuit. It’s not the greatest design, it might even be the worst, but it could be built with the parts on hand and sometimes that’s all that matters. After packing a 2N3904 transistor, an LM386 amplifier, and every Hackaday reader’s favorite chip the 555 timer into an enclosure along with some of their closest friends, it was time to build the rest of the metal detector.

Look ma, no MCU!

The sensor coil was made by salvaging the wire from an old fluorescent lamp ballast and winding it around the lid of a bucket 27 times. This was mounted to the end of a broom handle with some angle pieces made from PVC sheet material, being careful not to use any metal fasteners that would throw off the detector. With the handle of an old drill in the middle to hold onto, the metal detector was complete and actually looked the part.

So did [zaphod] save the day by finding the surveyor stakes and reconnoitering the family’s plot? Unfortunately, no. It wasn’t a technical failure though; the metal detector did appear to work, although it took a pretty sizable object to set it off. The real problem was that, after looking more closely into it, the surveyors only put down one stake unless they are specifically instructed otherwise. Since they already knew where that one was…

If your homemade metal detector can’t find something that was never there, did it really fail? Just a little something to meditate on. In any event, when even the cheapest smart bulb is packing a microcontroller powerful enough to emulate early home computers, we’re always happy to see somebody keep the old ways alive with a handful of ICs.