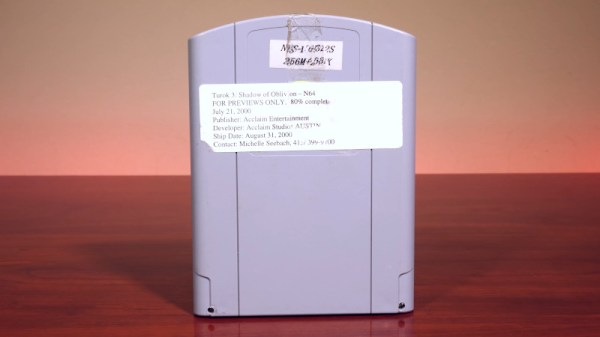
The Atomic Pi: Is It Worth It?

Several months ago, a strange Kickstarter project from ‘Team IoT’ appeared that seemed too good to be true. The Atomic Pi was billed as a high-power alternative to the Raspberry Pi, and the specs are amazing. For thirty five American buckaroos, you get a single board computer with an Intel processor. You get 16 Gigs of eMMC Flash, more than enough for a basic Linux system and even a cut-down version of Windows 10. You have WiFi, you have Bluetooth, you have a real time clock, something so many of the other single board computers forget. The best part? It’s only thirty five dollars.

Naturally, people lost their minds. There are many challengers to the Raspberry Pi, but nothing so far can beat the Pi on both price and performance. Could the Atomic Pi be the single board computer that finally brings the folks from Cambridge to their knees? Is this the computer that will revolutionize STEM education, get on a postage stamp, and sell tens of millions of units?

No. The answer is no. While I’m not allowed to call the Atomic Pi “literal garbage” because our editors insist on the technicality that it’s “surplus” because they were purchased before they hit the trash cans, there will be no community built around this thirty five dollar single board computer. This is a piece of electronic flotsam that will go down in history right next to the Ouya console. There will be no new Atomic Pis made, and I highly doubt there will ever be any software updates. Come throw your money away on silicon, fiberglass and metal detritus! Or maybe you have a use for this thing. Meet the Atomic Pi!

Continue reading “The Atomic Pi: Is It Worth It?”

Thumbs Up For This CRT Handheld Gaming Console

Despite all the progress video game graphics have made, it is safe to say that we won’t see any decline in oldschool 8-bit games any time soon. For some it’s about nostalgia, for others it’s just a great and simple-enough first step into game development itself. For [gocivici] it was a bit of both when he built this camcorder style, one-button gaming console.

With a Raspberry Pi Zero running PICO-8 at its core, [gocivici] salvaged the viewfinder of an old camcorder for the display, and that way turned it into a whole other kind of handheld console. For full ergonomic handling, one single, thumb-operated push button serves as only control option. This of course makes it a bit challenging to re-use existing games that would require more input options, so he and some friends decided to just write a suitable game on their own with the hopes that others might follow.

Unfortunately we don’t see a lot of projects using these old camcorder viewfinders, and considering modern LCD and OLED options it’s not really that surprising, but there’s just something intriguing about these tiny CRTs. So in case you want to see more of them, have a look at this tiny Atari display, and the DIY night vision monocle from a few years back. And to keep your eyes safe and sound, [gocivici] got you covered as well.

Continue reading “Thumbs Up For This CRT Handheld Gaming Console”

Raspberry Pi Breathes Life Into A Scale Model SEGA

Miniature game consoles are all the rage right now. Many of the big names in gaming are releasing their own official “mini” versions of their classic machines, but naturally we see plenty of DIY builds around these parts as well. Generally they’re enclosed in a 3D printed model of whatever system they’re looking to emulate, but as you might expect that involves a lot of sanding and painting to achieve a professional look.

But for SEGA Genesis (or Mega Drive as it was known outside the US) fans, there’s a new option. A company by the name of Retro Electro Models has released a high-fidelity scale model of SEGA’s classic console, so naturally somebody hacked it to hold a Raspberry Pi. Wanting to do the scale detailing of the model justice, [Andrew Armstrong] went the extra mile to get the power button on the front of the console working, and even added support for swapping games via RFID tags.

[Andrew] uses the Raspberry Pi 3 A+ which ended up being the perfect size to fit inside the model. Fitting the Pi Zero would have been even easier, but it lacks the horsepower of its bigger siblings. The RFID reader is connected to the Pi over SPI, and the reed switch used to detect when the power switch has been moved is wired directly to the GPIO pins. The system is powered by a USB cable soldered directly to Pi’s PCB and ran out a small hole in the back of the case.

For input, [Andrew] is using a small wireless keyboard that includes a touch pad and gaming controls. Unfortunately, it has a proprietary receiver which had to be integrated into the system. In a particularly nice touch, he used snipped off component leads to “wire” the receiver’s PCB directly to the pins of the Pi’s USB port. Not only does it look cool, but provides a rigid enough connection that he didn’t even need to glue it down to keep it from rattling around inside the case. Definitely a tip to keep in the back of your mind.

The software side of this project is about what you’d expect for an emulation console, though with the added trickery of loading games based on their RFID tag. At this point [Andrew] only has a single “cartridge” for the system, so he simply drops the tags into the cartridge slot of the console to load up a new title. It doesn’t look like Retro Electro Models is selling loose cartridges (which makes sense, all things considered), so there might still be a job for your 3D printer yet if you want to have a library of scale cartridges to go with your console.

For those of you who were on Team Nintendo in the 1990’s, we’ve seen a similar build done with a 3D printed case. Of course, if even these consoles are a bit too recent for your tastes, you could build a miniature Vectrex instead.

Continue reading “Raspberry Pi Breathes Life Into A Scale Model SEGA”

2600-Inspired Handheld Brings The Faux Woodgrain

The Atari 2600 is a console from a very different time, when home appliances, furniture, and even automobiles were all covered in fake vinyl woodgrain veneer. Somehow it was the in thing for a decade, and then immediately became tacky overnight. Regardless, if you want to evoke the era, that’s what you do – and that’s exactly what [Christian] did with this handheld RetroPie build.

An early concept sketch shows off [Christian]’s art skills.
The technical side of things is fairly routine in these parts – a Pi Zero runs RetroPie so you can play emulated games from the mid-90s and earlier. It’s the visual presentation that we particularly enjoy. The look of the early Atari is evoked through clever use of materials. The body is in black plastic, with blocky red buttons for controls. It’s finished with a vinyl woodgrain applique around the screen, and we think it’s a wonderful aesthetic.

The files to print your own are available on Thingiverse, and [Christian] has provided a basic guide to sourcing similar parts. It’s all common stuff, readily available on eBay or elsewhere.

We love seeing retro throwbacks like this – the tiny Macintosh Plus from the 2017 Superconference is a particular highlight.

SNES Controller Has A Pi Zero In The Trunk

We’re no stranger to seeing people jam a Raspberry Pi into an old gaming console to turn it into a RetroPie system. Frankly, at this point it seems like we’ve got to be getting close to seeing all possible permutations of the concept. According to the bingo card we keep here at Hackaday HQ we’re just waiting for somebody to put one into an Apple Bandai Pippin, creating the PiPi and achieving singularity. Get it done, people.

That being said, we’re still occasionally surprised by what people come up with. The Super GamePad Zero by [Zach Levine] is a fairly compelling take on the Pi-in-the-controller theme that we haven’t seen before, adding a 3D printed “caboose” to the stock Super Nintendo controller. The printed case extension, designed by Thingiverse user [Sigismond0], makes the controller about twice as thick, but that’s still not bad compared to modern game controllers.

In his guide [Zach] walks the reader through installing the Raspberry Pi running RetroPie in the expanded case. This includes putting a power LED where the controller’s cable used to go, and connecting the stock controller PCB to the Pi’s GPIO pins. This is an especially nice touch that not only saves you time and effort, but retains the original feel of the D-Pad and buttons. Just make sure the buttons on your donor controller aren’t shot before you start the build.

Adding a little more breathing room for your wiring isn’t the only reason to use the 3D printed bottom, either. It implements a very clever “shelf” design that exposes the Pi’s USB and HDMI ports on the rear of the controller. This allows you to easily connect power and video to the device without spoiling the overall look. With integrated labels for the connectors and a suitably matching filament color, the overall effect really does look like it could be a commercial product.

The SNES controller is an especially popular target for hacks and modifications. From commercially available kits to the wide array of homebrew builds, it there’s plenty of people who want to keep this legendary piece of gaming gear going strong into the 21st century

Continue reading “SNES Controller Has A Pi Zero In The Trunk”

Contest Results: Raspberry Pis Put On A Show

Some of the most satisfying projects of all are the ones that do something visual. All the network routers, data loggers, and thermostats are great. But we are visual creatures and even a humble blinking LED is enough to give you a little rush even compared to finding a large prime number. We wanted to see what our community could do visually with a Raspberry Pi so we challenged you with the Visualize it with Pi contest.

As always, the competition was brisk, with a lot of great projects. This contest showed off the trend towards using LED modules and assemblies to add visuals to projects. Why not? They are cheap enough and a well-integrated module can make a project simple to wire and integrate.

We didn’t see as many media-related projects as you might expect, although there was one tied into Stranger Things, one to Tron, and the virtual reality lighting project did have some Star Wars images. Projects ranged from the practical storage box labels to the whimsical lemonade bottle that strobes to the beat of the music. If none of that is hardcore enough for you, there was even a Raspberry Pi-controlled radio telescope. You can find all the entries over on Hackaday.io. Now let’s see which entries managed to turn the head of the judging panel.

Continue reading “Contest Results: Raspberry Pis Put On A Show”

Retro Console Upgrade Gives Atari Flair

If you’re desperate for a sense of nostalgia for video games of yore but don’t want to shell out the big bucks for an NES classic, you can always grab a single arcade-style game that’ll plug straight into your TV. Of course it’s no longer 1980, and playing Space Invaders or Asteroids can get old after a while. When that happens, just replace the internals for an upgraded retro Atari 2600 with all the games from that system instead of just one.

As expected for something that has to fit in such a tiny package, this upgrade is based on a Raspberry Pi Zero. It’s not quite as simple as throwing RetroPi on it and calling it a day, though. For one, [Blue Okiris] is still using the original two-button controller/joystick that came with the Ms. Pac-Man game this build is based on, and that added its own set of challenges. For another, RetroPi didn’t have everything he needed so he switched to another OS called Recalbox. It also includes Kodi so it could be used as a media center as well.

The build looks like a hack in the truest sense of the word. The circuit board sticks out the bottom a little bit, but this is more of a feature than a bug because that’s where some extra buttons and the power switch are. Overall, it’s a great Retro Atari system that has all the true classics that should keep [Blue Okiris] entertained until Atari releases an official system one day. If you’d like to go a little deeper in the Atari world, though, you could always restore one instead.

Continue reading “Retro Console Upgrade Gives Atari Flair”