Ultimate Game And Watch Has Support For NES

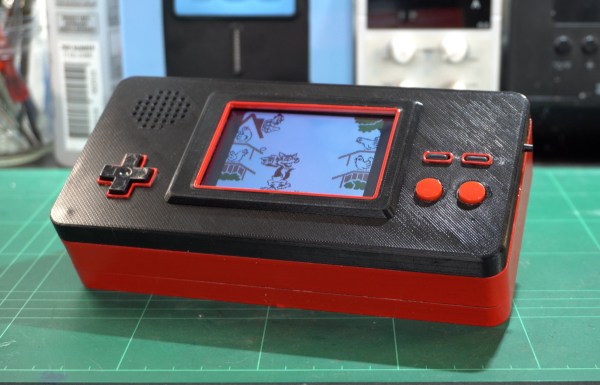
We’ve talked about feature creep plenty of times around here, and it’s generally regarded as something to be avoided when designing a prototype. It might sound good to have a lot of features in a build, but this often results in more complexity and more difficulty when actually bringing a project to fruition. [Brendan] has had the opposite experience with this custom handheld originally designed for Game and Watch games, though, and he eventually added NES and Game Boy functionality as well.

As this build was originally intended just for Game and Watch games, the screen is about the size of these old games, and while it can easily mimic the monochrome LCD-style video that would have been present on these 80s handhelds, it also has support for color which means that it’s the perfect candidate for emulating other consoles as well. It’s based around a Raspberry Pi Zero 2W and the enclosure is custom printed and painted. Some workarounds for audio had to be figured out, though, since native analog output isn’t supported, but it still has almost every feature for all of these systems.

While we’ve seen plenty of custom portable builds from everything from retro consoles to more modern ones, the Game and Watch catalog is often overlooked. There are a few out there, but in this case we appreciate the feature creep that allowed this build to support Game Boy and NES games as well.

Cramming A DS Inside A Gameboy

Many holiday recipes and console hacks share a common theme: cramming a thing inside another thing. Whether it’s turducken or a Nintendo DS inside a Gameboy, the result is always unexpected. The chassis for this mod is a humble Gameboy color with a Gameboy SP screen tackled on the top to serve as the secondary display. Unfortunately, this mod lost touch screen functionality, limiting some of the games you can play.

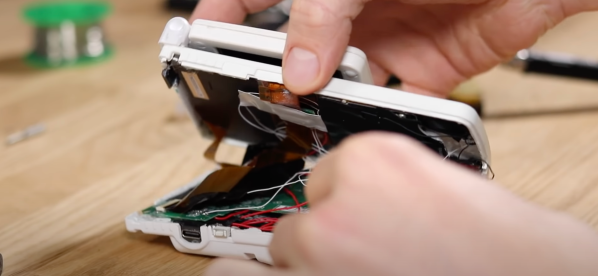
[TheRetroFuture] received the custom handheld from [GameboyCustom], which was somewhat damaged in shipping. The original screw mounts had to be removed and the case glued back together to fit the DS motherboard. So for [TheRetroFuture] to get inside to start troubleshooting involved a razor blade and patience. Testing various points and swapping components got [TheRetroFuture] closer to the root problems. The fix ended up being a few wires that came loose during shipping. Finally, after reseating a display connection and some careful soldering, it booted and started playing games.

Overall, it’s pretty impressive to see Mario Kart DS running on both screens on the tiny handheld. But you might be asking, why? Why shove one handheld inside another handheld? Sometimes it’s to gain new functionality like this Raspberry Pi inside a PSP body. Sometimes, it’s just because we can. Video after the break.

Continue reading “Cramming A DS Inside A Gameboy”

A Commodore 64 As You Have Never Seen One Before: Game Boy Form Factor!

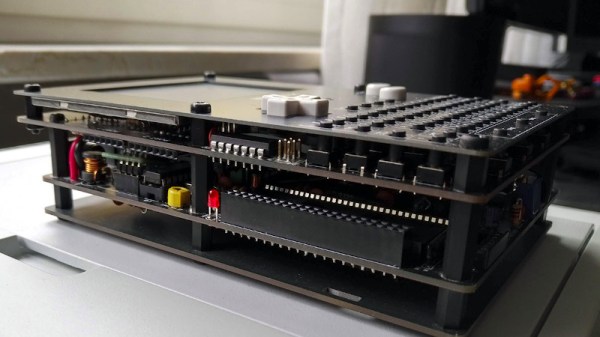
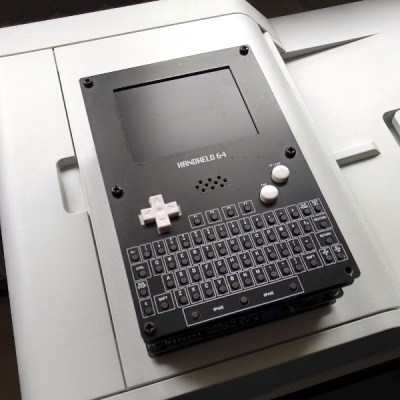
It’s now nearly four decades since the iconic Commodore 64 8-bit computer saw the light of day, and the vintage format shows no sign of dying. Enthusiasts have produced all kinds of new takes on the platform, but it’s fair to say that most of them have concentrated on the original style keyboard console form factors. A completely different take on a Commodore 64 comes from [UNI64] in the form of the Handheld 64, a complete Commodore 64 in a Game Boy style form factor that uses the original 64 chipset.

It achieves this improbable feat by sandwiching together several PCBs, with a tactile switch keyboard and LCD display at the top. It appears to bring the 64 ports out to headers, and the ROM cartridge port to an edge connector socket at the top of the device. A departure from the 1980s comes in using a Raspberry Pi Zero to emulate a 1541 floppy drive though.

Sadly unlike a Game Boy there’s no onboard battery, but don’t let that take away from the quality of this feat. A forum post from [3D-vice] has a set of decent-quality pictures, and even if you don’t have a handy 64 chipset lying about we’re sure you’ll still appreciate them. If home made 64s are your thing, take a look at how you can build one without Commodore parts.

Thanks [pbuyle] for the tip!

Game Cartridges And The Technology To Make Data Last Forever

Game cartridges are perhaps the hardiest of all common storage schemes. Short of blunt traumatic force or application of electrical surges to the cartridge’s edge connectors, damaging a game cartridge is hard to do by accident. The same is also true for the data on them, whether one talks about an Atari 2006 cartridge from the late 1970s or a 1990s Nintendo 64 cartridge.

The secret sauce here are mask ROMs (MROM), which are read-only memory chips that literally have the software turned into a hardware memory device. A mask layer unique to each data set is used when metalizing the interconnects during chip fabrication. This means that the data stored on them is as durable as the processor in the game console itself. Yet this is not a technology that we can use in our own hobby projects, and it’s not available for personal long-term data storage due to the costs associated with manufacturing what is essentially a custom chip.

Despite its value as truly persistent storage, MROM has fallen out of favor over the decades. You may be surprised to find a lot of what’s currently used in the consumer market is prone to data corruption over time spans as short as one year to one decade depending on environmental conditions.

So what are we to do if we need to have read-only data that should remain readable for the coming decades?

Continue reading “Game Cartridges And The Technology To Make Data Last Forever”

Dumping A N64 Development Cartridge Safely

Retro gaming enthusiasts have always had great interest in rarities outside the usual commercial titles. Whether they be early betas, review copies, or even near-complete versions of games that never made it to release, these finds can be inordinately valuable. [Modern Vintage Gamer] recently came across a pre-release version of Turok 3 for the Nintendo 64, and set about dumping and preserving the find. (Video, embedded below.)

With one-off cartridges like these, it’s important to take the utmost care in order to preserve the data onboard. Simply slapping it into a regular console might boot up the game, but carries with it a non-zero chance of damaging the cart. Instead, the first step taken was to dump the cart for archival purposes. When working with a prototype cart, commodity dumpers like the Retrode aren’t sufficient to do the job. [Modern Vintage Gamer] notes that a Doctor V64 or Gameshark with a parallel port could work, but elects to use a more modern solution in the form of the Ultrasave and 64drive.

With the cartridge backed up and duplicated onto the 64drive, the code can be run on a real console without risk of damage to the original. At first glance, the game appears similar to the final retail version. Analysis of the dump using a file comparison tool suggests that the only differences between the “80% Complete” ROM and the retail edition are headers, leading [Modern Vintage Gamer] to surmise that the game may have been rushed to release.

While in this case the dump didn’t net an amazing rare version of a retro game, [Modern Vintage Gamer] does a great job of explaining the how and why of the process of preserving a vintage cartridge. We look forward to the next rare drop that shakes up the retro world; we’ve seen efforts on Capcom arcade boards net great results. Video after the break.

Continue reading “Dumping A N64 Development Cartridge Safely”

An Epic Quest To Build The Perfect Retro Handheld

It’s a good time to be a fan of classic video games. Most of us carry around a smartphone that’s more than capable of emulating pretty much everything from the 32-bit era on down, and if you want something a little more official, the big players like Sony and Nintendo have started putting out “retro” versions of their consoles. But even still, [Mangy_Dog] wasn’t satisfied. To get the portable emulation system of his dreams, he realized he’d have to design and build it himself.

The resulting system, which he calls the “Playdog Blackbone”, is without a doubt one of the most impressive DIY builds we’ve ever seen. While there are still some issues that he’s planning on addressing in a later version of the hardware, it wouldn’t be an exaggeration to say that there’s commercially available game systems that didn’t have half as much thought put into them as the Blackbone.

Which is, incidentally, how this whole thing got started. The original plan was to buy one of those cheap emulation handhelds, which invariably seem to come in the form of a PSP clone, and fit it with a Raspberry Pi. But [Mangy_Dog] quickly realized that not only were they too small to get everything he wanted inside, but they also felt terrible in the hand. Since he wanted the final product to be comfortable to play, his first step was to design the case and get feedback on it from other retro game enthusiasts.

After a few iterations, he arrived at the design we see today. Once he printed the case out on his SLA printer, he could move on with fitting all of his electronics inside. This takes the form of a custom PCB “motherboard” which an Orange Pi Zero Plus2 (sorry Raspberry fans) connects to. There’s actually a surprising amount of room inside the case, enough for niceties like dual speakers and a fan complete with ducting to keep the board cool.

Unsurprisingly, [Mangy_Dog] says a lot of people have been asking him if they can buy their own version of the Blackbone, and have suggested he do a crowdfunding campaign to kick off mass production. While he’s looking at the possibility of resin or injection molding the case so he can produce a few more copies, on the whole, his attention has moved on to new projects. Which frankly, we can’t wait to see.

If you’re interested in slightly more modern games, we’ve seen a number of handhelds based on “trimmed” Nintendo Wii’s which you might be interested in. While they might not have the sleek external lines of the Blackbone, the work that goes into the electronics is nothing short of inspirational.

Continue reading “An Epic Quest To Build The Perfect Retro Handheld”

Badge builder's meetup at DC27

Pictorial Guide To The Unofficial Electronic Badges Of DEF CON 27

DEF CON has become the de facto showplace of the #Badgelife movement. It’s a pageant for clever tricks that transform traditional green rectangular circuit boards into something beautiful, unique, and often times hacky.

Today I’ve gathered up about three dozen badge designs seen at DC27. It’s a hint of what you’ll see in the hallways and meetups of the conference. From hot-glue light pipes and smartphone terminal debugging consoles to block printing effects and time of flight sensors, this is a great place to get inspiration if you’re thinking of trying your hand at unofficial badge design.

If you didn’t catch “The Badgies” you’ll want to go back and read that article too as it rounds up the designs I found to be the craziest and most interesting including the Car Hacking Village, Space Force, SecKC, DC503, and Frankenbadge. Do swing by the Hands-On articles for the AND!XOR badge and for [Joe Grand’s] official DC27 badge. There was also a lot of non-badge hardware on display during Hackaday’s Breakfast at DEF CON so check out that article as well.

Enough preamble, let’s get to the badges!

Continue reading “Pictorial Guide To The Unofficial Electronic Badges Of DEF CON 27”