Making A Solder Paste Stencil From What You Have On Hand

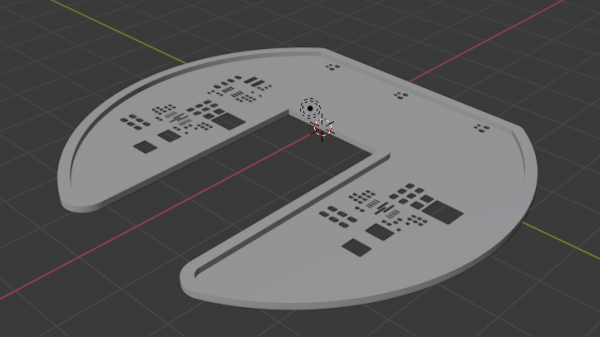
Sometimes there are moments when an engineer has to use whatever materials they have to hand in order to complete the job on time. Such a situation arose at the RevSpace hacker space in Den Haag, Netherlands, as they were the assembly venue for a conference badge.

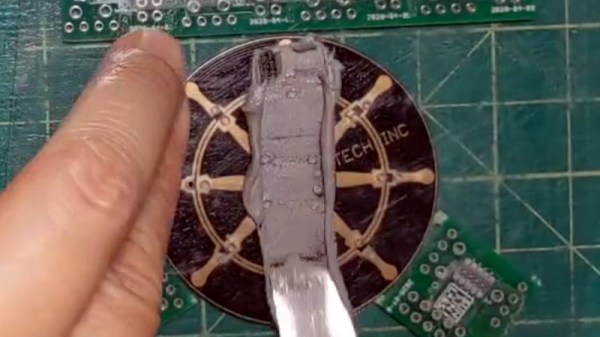
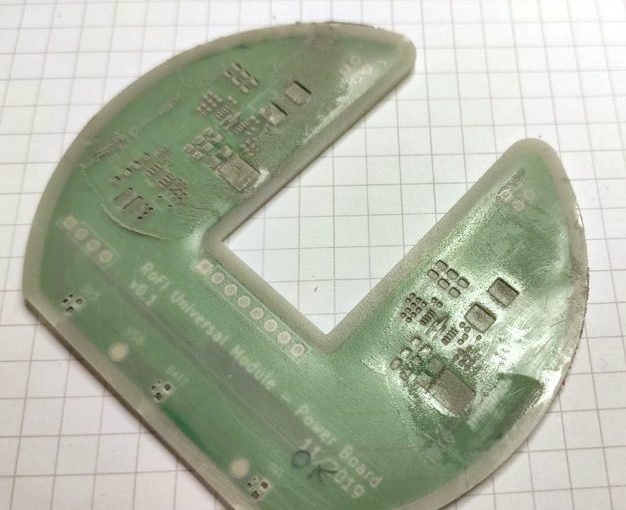
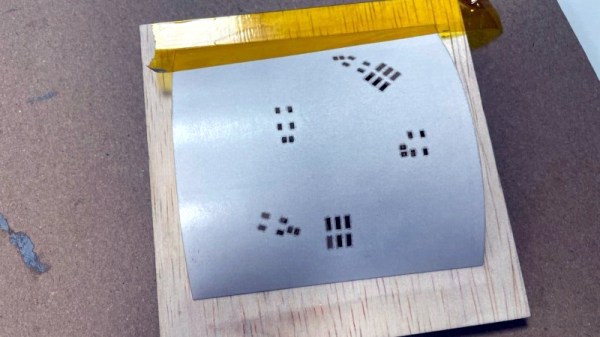
Their problem was that the badge PCB had no solder paste stencil, and the solution was to laser cut one out of an unexpected material. The backing paper for self-adhesive vinyl sheet has properties not unlike those desired of a stencil, so they tried laser-cutting one from that material. The result was a robust stencil that outperformed the Mylar they had previously used, enabled the manufacture of 350 boards.

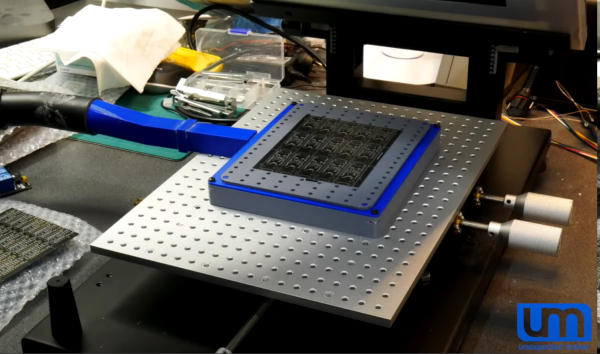
They think that the polymer layer on top of the paper may be silicone, and found that the laser didn’t unduly melt the edges of the cut. We’re not sure we’d feed random unknown plastics into our cutter, we’re guessing they have good quality ventilation. It’s mounted into a plywood jig in much the same way as a conventional stencil might be.

The badges were destined for WICCON, a Dutch conference from an organisation for women in cybersecurity. Sadly we’ve not seen a completed one so we’re not sure what it does, however we’re pleased to hear they were completed before the event. That’s a hurdle all badge designers will know well.

Long term readers may remember, that RevSpace have something of a history when it comes to assembling badges.

Solder stencil vacuu assist jig

Stencil Vacuum-Assist Helps Avoid The Heartbreak Of Smeared Solder Paste

While using a stencil should make solder paste application onto PCBs a simple affair, there are a number of “gotchas” that make it more art than science. Luckily, there are tools you can build, like this 3D-printed vacuum-assist stencil jig, that take a little of the finesse out of the process.

For those who haven’t had the pleasure, solder paste stencils are often used to make the job of applying just the right amount of solder paste onto the pads of a PCB, and only on the pads. The problem is that once the solder paste has been squeegeed through the holes in the stencil, it’s not easy to remove the stencil without smearing. [Marius Heier]’s stencil box is essentially a chamber that attaches to a shop vac, along with a two-piece perforated work surface. The center part of the top platform is fixed, while the outer section moves up and down on 3D-printed springs.

In use, the PCB is placed on the center fixed platform, while the stencil sits atop it. Suction pulls the stencil firmly down onto the PCB and holds it there while the solder paste is applied. Releasing the suction causes the outer section of the platform to spring up vertically, resulting in nice, neat solder-covered pads. [Marius] demonstrates the box in the video below, and shows a number of adapters that would make it work with different sized PCBs.

If you think you’ve seen a manual vacuum stencil box around here recently, you’re right — we featured one by [UnexpectedMaker] not too long ago.

Continue reading “Stencil Vacuum-Assist Helps Avoid The Heartbreak Of Smeared Solder Paste”

Solder Paste Dispenser Without Giant Compressor

We have certainly all had our moments with solder paste. Some of us hate it; it’s sticky and gooey, and it gets everywhere. That is, unless you have a solder paste dispenser. The trouble with these is that they typically require the use of an air compressor, which can be cumbersome to haul around in certain situations. If you need a solder paste dispenser that fits conveniently where air compressors won’t, take a look at this small one from [Nuri Engineer] called the solderocket.

This design foregoes the traditional compressor in favor of pressurized carbon dioxide canisters. These are common enough and used for things like rapidly inflating bicycle tires, but for this more delicate procedure the pressurized gas needs to be handled more daintily. A rotary knob is attached to the canister to regulate pressure, and a second knob attached to a microcontroller adjusts the amount of time the air pressure is applied to the solder paste. With this small compact setup, any type of paste can be delivered to a PCB without needing to use messy stencils or needing larger hardware like a compressor.

This could be just the tool that you need if you regularly work with surface-mount components. Of course there are other methods of dispensing solder paste that don’t require any compressed gas of any kind, but as long as something is around that gets the job done, we can’t really argue with either method.

PCB sitting inside a 3D printed holder job, with holes to apply vacuum

Solder Paste Stencilling That Doesn’t Suck

Working with solder paste stencils can be a real faff, they rarely sit flat and move around when you so much as breath on them. [Unexpected Maker] airs his frustrations, and comes up with a simple solution, he simply makes a 3D-printed jig to align the PCB panel and applies his shop vacuum cleaner and hey presto!

If you’re ever been tempted to switch from frameless to framed solder stencils, then you’ll notice they can be rather awkward to work with. The usual online vendors have plenty of listings for stencil frame holders, but they do all seem to us, exactly the same, and more suited to stencilling T-shirts, than working with tiny PCB footprints.

The problem with unframed stencils is one of clamping and registration to the PCB, which framed stencils fix, when used with a jig that can dial in the rotation and translation errors.

But problem with those is, unless you have a perfectly flat support region all round the PCB, the weight of the frame tends to make the stencil bow up over the PCB, causing parts of it to lift away from the solder lands. This results in paste not being pushed into the places you want it, and instead it sticks to the stencil apertures and comes away when you lift it up. Most irritating.

You can try offset it by taping spare PCBs of the same thickness all around, but this is not always terribly successful in this scribe’s extensive experience doing this job by hand. [Unexpected Maker] solves this bowing issue by making a 3D printed jig that bolts to the stencil holder, takes a custom top plate with holes in, which in turns allows a vacuum to be applied from below. This sucks the PCB down to the jig, keeping it flat (in case it is also warped) and also pulls the stencil plate directly down to the PCB, making it also lie perfectly flat.

Continue reading “Solder Paste Stencilling That Doesn’t Suck”

Who Says Solder Paste Stencils Have To Be CNC Cut?

Imagine having a surface mount kit that you’d like to stencil with solder paste and reflow solder, but which doesn’t come with a solder stencil. That was what faced [Honghong Lu], and she rose to the challenge by taking a piece of PET sheet cut from discarded packaging and hand-cutting her own stencil. It’s not a huge kit, the Technologia Incognita 2020 kit, but her home-made stencil still does an effective job.

So how does one create a solder stencil from household waste? In the video we’ve put below the break, she starts with her packaging, and cuts from it a square of PET sheet. It’s 0.24mm thick, which is ideal for the purpose. She then lays it over the PCB and marks all the pads with a marker pen, before cutting or drilling the holes for the pads. The underside is then sanded to remove protruding swarf, and the stencil can then be used in the normal way. She proves it by stenciling the solder paste, hand placing the parts, and reflowing the solder on a hotplate.

It’s clear that this is best suited to smaller numbers of larger components, and we’ll never use it to replace a laser-cut stencil for a thousand tiny 0201 discretes. But that’s not the point here, it’s an interesting technique for those less complex boards, and it’s something that can be tried by anyone who is curious to give stenciling and reflowing a go and who doesn’t have a project with a ready-cut stencil. And for that we like it.

Making your own stencils doesn’t have to include this rather basic method. They can be etched, or even 3D printed.

Continue reading “Who Says Solder Paste Stencils Have To Be CNC Cut?”

Can Solder Paste Stencils Be 3D Printed? They Can!

3D printed solder paste stencil, closeup.

[Jan Mrázek]’s  success with 3D printing a solder paste stencil is awfully interesting, though he makes it clear that it is only a proof of concept. There are a lot of parts to this hack, so let’s step through them one at a time.

First of all, it turns out that converting a PCB solder paste layer into a 3D model is a bit of a challenge. A tool [Jan] found online didn’t work out, so he turned to OpenSCAD and wrote a script (available on GitHub) which takes two DXF files as input: one for the board outline, and one for the hole pattern. If you’re using KiCad, he has a Python script (also on GitHub) which will export the necessary data.

The result is a 3D model that is like a solder paste mask combined with a raised border to match the board outline, so that the whole thing self-aligns by fitting on top of the PCB. A handy feature, for sure. [Jan] says the model pictured here printed in less than 10 minutes. Workflow-wise, that certainly compares favorably to waiting for a stencil to arrive in the mail. But how do the actual solder-pasting results compare?

3D printed solder stencil on PCB, after applying solder paste.

[Jan] says that the printed stencil had a few defects but it otherwise worked fine for 0.5 mm pitch ICs and 0402 resistors, and the fact that the 3D printed stencil self-registered onto the board was a welcome feature. That being said, it took a lot of work to get such results. [Jan]’s SLA printer is an Elegoo Mars, and he wasn’t able to have it create holes for 0.2 mm x 0.5 mm pads without first modifying his printer for better X/Y accuracy.

In the end, he admits that while a functional DIY solder stencil can be 3D printed in about 10 minutes, it’s not as though professionally-made stencils that give better results are particularly expensive or hard to get. Still, it’s a neat trick that could come in handy. Also, a quick reminder that we stepped through how to make a part in OpenSCAD in the past, which should help folks new to OpenSCAD make sense of [Jan]’s script.

DIY Dispenser Places Solder Paste Without The Mess

When doing surface-mount assembly you can certainly use a soldering iron in the traditional way, but it’s far more convenient to cover the pads with solder paste, place the components, and bake the board in a reflow oven. If you’re lucky enough to have a precut stencil this can be done in one go, otherwise a tiny blob of paste must be laboriously placed on each pad by hand. [Kevarek] has made this a bit easier by designing a low-cost handheld solder paste dispenser.

The unit takes the form of a handheld 3D printed wand containing a geared motor and a threaded shaft, that engages with a syringe full of paste clamped onto its end. There’s a control box powered by an STM32 microcontroller that not only allows adjustment of flow rate, but provides advanced features such as performing a slight retraction at the end of dispensing to avoid excess paste. There’s a push-button on the wand for control, as well as a set on the control box to adjust its parameters.

If you’ve ever handled solder paste, you’ll know it can be a uniquely annoying and finicky substance. Either it’s too stiff and clumps together, or too runny and spreads out. No doubt some readers are lucky enough to always have fresh paste of the highest quality to hand, but too often a hackerspace will have a tub of grey goop with uncertain provenance. We like this tool, and while it won’t make up for poor quality or badly stored paste, at least it’ll make applying paste a breeze.

We’ve covered paste dispensers quite a few times in the past, but you might also wish to read our in-depth guide to the subject.