When it comes to programming, most of us write code at a level of abstraction that could be for a computer from the 1960s. Input comes in, you process it, and you produce output. Sure, a call to strcpy might work better on a modern CPU than on an older one, but your basic algorithms are the same. But what if there were ways to define your programs that would work better on modern hardware? That’s what a pre-print book from [Sergey Slotin] answers.
As a simple example, consider the effects of branching on pipelining. Nearly all modern computers pipeline. That is, one instruction is fetching data while an older instruction is computing something, while an even older instruction is storing its results. The problem arises when you already have an instruction partially executed when you realize that an earlier instruction caused a branch to another part of your code. Now the pipeline has to be backed out and performance suffers while the pipeline refills. Anything that had an effect has to reverse and everything else needs to be discarded.
 That’s bad for performance. Because of this, some CPUs try to predict if a branch is likely to occur or not and then speculatively fill the pipeline for the predicted case. However, you can structure your code, for example, so that it is more obvious how branching will occur or even, for some compilers, explicitly inform the compiler if the branch is likely or not.
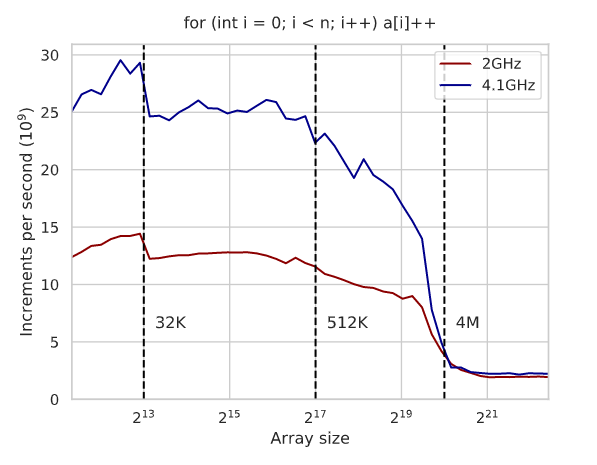
As you might expect, techniques like this depend on your CPU and you’ll need to benchmark to show what’s really going on. The text is full of graphs of execution times and an analysis of the generated assembly code for x86 to explain the results. Even something you think is a pretty good algorithm — like binary search, for example, suffers on modern architectures and you can improve its performance with some tricks. Actually, it is interesting that the tricks work on GCC, but don’t make a difference on Clang. Again, you have to measure these things.
Probably 90% of us will never need to use any of the kind of optimization you’ll find in this book. But it is a marvelous book if you enjoy solving puzzles and analyzing complex details. Of course, if you need to squeeze those extra microseconds out of a loop or you are writing a library where performance is important, this might be just the book you are looking for. Although it doesn’t cover many different CPUs, the ideas and techniques will apply to many modern CPU architectures. You’ll just have to do the work to figure out how if you use a different CPU.
We’ve looked at pieces of this sort of thing before. Pipelining, for example. Sometimes, though, optimizing your algorithm isn’t as effective as just changing it for a better one.