Join Hackaday Editors Elliot Williams and Tom Nardi as they take a whirlwind tour of the best and brightest hacks of the last week. This episode starts off with an update about that Soviet Venus lander that’s been buzzing the planet, then moves on to best practices for designing 3D printed parts, giving Chrome OS devices a new lease on life, and a unique display technology that brings a Star Wars prop to life.
You’ll also hear about designing new motherboards for beloved old computers, why you might want to put your calipers on a flatbed scanner, and a NASA science satellite that’s putting in double duty as a wartime reporter. Finally, they’ll cover the interesting physics of meteor burst communications, and the latest developments in the ongoing libogc license kerfuffle.
Check out the links below if you want to follow along, and as always, tell us what you think about this episode in the comments!
One of the reconstructed images, using all 4,096 matrix patterns as input, next to the original object. (Credit: okooptics, Jon Bumstead)
There’s a strange allure to single-pixel cameras due to the simultaneous simplicity and yet fascinating features that they can offer, such as no set resolution limit. That said, the typical implementations that use some kind of scanning (MEMS) mirror or similar approach suffer from various issues even when you’re photographing a perfectly stationary and static scene due to their complex mechanical nature. Yet there’s a way around this, involving a LED matrix and a single photoresistor, as covered by [Jon Bumstead] in an article with accompanying video.
As he points out, this isn’t a new concept, with research papers cited that go back many years. At the core lies the signal processing technique called compressed sensing, which is incidentally also used with computed tomography (CT) and magnetic resonance imaging (MRI) scanners. Compressed sensing enables the reconstruction of a signal from a series of samples, by using existing knowledge of the signal.
In the case of this single-pixel camera, the known information is the illumination, which is a Hadamard matrix pattern displayed on the 64 x 64 pixel LED matrix, ergo 4,096 possible patterns. A total of 4,096 samples are thus recorded, which are subsequently processed with a Matlab script. As pointed out, even 50% of the maximum possible matrices can suffice here, with appropriately chosen patterns.
While not an incredibly fast method, it is fully solid-state, can be adapted to use other wavelengths, and with some tweaking of the used components probably could cut down the sampling time required.
We’ve certainly seen people take a photo of a part, bring it into CAD, and then scale it until some dimension on the screen is the same as a known dimension of the part. We like what [Scale Addition] shows in the video below. In addition to a picture of the part, he also takes a picture of a vernier caliper gripping the part. Now your scale is built into the picture, and you can edit out the caliper later.
He uses SketchUp, but this would work on any software that can import an image. Given the image with the correct scale, it is usually trivial to sketch over the image or even use an automatic tracing function. You still need some measurements, of course. The part in question has a vertical portion that doesn’t show up in a flat photograph. We’ve had good luck using a flatbed scanner before, and there’s no reason you couldn’t scan a part with a caliper for scale.
This is one case where a digital caliper probably isn’t as handy as an old-school one. But it would be possible to do the same trick with any measurement device. You could even take your picture on a grid of known dimensions. This would also allow you to check that the distances at the top and bottom are the same as the distances on the right and left.
This week Elliot Williams was joined by fellow Europe-based Hackaday staffer Jenny List, to record the Hackaday Podcast as the dusk settled on a damp spring evening.
On the agenda first was robotic sport, as a set of bipedal robots competed in a Chinese half-marathon. Our new Robot overlords may have to wait a while before they are fast enough chase us meatbags away, but it demonstrated for us how such competitions can be used to advance the state of the art.
The week’s stand-out hacks included work on non-planar slicing to improve strength of 3D prints. It’s safe to say that the Cartesian 3D printer has matured as a device, but this work proves there’s plenty more in the world of 3D printing to be developed. Then there was a beautiful record cutting lathe project, far more than a toy and capable of producing good quality stereo recordings.
Meanwhile it’s always good to see the price of parts come down, and this time it’s the turn of LIDAR sensors. There’s a Raspberry Pi project capable of astounding resolution, for a price that wouldn’t have been imaginable only recently. Finally we returned to 3D printing, with an entirely printable machine, including the motors and the hot end. It’s a triumph of printed engineering, and though it’s fair to say that you won’t be using it to print anything for yourself, we expect some of the very clever techniques in use to feature in many other projects.
The week’s cant-miss articles came from Maya Posch with a reality check for lovers of physical media, and Dan Maloney with a history of x-ray detection. Listen to it all below, and you’ll find all the links at the bottom of the page.
Still mourning the death of physical media? Download an MP3 and burn it to CD like it’s 1999!
It’s amazing how quickly medical science made radiography one of its main diagnostic tools. Medicine had barely emerged from its Dark Age of bloodletting and the four humours when X-rays were discovered, and the realization that the internal structure of our bodies could cast shadows of this mysterious “X-Light” opened up diagnostic possibilities that went far beyond the educated guesswork and exploratory surgery doctors had relied on for centuries.
The problem is, X-rays are one of those things that you can’t see, feel, or smell, at least mostly; X-rays cause visible artifacts in some people’s eyes, and the pencil-thin beam of a CT scanner can create a distinct smell of ozone when it passes through the nasal cavity — ask me how I know. But to be diagnostically useful, the varying intensities created by X-rays passing through living tissue need to be translated into an image. We’ve already looked at how X-rays are produced, so now it’s time to take a look at how X-rays are detected and turned into medical miracles.
We’ve all had times where we knew we had some part but we had to go searching for it all over as it wasn’t where we thought we put it. Organizing the numerous components, parts, and supplies that go into your projects can be a daunting task, especially if you use the same type of part at different times for different projects. It helps to have a framework to keep track of all the small details. Binner is an open source project that aims to allow you to easily maintain a database that can be customized to your use.
In a recent video for DigiKey, [Byte Sized Engineer] used Binner to track the locations of his components and parts in his freshly organized workshop. Binner already has the ability to read the labels used by well-known electronics suppliers via a barcode scanner, and uses that information to populate your inventory. It even grabs quantities and links in a datasheet for your newly added part. The barcode scanner can also be used to retrieve the contents of a location, so with a single scan Binner can bring up everything residing at that location.
Binner can be run locally so there isn’t the concern of putting in all the effort to build up your database just to have an internet outage make it inaccessible. Another cool feature is that it allows you to print labels, you can customize the fields to display the values you care about.
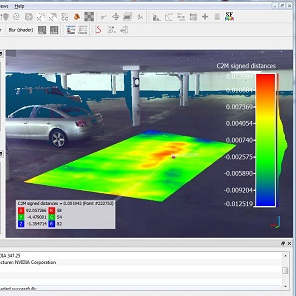
3D scanning is becoming much more accessible, which means it’s more likely that the average hacker will use it to solve problems — possibly odd ones. That being the case, a handy tool to have in one’s repertoire is a way to work with point clouds. We’ll explain why in a moment, but that’s where CloudCompare comes in (GitHub).
Not all point clouds are destined to be 3D models. A project may call for watching for changes in a surface, for example.
CloudCompare is an open source tool with which one can load up and do various operations on point clouds, including generating mesh models from them. Point clouds are what 3D scanners create when an object is scanned, and to become useful, those point clouds are usually post-processed into 3D models (specifically, meshes) like an .obj or .stl file.
We’ve gone into detail in the past about how 3D scanning works, what to expect from it, and taken a hands-on tour of what an all-in-one wireless scanner can do. But what do point clouds have to do with getting the most out of 3D scanning? Well, if one starts to push the boundaries of how and to what purposes 3D scanning can be applied, it sometimes makes more sense to work with point clouds directly instead of the generated meshes, and CloudCompare is an open-source tool for doing exactly that.
For example, one may wish to align and merge two or more different clouds, such as from two different (possibly incomplete) scans. Or, you might want to conduct a deviation analysis of how those different scans have changed. Alternately, if one is into designing wearable items, it can be invaluable to be able to align something to a 3D scan of a body part.
It’s a versatile tool with numerous tutorials, so if you find yourself into 3D scanning but yearning for more flexibility than you can get by working with the mesh models — or want an alternative to modeling-focused software like Blender — maybe it’s time to work with the point clouds directly.