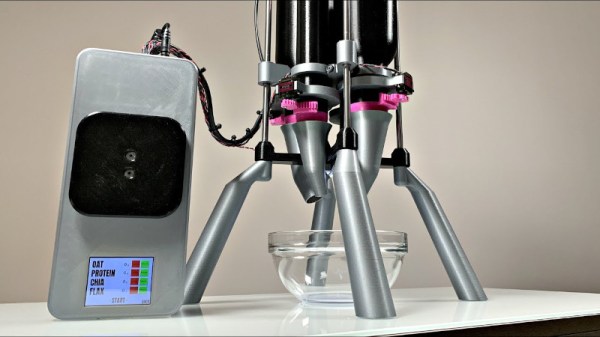
[Elite Worm] follows a strict diet that involves regularly mixing dry ingredients in varying proportions. The task grew tedious, and thus automation became a tantalising prospect. Enter the DIY shaking food dispenser.
The machine has a simple touch screen interface, with an Atmega328P running the show behind the scenes. The user can store a series of profiles, which each correspond to a different mixture of four base ingredients. Dealing with dry ingredients like oats, chia, and flax, shaking is often necessary to get things moving. To achieve this, the rig packs a hefty DC motor up top, which turns an eccentric shaft, shaking the whole rig. Each ingredient hopper has a servo-controlled nozzle, so ingredients can be dispensed in turn, with a load cell in the base measuring the weight delivered.
It’s a neat system, though [Elite Worm] notes that the device shakes just a little too much, and suspects it won’t hold up in the long term. We suspect a less violent, higher frequency vibration might be less hard on the components, but we’re sure there’ll be some quality engineering going into the next build. We’ve seen [Elite Worm]’s work here before, too. Video after the break.
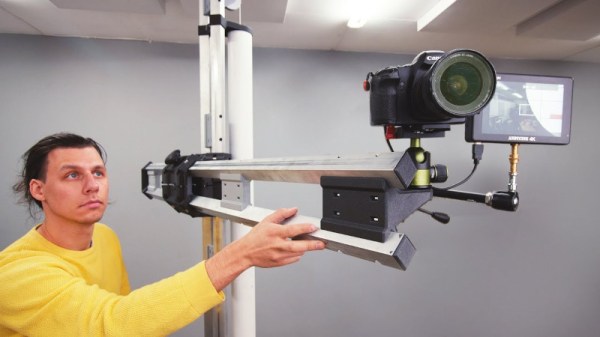
One of the first purchases for anyone looking to shoot video should be a tripod. Key to getting clean and stable shots, they can nevertheless be limiting in their range of motion. Wanting something a little more high-end, but dissatisfied with the high cost of commercial options, [Alexandre Chappel] decided to build his own camera arm.
The build is based around square alumiunium tubing, with the high-tolerance material acting as the arm’s vertical and horizontal rails. 3D printed brackets and adapters are used to bolt everything together, along with several printed components used as drilling guides to help accurately machine the aluminium tubes. Adjustment is built into the carriages that travel along the rails, to help account for any slop in the 3D printed parts. A counterweight system is then installed to ensure the camera doesn’t hit the floor when not in the locked position.
It’s a tidy build, and one that has given [Alexandre] far more flexibility to shoot than his existing tripods. Additionally, adjusting the camera position is much quicker than before. Of course, when you’re building your own rigs, the sky is the limit. Video after the break.
[James Whomsley] likes flying, and likes flying fast. After reaching a speed of 114 miles an hour with an RC plane, he wanted to go further and break that record. To do so, he looked towards rocket power, and started a new build.
The design consists of a combination of 3D printed parts, laser-cut plywood bulkheads, and foamboard flight surfaces, with a few carbon fiber stiffeners thrown in here and there. For this early prototype, power is solely from hobby rocket motors, providing thrust for 1.6 seconds, meaning flight times are necessarily short. The craft is launched from an aluminium profile rail thanks to a 3D printed sliding guide pin.
Initial tests with two rocket motors were promising, leading to a second trial with a full six motors fitted. The thrust line was a little low, however, and a major pitch-up just after launch meant the plane only reached around 62 miles an hour. [James] still has a ways to go to beat his previous record, so intends to explore adding ducted fan propulsion to get the plane in the air before using the rockets as a speed booster in steady flight.
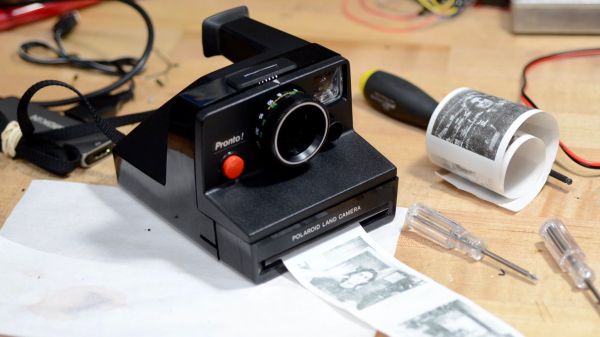
There’s nothing like a little diversion project to clear the cobwebs — something to carry one through the summer doldrums and charge you up for the rest of the hacking year. At least that’s what we think was up with [Sam Zeloof]’s printing Polaroid retro-conversion project.
Normally occupied with the business of learning how to make semiconductors in his garage, or more recently working on his undergraduate degree in electrical engineering, [Sam], like many of us, found himself with time to spare this summer. In search of a simple, fun project that wouldn’t glaze over the eyes of people when he showed it off, he settled on a printing party camera. The guts are pretty standard fare: a Raspberry Pi and Pi cam, coupled with a thermal receipt printer for instant hardcopy. The donor camera was a Polaroid Pronto from eBay, in good shape on the outside and mostly complete on the inside. A Dremel took care of the latter, freeing up space occupied by all the plastic bits that held the film cartridge and running gear of the film handling system.
The surgery made enough room to squeeze in the Pi Zero and a LiPo battery pack, along with a buck converter. Adding in the receipt printer and its drive board and mounting the Pi cam presented some challenges, but everything fit without breaking the original look and feel of the Polaroid. The camera now produces low-res hardcopy instantly using a dithering algorithm, and store high-resolution images on an SD card for later download. As a bonus, [Sam] included a simulated time and date stamp in the lower corner of the saved images, like those that used to show up on film.
[Sam]’s camera looks like a ton of fun. We’ve seen other Polaroid conversions, including a stunning SX-70 digital upgrade, but this one shines for its simplicity and instant hardcopy.
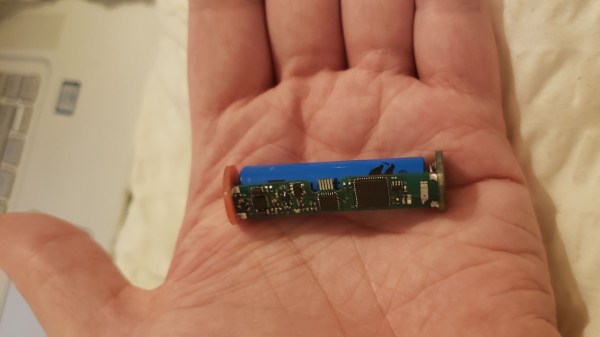
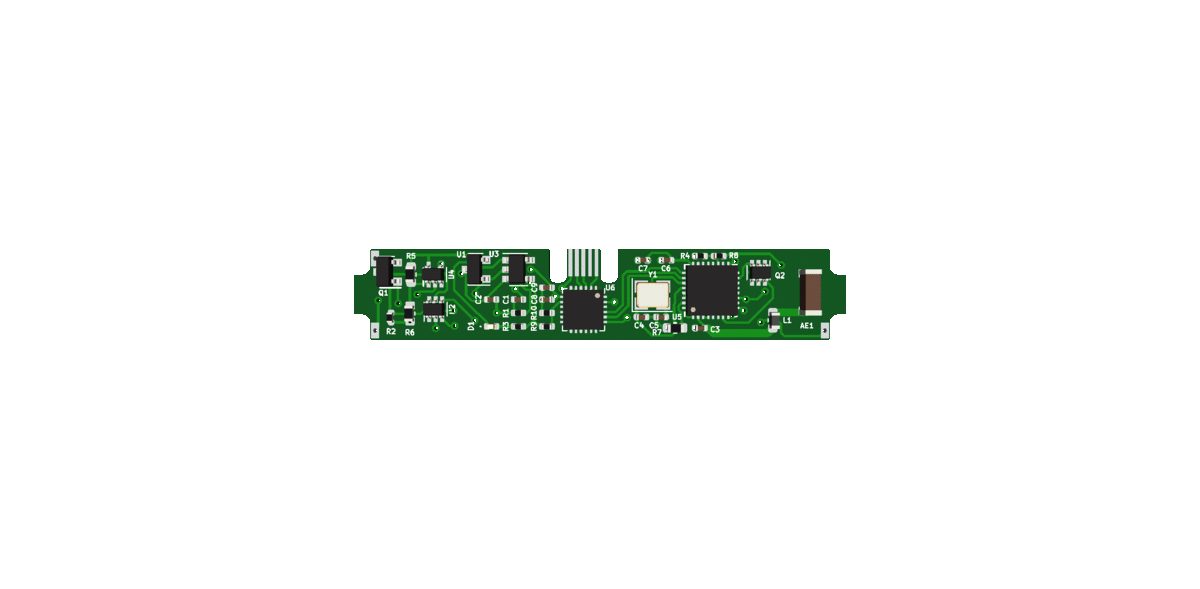
Internet-connected sex toys are a great way to surprise your partner from work (even the home office) or for spicing up long-distance relationships. For some extra excitement, they also add that thrill of potentially having all your very sensitive private data exposed to the public — but hey, it’s not our place to kink-shame. However, their vulnerability issues are indeed common enough to make them regular guests in security conferences, so what better way to fight fire with fire than simply inviting the whole of Twitter in on your ride? Well, [Space Buck] built just the right device for that: the Double-Oh Battery, an open source LiPo-cell-powered ESP32 board in AA battery form factor as drop-in replacement to control a device’s supply voltage via WiFi.
Double-Oh Battery with all the components involved
In their simplest and cheapest form, vibrating toys are nothing more than a battery-powered motor with an on-off switch, and even the more sophisticated ones with different intensity levels and patterns are usually limited to the same ten or so varieties that may eventually leave something to be desired. To improve on that without actually taking the devices apart, [Space Buck] initially built the Slot-in Manipulator of Output Levels, a tiny board that squeezed directly onto the battery to have a pre-programmed pattern enabling and disabling the supply voltage — or have it turned into an alarm clock. But understandably, re-programming patterns can get annoying in the long run, so adding WiFi and a web server seemed the logical next step. Of course, more functionality requires more space, so to keep the AA battery form factor, the Double-Oh Battery’s PCB piggybacks now on a smaller 10440 LiPo cell.
But then, where’s the point of having a WiFi-enabled vibrator with a web server — that also happens to serve a guestbook — if you don’t open it up to the internet? So in some daring experiments, [Space Buck] showcased the project’s potential by hooking it up to his Twitter account and have the announcement tweet’s likes and retweets take over the control, adding a welcoming element of surprise, no doubt. Taking this further towards Instagram for example might be a nice vanity reward-system improvement as well, or otherwise make a great gift to send a message to all those attention-seeking people in your circle.
Sometimes, projects are borne out of neccessity; a fix for a problem that needs to be solved. Other times, they’re done just for the love of creation and experimentation. [ultraembedded]’s FPGAmp media player falls under the latter, and served as a great learning experience along the way.
The aim of FPGAmp is to play back a variety of media files on the Arty A7 development board, based around the Xilinx Artix-7 FPGA. Capable of playing back MJPEG video at 800 x 600 resolution and 25 fps, it’s also able to play back MP3s as well for stereo audio. Demonstrating the device on Twitter, [ultraembedded] notes that the method of using an LED to do SPDIF optical audio output isn’t legit, but does work. A later update switches to using a dedicated audio output board with the Arty A7 platform, featuring an excellent song from The Cardigans.
Using a RISC V processor core and a hardware JPEG decoder, we imagine [ultraembedded] really sharpened their FPGA skills with this project. Particularly in the wake of the sale of ARM to NVIDIA, RISC V continues to gain relevance in the hardware community. We were lucky enough to feature a keynote at last year’s Supercon, with Megan Wachs speaking on the technology. Video after the break.
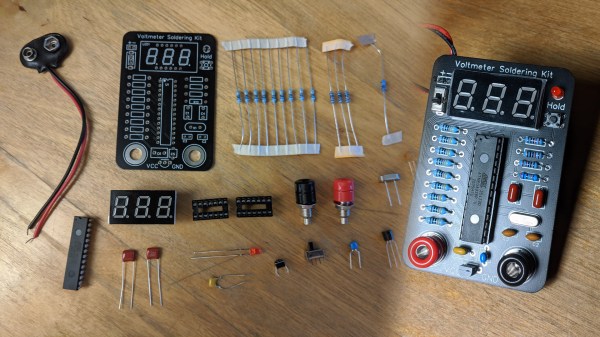
Unsatisfied with the standard fare of soldering practice kits that offer little to no purpose once they’re built, [Jim Heaney] decided to take matters into his own hands and design an easy-to-assemble kit for his class that, once put together, becomes the handiest of tools in any maker’s workbench: a functional voltmeter.
At the heart of the kit is a standard Atmega 328P microcontroller. While he could’ve picked something smaller or cheaper, not only does the bulky part make for easier soldering, [Jim] reasons that it’s a chip that’s easy to repurpose should his students want to build something like a breadboard Arduino, for example. The voltmeter has a fixed measurement range from 0 to 100 VDC, the only switches on the board are for powering it on and a hold button, which freezes the value currently being shown in the three-digit, seven-segment display.
Along with selling his kit to other makers and educators, [Jim] also hopes that his project encourages others to design similar soldering kits which favor some sort of function rather than getting binned once there’s solder on all the pads, as well as part variety and documentation. If you’re on the other end of the soldering spectrum, then why not challenge your skills soldering on a time limit?