LED Wall Clock Gets Raspberry Pi Pico Upgrade

When [Rodrigo Feliciano] realized that the reason his seven-segment LED wall clock wasn’t working was because the original TG1508D5V5 controller was fried, he had a decision to make. He could either chuck the whole thing, or put in the effort to reverse engineer how the displays were driven and replace the dead controller with something a bit more modern. Since you’re reading this post on Hackaday, we bet you can guess which route he decided to take.

If you happen to own the same model of clock as [Rodrigo], then you really lucked out. He’s done a fantastic job documenting how he swapped the original controller out for a Raspberry Pi Pico W, which not only let him bring the clock back to life, but let him add new capabilities such as automatic time setting via Network Time Protocol (NTP).
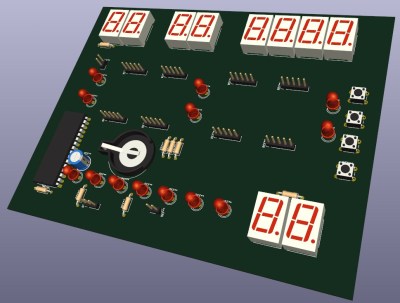
But even if you don’t have this particular clock there’s probably something you can learn from this project, as it’s a great example of practical reverse engineering. By loading a high-resolution image of the back of the PCB into KiCad, [Rodrigo] was able to place all the components into their correct positions and following traces to see what’s connected to what.

Pretty soon he not only had a 3D model of the clock’s PCB, but a schematic he could use to help wire in the Pi Pico. Admittedly this is a pretty straightforward PCB to try and reverse engineer, but hey, you have to start somewhere.

We had high hopes for KiCad’s image import feature when it was introduced, and it’s great to see real-world examples like this trickle in as more folks learn about it.

Continue reading “LED Wall Clock Gets Raspberry Pi Pico Upgrade”

Creating Temporal Light Reflections With Metamaterials

Owing to the wave nature of light there are many ways that such different waves can interact with each other, but also with materials. Everyone knows about reflecting light with a mirror, which is a property of materials like metals, but specific structures can cause the light to behave in a way that creates rather amazing results.

Examples of this are cases of iridescence in nature (like butterfly wings) and eye color, where the perceived colors are the result of environmental light interacting with these structures rather than pigmentation or dyes. An even more interesting interaction has now been demonstrated by reflecting multiple microwave radiation beams off each other, creating a time reflection.

The study by [Emanuele Galiffi] et al. (shared copy) was published in Nature Physics. By creating a metamaterial that allows for temporal coherent wave control (CWC) the electromagnetic radiation was controlled to where it allowed for this kind of unusual interaction. The key here being that there is no major constructive or destructive interaction between the two waves as with spatial CWC, rather the wave reflect off each other, or more specifically the time interface.

Although the popular reporting talks about ‘turning back time’ and ‘watching the back of your own head in a mirror’, the impact is far less dramatic: in the article conclusion the researchers mention unveiling new light-matter interactions in the microwave- and other parts of the spectrum, as well as new ways to control and shape light.


Top image: Temporal coherent wave control and photonic collisions enabled by time-interfaces. (Credit: Emanuele Galiffi et al., Nature Physics, 2023)

Turning A Lada Into An EV With 50 Cordless Drills, Because Why Not?

[Garage 54] is no stranger to vehicle-related projects of the “because why not?” variety, and their latest is using 50 cordless drills combined into a monstrous mega-motor to turn a gutted (and extended) Lada into an electric vehicle (EV).

Doing this leans on some of [Garage 54]’s earlier projects, such as replacing the aforementioned Lada’s engine block with a frame containing sixteen chainsaws. That means they don’t need to start completely from scratch, and have a frame design that can drop into the vehicle once the “engine” is constructed.

Fifty cordless drills won’t set any efficiency records for EV engines, but it’s got a certain style.

Here’s what’s in the new engine: each of the drills has its chuck replaced with an aluminum pulley, and belts connect each group of drills to an output shaft. Ideally, every drill motor would run at the same time and at exactly the same speed, but one works with what they have. [Garage 54] originally worked to synchronize the drills by interfacing to each drill’s motor control board, but eventually opted to simply bypass all controls and power each drill’s motor directly from the batteries. Initial tests are done by touching bare cable ends with a turned-away face and squinted eyes, but we expect “Just A Big Switch” to end up in the final assembly.

It looks wild and we can think of more than a few inefficiencies present in a system like this, but the output shaft does turn and torque is being transferred, so the next step is interfacing to the car’s factory gearbox.

If it powers the car in any meaningful way, that Lada might very well become the world’s most gloriously hacked-together EV. And hey, if the power output of the EV motor is disappointing, you can just make your own.

Continue reading “Turning A Lada Into An EV With 50 Cordless Drills, Because Why Not?”

Repairing A BPS-305 30V Bench Power Supply

When [Tahmid Mahbub] recently reached for his ‘Lavolta’ BPS-305 bench supply, he was dismayed to find that despite it being a 30V, 5A-rated unit, the supply refused to output more than 15V. To be fair, he wasn’t sure that he had ever tried to push it beyond 15V in the years that he had owned it, but it had better live up to its specs. Ergo out came the screwdriver to open the power supply to see what had broken, and hopefully to fix it.

After some more probing around, he discovered that the unit had many more issues, including a highly unstable output voltage and output current measurement was completely wrong. Fortunately this bench power supply turns out to be very much like any number of similar 30V, 5A units, with repair videos and schematics available.

While [Tahmid] doesn’t detail his troubleshooting process, he does mention the culprits: two broken potentiometers (VR104 and VR102). VR104 is a 5 kOhm pot in the output voltage feedback circuit and VR102 (500 Ohm) sets the maximum output current. With no 500 Ohm pot at hand, a 5 kOhm one was combined with a 470 Ohm resistor to still allow for trimming. Also adjusted were the voltage and current trimpots for the front display as they were quite a bit off. Following some testing on the reassembled unit, this power supply is now back in service, for the cost of two potentiometers and a bit of time.

Experimental setup and measured optical depth. (Credit: Josiah Sinclair et al,, PRX Quantum, 2022)

Quantum Mechanics And Negative Time With Photon-Atom Interactions

Within our comfortable world of causality we expect that reactions always follow an action and not vice versa. This why the recent chatter in the media about researchers having discovered ‘negative time’ with photons being emitted before the sample being hit by source photons created such a stir. Did these researchers truly just crack our fundamental concepts of (quantum) physics wide open? As it turns out, not really.

Much of the confusion stems from the fact that photons aren’t little marbles that bounce around the place, but are an expression of (electromagnetic) energy. This means that their resulting interaction with matter (i.e. groupings of atoms) is significantly more complicated, often resulting in the photonic energy getting absorbed by an atom, boosting the energy state of its electron(s) before possibly being re-emitted as the excited electrons decay into a lower orbit.

This dwell time before re-emission is what is confusing to many, as in our classical understanding we’d expect this to be a very deterministic process, while in a quantum world it most decidedly is not.

Continue reading “Quantum Mechanics And Negative Time With Photon-Atom Interactions”

A Foil Tweeter, Sound From Kitchen Consumables

The world of audio has produced a variety of different loudspeaker designs over the last century, though it’s fair to say that the trusty moving coil reigns supreme. That hasn’t stopped plenty of engineers from trying new ways to make sound though, and [R.U.H] is here with a home-made version of one of them. It’s a foil tweeter, a design in which a corrugated strip of foil is held in a magnetic field, and vibrates when an audio frequency current is passed through it.

He shows a couple of takes on the design, both with neodymium magnets but with different foils and 3D printed or wooden surrounds. They both make a noise when plugged into an amplifier, and unsurprisingly the thicker foil has less of the high notes.

We can see that in there is the possibility for a high quality tweeter, but we can’t help having one concern. This device has an extremely low impedance compared to the amplifier, and thus would probably be drawing far too much current. We’d expect it to be driven through a transformer instead, if he had any care for not killing the amplifier.

Happily there are other uses for a ribbon, they are far better known as microphones.

Continue reading “A Foil Tweeter, Sound From Kitchen Consumables”

An animated GIF of Engineer Bo's Precision Bluetooth Scroll Wheel wirelessly, and effortlessly scrolling down the Hack A Day blog with a single finger

Doomscroll Precisely, And Wirelessly

Around here, we love it when someone identifies a need and creates their own solution. In this case, [Engineer Bo] was tired of endless and imprecise scrolling with a mouse wheel. No off-the-shelf solutions were found, and other DIY projects either just used hacked mice scroll wheels, customer electronics with low-res hardware encoders, or featured high-res encoders that were down-sampled to low-resolution. A custom build was clearly required.

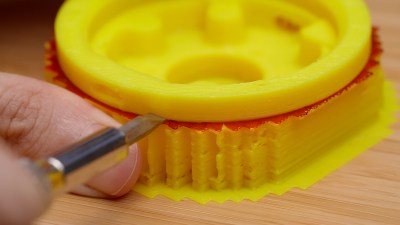
A photo of a 3D printed yellow plastic form with red marker drawn on the top of the support material and used in Engineer Bo's Precision Bluetooth Scroll Wheel

We loved seeing hacks along the whole process by [Engineer Bo], working with components on hand, pairing sensors to microcontrollers to HID settings, 3D printing forms to test ergonomics, and finishing the prototype device. When 3D printing, [Engineer Bo] inserted a pause after support material to allow drawing a layer of permanent marker ink that acts as a release agent that can later be cleaned with rubbing alcohol. 

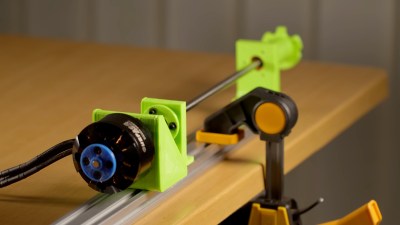
We also liked the detail of a single hole inside used to install each of the three screws that secure the knob to the base. While a chisel and UV-curing resin cleaned up some larger issues with the print, more finishing was required. For a project within a project, [Engineer Bo] then threw together a mini lathe with 3D printed and RC parts to make sanding easy.

Scroll down with your clunky device to see the video that illustrates the precision with a graphic of a 0.09° rotation and is filled with hacky nuggets. See how the electronics were selected and the circuit designed and programmed, the use of PCBWay’s CNC machining in addition to board assembly services, and how to deal with bearings that spin too freely. [Engineer Bo] teases that a future version might use a larger bearing for less wobble and an anti-slip coating on the base. Will the board files and 3D models be released, too? Will these be sold as finished products or kits? Will those unused LED drivers be utilized in an upcoming version? We can’t wait to see what’s next for this project.

Continue reading “Doomscroll Precisely, And Wirelessly”