If you’ve got a resistor and you can’t read the color bands (or they’re not present), you can always just grab a multimeter and figure out its value that way. [Giacomo Yong Cuomo] and [Sophia Lin] have built an altogether different kind of ohmmeter, that can actually spit out color values for you, and even read the resistance aloud. It’s all a part of their final project for their ECE 4760 class.
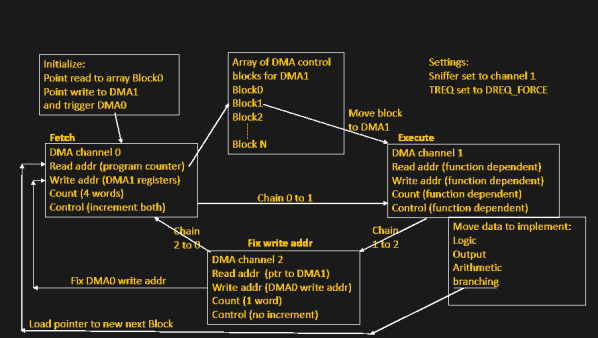
The build is based around a Raspberry Pi Pico. It determines the value of a resistor by placing it in a resistor divider, with the other reference resistor having a value of 10 kΩ. The resistor under test is connected between the reference resistor and ground, while the other leg of the reference resistor is connected to 3.3 V. The node between the two resistors is connected to the Pi Pico’s analog-to-digital converter pin. This allows the Pico to determine the voltage at this point, and thus calculate the test resistor’s value based on the reference resistor’s value and the voltages involved.
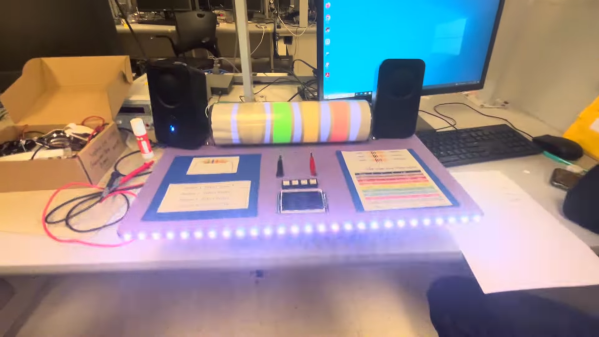
A large fake resistor provides user feedback. It’s filled with addressable LEDs, which light up the appropriate color bands depending on the test resistor’s value. It’s capable of displaying both 3-band, 4-band, and 5-band color configurations. While six-band resistors do exist, the extra band is typically used for denoting temperature coefficients which can’t readily be determined by this simple test. It can also play audio files to announce the resistance value over a speaker.
It’s a neat project that surely taught the duo many useful skills for working with microcontrollers. Plus, it’s kinda fun — we love the big glowing resistor. We’ve featured some other fancy resistors before, too!
Continue reading “Talking Ohmmeter Also Spits Out Color Bands For You”