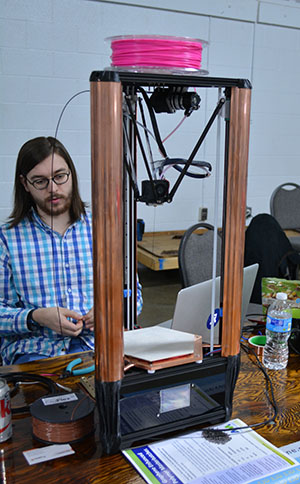
Well, this is timely. We saw a lot of things at Midwest RepRap Festival this year on both the printer and the material fronts. We told you about the delicious offerings made possible through remote extruder setups, strong and heavy filaments infused with copper and other metals, and a printer built out of K’NEX. No one was printing with canned cheese, though, and maybe for good reason.
[Andrew] here has created a 3D-printed arm that holds a can of aerosol cheese-like substance in place. A motor causes the holder to move the spout to the side, dispensing the goo. At first he squirts it in a coiled pile on to a cracker. That goes pretty well until it’s time to move away from the cracker. [Andrew]’s later attempt to build up four cheesy walls had us cheering. You can see what we mean after the break.
There are a couple of issues at play. Sometimes the add-on just plain falls off the end of the spout. Other times, air in the can interrupts the flow, just as it does during manual operation. And every once in a while, it just seems that the spout was too close to the substrate.
What do you think about the viability of cheese printing? Would it work better if the extrusion took place remotely, and the cheese was pushed through a thinner tip? Would a cooled print bed help? Let us know.
The Midwest RepRap Festival is over – forever. This was the last one. Apparently enough people complained that Goshen, Indiana wasn’t in the midwest. The number of Dairy Queens I passed contradicts this, but whatever. Next year, there’s going to be a different con in Goshen. Same content, different name. If you have a suggestion, you know where to put it.
The world’s largest 3D printed trash can. People were taking pictures of them standing next to it.
Contaminated with masterbatch
The Groot fail
What the infill looks like on the PartDaddy
I promised the world’s largest 3D printed trash can, and I gave you the world’s largest 3D printed trash can. This gigantic orange vase was printed on the PartDaddy, SeeMeCNC’s 18-foot tall delta printer a few months ago at the NYC Maker Faire. I have been using this as a trash can in my basement since then, making me one of the only people who have their trash can on Wikipedia.
A failed print on Saturday morning
Speaking of the PartDaddy, this is what a fail looks like. The first PartDaddy print was a Groot, a 13-hour long print job. It was left running overnight, but it ran out of PLA pellets sometime around 4 in the morning. If you’re wondering what the black band is around the Groot’s face is, here’s the breakdown:
The PartDaddy sucks PLA pellets up from a trash can (that’s not 3D printed), and dispenses it into a hopper above the print head. This hopper was 3D printed on the PartDaddy, and there is still a little bit of colarant dust in there. When the PLA pellets run out, that dust is embedded in the extrusion. When you realize that masterbatch is only about 5% of the finished plastic, it doesn’t take much black dust to discolor a print.
Yes, this is a print fail that could have been fixed by having an all-night bash. A few other people left their printers running overnight including [The Great Fredini] and his Scan-A-Rama. This was a Rostock Max that had something wonky happen with the Bowden. There was filament everywhere.
How about some Star Wars droids? An R2 from the Droid Builder’s Club was there, but there was also the beginnings of a completely 3D printed Roger. While we’re on the subject of plastic robots that will fall apart at a moment’s notice, there was a K’NEX 3D printer. Yes, it’s made almost entirely out of K’NEX, and it did work at one time. Those orange parts sitting next to it? Those came out of the K’NEX printer. If you’re looking for the definitive RepStrap, there ‘ya go.
Roger Roger, or a B1 Battle Droid
K’NEX Printer
Lincoln death mask in bronzefill. Patinaed with vinegar.
NEW FILAMENTS
For the last few months, metal filaments – PLA with tiny particles of copper, brass, bronze, iron, or aluminum have been available. MRRF was the first place where you could see them all together. A few things of note: these filaments are heavy – the printed objects actually feel like they’re made out of metal. They’re actually metal, too: the iron-based filaments had a tiny bit of red corrosion, and the Lincoln death mask above was treated with acetic acid. These filaments are also expensive, around $100 for 1kg. Still, if you want to print something that will be around in 100 years, this is what you should get.
The most beautiful printer ever
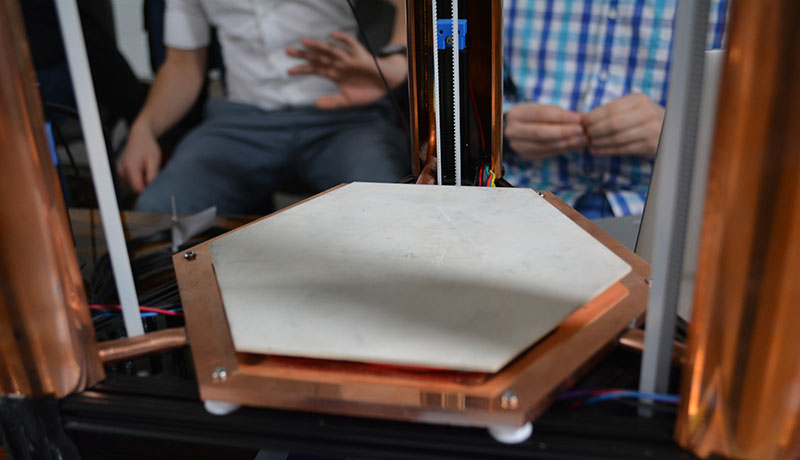
MRRF should have had a contest for the best looking 3D printer at the show. A beautiful delta from Detroit Rock City would have won:
That white hexagon in the center is a ceramic PCB that I’m told cost an ungodly amount of money. Underneath the ceramic build plate, there’s a few Peltiers between the bed and the large copper heat sink. The heat sink is connected to the three risers by heat pipes, making the entire printer one gigantic heat sink. Why would anyone make such an amazing art deco printer? For this.
Because you can use Peltiers to heat and cool a bed, a little bit of GCode at the end of a print will cool the bed to below room temperature. If you do your design right, this means the print will just fall over when it’s done. When the print bed is cooling, you can actually hear the bond between the bed and print cracking. It’s beautiful, it’s cool, and I’m told this printer will make its way to hackaday.io soon.
There you go, the best and coolest from the last Midwest RepRap Festival ever. There will never be another one. It only needs a better name, and [John] at SeeMeCNC is great at coming up with names. Just ask what VIP is a backronym of.
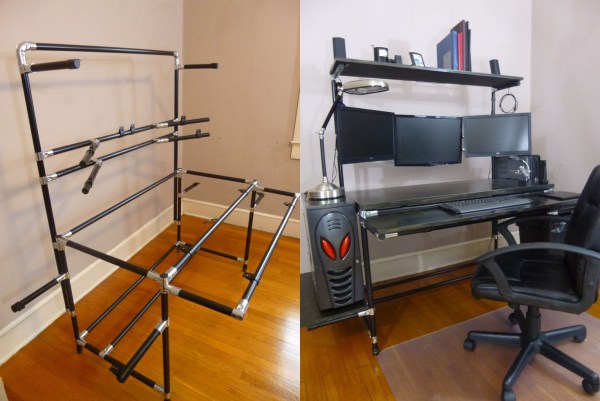
Sometimes you just want to build something quickly and easily. Maybe you just need a basic structure for your actual project, or perhaps you want to be able to easily modify the design. Maybe you don’t have access to many fancy tools to build a solid, lightweight structure. Another possibility is that you want to be able to break down your structure and move it at a later date. In cases like these, you might want to consider using lean pipe.
Lean pipe is kind of like K’NEX for adults. It’s made up of metal pipe and specialized fittings. If you’ve ever worked with PVC pipe before then this may sound familiar. The difference is lean pipe is stronger and designed specifically for building sturdy structures. The fixtures designed for use with lean pipe are much easier to work with than PVC pipe. With PVC pipe, it seems like you never have the exact right fitting and you have to build your own adapters, quickly increasing the cost of the design.
A typical lean pipe fitting will either slide over the end of a section of pipe, or wrap around it somewhere in the middle. An adjustment screw can then be tightened to clamp the fitting in place around the sections of pipe. The video below does a good job demonstrating the different possibilities with fittings. The primary issue with this material is that you might not be able to find it at your local hardware store. Luckily, a quick Internet search will turn up a number of online purchasing options.
So what can you build with this stuff? Cody has been building himself computer desks with an industrial look. He first starts out with the frame design. This is the part that’s made from the lean pipe. Once the frame is completed he just needs to work on the wood surfaces. All he really needs to do is cut the wood to shape and then finish it to look nice. It then lays in place and can be bolted down for extra security. Continue reading “Building Things With Lean Pipe”→
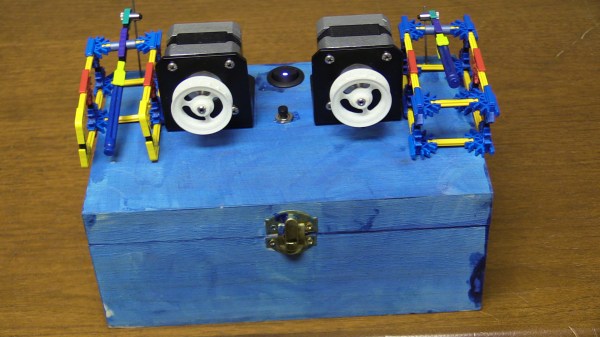
Inspired by the floppy drive orchestras of others, [Jeremy] has built a Pi-driven MIDI music box with stepper motor resonators and outlined the build on hackaday.io.
Control for the motors comes from an Iteaduino Mega 2560. The music starts as a MIDI file, gets processed into a text file, and is played over serial by a Raspberry Pi. He’s added percussion using K’NEX instruments and 9g servos, which we think is a nice touch. It can be powered via LiPo or from the wall, and [Jeremy] baked in protection against blowing up the battery. As he explains in the tour video after the break, the box is clamped to a wooden table to provide richer sound.
[Jeremy]’s favorite part of the build was enclosing the thing as it was his first time using panel-mount components. Stick around to see a walk-through of the guts and a second video demonstrating its musical prowess.
[Angelo] is only 15, but that doesn’t mean his fabrication skills are limited to Lego and K’Nex. He’s built himself an amazingly well constructed FM transmitter that’s powerful enough to be received a quarter mile away.
The FM transmitter circuit itself is based off one of [Art Swan]’s builds, but instead of the solderless breadboard construction you would expect to find in a small demo circuit, [Angelo] went all the way, etching his own PCB and winding his own coil.
Using photosensitized copper clad board, [Angelo] laid out the circuit with Fritzing, etched a board, and went at it with a drill. The components found in the transmitter are pretty standard and with the exception of the trimmer cap and electret mic, can be picked up in the parts drawers of any Radio Shack. He gets bonus points for using a 1/4 – 20 bolt for winding the coil, too.
The power supply for the transmitter is a single 9V battery, the battery connector being salvaged from a dead 9V. Awesome work, and for someone so young, [Angelo] already seems to have a grasp of all the random, seemingly useless information that makes prototyping so much easier. Video below.
[Unihopper] built this sliding camera mount to add some motion to his freestyle unicycle videos. It’s extremely simple, but still pulls off a pretty nice effect as you can see in the clip after the break.
The image above shows the mount without a camera attached. You can see the threaded peg on the block in the foreground which is used for that purpose. Felt has been wrapped around the base of the block, which rides in a wooden channel. The string, which connects to an eye hook in the wood block, is attached to a spool on the far end of the plank. A K’nex motor drives that spool, slowly sliding the camera toward it.
We were all children at one time, and surely some of us remember the pain of trying to make one type of building block work with another type of block. The folks at the Free Art and Technology Lab have an answer for your inner child: adapters that connect any type of building block to any other type of building block.
The project is called the Free Universal Construction Kit. This “gee, I wish I thought of that ideas” is a set of 79 play set adapter that allow any child to mix up their Duplo, Fischertechnik, Gears! Gears! Gears, K’Nex, Krinkles, Lego, Lincoln Logs, Tinkertoy, ZomeTool, and Zoob building sets in any way imaginable. Most of these adapters are up on Thingiverse, ready to be printed out with a 3D printer or sent to Shapeways.
An interesting aspect of the work of the F.A.T. Lab is the legal and intellectual property aspect; since this is the product of reverse-engineering several building sets, it’s entirely possible the manufactures of these toys wouldn’t want adapters out in the wild. The team really covered their bases, though. Of the ten toy systems included, eight are no longer patent protected, much to the chagrin of the company behind MEGA Bloks. Adapters for the two remaining systems – Zoob and ZomeTool – won’t be released until the patents run out in 2016 and 2022, respectively.
Check out the video after the break for the wonderful ‘a-ha moment’ one of the inventors had when watching his 4-year-old son playing with Tinker Toys and K’Nex.


 That white hexagon in the center is a ceramic PCB that I’m told cost an ungodly amount of money. Underneath the ceramic build plate, there’s a few Peltiers between the bed and the large copper heat sink. The heat sink is connected to the three risers by heat pipes, making the entire printer one gigantic heat sink. Why would anyone make such an amazing art deco printer?