Well, That Was Quick: Heng Lamp Duplicated

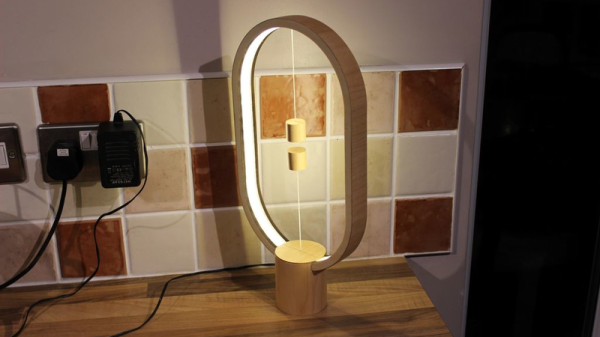
That didn’t take long at all! We covered a pretty cool lamp with a novel magnetic switch mechanism, and [msraynsford] has his version laser cut, veneered, a video posted on YouTube (embedded below), and an Instructable written up before we’d even caught our breath.

For those who missed it, the original Heng lamp is a beautiful design with a unique take on a magnetic switch. As with the original, the secret sauce is a switch inside that’s physically held closed by the two magnets. It’s a pretty clever mechanism that looks magical to boot.

[msraynsford]’s version replaces the floating spheres with floating cylinders, which are easier to fabricate in layers on a laser cutter, but otherwise the copy is fairly true to the aesthetics of the original. Pretty sweet!
Continue reading “Well, That Was Quick: Heng Lamp Duplicated”

Hand drawing and laser etching - rocket

Converting Kids’ Hand-Drawings To G-Code

[Martin Raynsford] wrote a program that converts a black-and-white 2D image to G-code so that his laser printer could then etch the image. Not satisfied with just that, he used his laser printer to make a scanner that consists of a stand for his webcam and a tray below it for positioning the paper just right. The result was something he took to a recent Maker Faire where many kids drew pictures on paper which his system then scanned and laser etched.

Screenshot of Martin's scanning and G-code maker program
Martin’s scanning and G-code maker program

[Martin’s] program, written in C#, does the work of taking the image from the webcam using OpenGL and scanning it line by line looking for pixels that surpass a contrast threshold. For each suitable pixel the program then produces G-code that moves the laser to the corresponding coordinate and burns a hole. Looking at the source code (downloadable from his webpage) it’s clear from commented-out code that he did plenty of experimenting, including varying the laser burn time based on the pixel’s brightness.

While it’s a lot of fun writing this code as [Martin] did, after the break we talk about some off-the-shelf ways of accomplishing the same thing.

Continue reading “Converting Kids’ Hand-Drawings To G-Code”

DIY Vacuum Table Makes Lasering Even Easier

If you’ve ever tried to laser flexible rolls of material you’ll know it can be really annoying to setup in the laser cutter.

Most of the time we use magnets, but then you have to make sure the magnets are clear of the work path — and then you end up wasting extra material… It’d be amazing to have a vacuum table that just sucks down your work piece to keep it in place! As it turns out, it’s not that hard to make!

After getting frustrated lasering warped material themselves, [Martin Raynsford] and the gang decided to make their very own vacuum table — using a laser cutter of course. Continue reading “DIY Vacuum Table Makes Lasering Even Easier”

Playing Space Invaders With Real Fire And Lasers

Making a Space Invaders game is up there on the list of most unconventional things you could do with a laser cutter. In watching the tiny little ships burst into flames, [Martin Raynsford’s] modification has got to be one of the more dangerous looking ones we’ve seen as well.

[Martin] always had the desire to make a tangible version of the classic game. Since his Whitetooth A1 laser cutter already contained the bulk of the moving hardware needed, not to mention an actual high powered laser to “pew pew” with, he decided it was the perfect starting point for such a project. The game is played looking down into the cutter since the laser of course fires in that direction, however a basic webcam is mounted to the laser assembly so that you can view the game on a computer screen at the proper perspective. An Arduino Mini is responsible for stepper control, allowing the player to jog back and forth and fire with a keyboard. [Martin] added an extra gear to the z-axis bed-leveler so that it could drive rows of paper invaders left and right across the bottom. Paperclips wedged into slots along a modified backboard hold each of the paper slips in place. This works ideally since they can be reloaded easily and won’t be maimed during use.

Due to the heat of the laser, landing a well positioned shot will likely nuke all of the nearby invaders as well, making for a theatrical inferno and easy win. Now to step up the difficulty level and figure out how to make them fire back…

Continue reading “Playing Space Invaders With Real Fire And Lasers”

Super Affordable LED Lighting Ready To Go Off Mains Voltage

lights

If you’re looking for a super cheap way to add LED lighting accents to your house, then this hack is for you! Corn-cob style LED light bulbs can be had for a few dollars. The bulbs include driver circuitry, and 8 LED arrays! All you have to do is take it apart.

[Martin Raynsford] stumbled upon this idea when trying to think of a way to light his laser engraving enclosure. It originally came with a regular light bulb, but it didn’t distribute light nicely and was in the way for some of his other planned upgrades.

Not wanting to add another DC power supply to the mix he remembered an old corn-cob LED light bulb he had — as it turns out, they’re pretty easy to take apart! Solder some longer leads on (take note of how they are wired, some are in series, some in parallel) and you’ve just made yourself some easy to use LED accent lighting!

Of course you could just buy those cheap LED rolls from China nowadays for next to nothing for your accent lighting.

[via Hacked Gadgets]

Adding A Manual Z-axis To Your Laser

DSC07543 (Custom)

[Martin Raynsford] sells lasers, and laser cuts stuff for a living — we’re kinda jealous. Anyway, laser cutters from China are great, but sometimes lack certain functionality, so he decided to add his own z-axis feature!

The main laser cutter he uses has a very slow z-axis, and it’s also difficult to control — a job can’t be paused to adjust the height offset, the datum must be set every time manually, and you have to be in the very top level of the menu in order to do anything with it! With this in mind, [Martin] decided to add his own z-axis control, completely separate from the laser’s on board control system.

He’s using an Arduino Pro Mini to control the stepper motor with PWM. His new controller has four buttons — fast and slow, in each direction. He’s used the original end stops to protect the axis, and he’s also added a feature to set a datum by holding down both fast and slow buttons at the same time. It ended up being a very cheap upgrade to his system, and he’s also shared the source for anyone looking to recreate it.

Continue reading “Adding A Manual Z-axis To Your Laser”

Magnetic CNC Marble Maze

magnetic-cnc-marble-maze

[Martin Raynsford] figured out a way to sneak some learning into a fun package. He did such a good job the test subjects didn’t even know they were teaching themselves just a tiny bit of CNC programming.

The apparatus above is a marble maze, but instead of building walls [Martin] simply etched a pattern on the playing field. The marble is a ball bearing which moves through the maze using a magnetic CNC gantry hidden underneath. Where does one get ball bearings of this size? If you’re [Martin] you scavenge them from your laser-cut Donkey Kong game.

He showed off the rig at the Maker Faire.  It takes simple commands as cardinal directions and units of movement. The ‘player’ (remember, they’re secretly learning something, not just playing a game) inputs a series of movements such as “N10,E10” which are then pushed through a serial connection to the Arduino. It follows these commands, moving the hidden magnet which drags the ball bearing along with it. It’s simple, but watch the clip after the break and we think you’ll agree the sound of the stepper motors and the movement of the ball will be like crack for young minds.

Continue reading “Magnetic CNC Marble Maze”