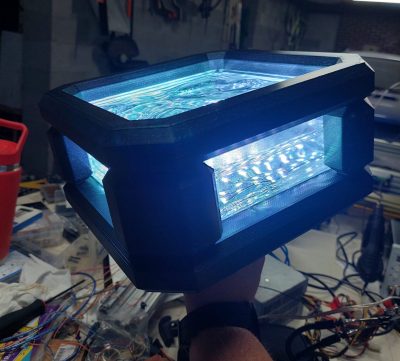
HDMI Is An Attack Surface, So Here’s An HDMI Firewall

Many years of using televisions, monitors, and projectors have conditioned us into treating them as simple peripherals whose cables carry only video. A VGA cable may have an i2c interface for monitor detection, but otherwise it presents little security risk. An HDMI interface on the other hand can carry an increasing number of far more capable ports, meaning that it has made the leap from merely a signal cable to being a connector stuffed with interesting attack vectors for a miscreant. Is it time for an HDMI firewall? [King Kévin] thinks so, because he’s made one.

It’s a surprisingly simple device, because the non-signal capabilities of HDMI rely on a set of conductors which are simply not connected. This of course also disconnects the on-board EEPROM in the device being connected, so there’s an EEPROM on the firewall board to replace it which must be programmed with the information for the device in question.

The premise of HDMI as an attack surface is a valid one, and we’re sure there will be attacks that can be performed on vulnerable displays which could potentially in turn do naughty things to anything which connects to them. The main value for most readers here probably lies though in the introduction it gives to some of what goes into an HDMI interface, and in accessing the i2c interface therein.

It comes as a surprise to realise that HDMI is nearing 20 years old, so it’s hardly surprising that its hacking has quite a history.

2022 Sci-Fi Contest: A Friendly Wall Drawing Robot

Drawing on walls is fine for children, but adults tend to get bored quickly with such antics. Even more so when they realize who is responsible for cleaning up afterwards. Instead, consider delegating those duties to a friendly helper by the name of Fumik, as [engineer2you] has done.

Fumik, who looks like a cute little jellyfish, can draw pictures up to 5 meters wide and 3 meters high, making for a massive canvas. Powered by an Arduino Mega 2560 outfitted with a CNC shield, a pair of stepper motors drive pulleys with toothed belts to move Fumik to various positions along the wall. Another smaller stepper motor is used to drive the pen forwards and backwards as needed. Fumik can be programmed to trace out various designs in SVG format. These must be converted to code and programmed into the Arduino, at which point Fumik can begin work, drawing on the wall with its pen.

It’s a fun build, and based on photos shared by [engineer2you,] Fumik is quite able at drawing clean and neat designs without a lot of smudging or jagged lines. As a bonus, it’s easy to swap out the pen, so multicolored designs can be drawn in multiple passes.

We’ve seen other robot drawing builds before, too, like this capable portrait artist. Video after the break.

Continue reading “2022 Sci-Fi Contest: A Friendly Wall Drawing Robot”

Fumik: An Arduino Wall Drawing Robot Jellyfish

If you’ve ever wanted to build a large format plotter but didn’t have the floor space, maybe put it up against the wall and make it cute. That’s the idea behind Fumik, the wall-drawing robot. As you might expect, the little device is just a motion base with a pen. We hope there’s paper against the wall since not everyone wants computer-generated art on their drywall.

The maximum size is apparently 5 m wide by 3 m tall, plenty of room to express yourself. The controller is an Arduino Mega, and stepper motors with a CNC shield drive the whole assembly. Interestingly, the motor and electronics are all onboard the jellyfish itself, rather than the wall.

The device only holds one pen at a time, but you can draw with one color and then manually change the pen. The files on GitHub are good, but you’ll need to intuit some of the mechanics from the videos. However, since it uses off-the-shelf hardware, it should be pretty easy to figure it out. This looks like a cheap and cheerful wall plotter, and the results speak for themselves.

We have seen similar wall plotters. More than once, even.

Continue reading “Fumik: An Arduino Wall Drawing Robot Jellyfish”

Mirror, Mirror On The Wall, Do My Eyes Deceive Me After All

Say what you will about illusions, [Create Inc] has some 3D prints that appear to change shape when viewed in a mirror. For example, circles transform into stars and vice versa. A similar trick was performed by [Kokichi Sugihara] in 2016, where he showed circles that appear as squares in the mirror. For the trick to work, the camera’s position (or your eye) is important as the shapes look different from different angles. The illusion comes in when your brain ignores any extra information and concludes that a much more complex shape is a simpler one. [Create Inc] walks you through the process of how the illusion works and how it was created in Blender.

When he posted the video on Reddit, most seemed to think that it wasn’t a mirror and there was some camera trickery. At its heart, this is reverse-engineering a magic trick, and we think it’s an impressive one. STL files are on Thingiverse or Etsy if you want to print your own. We covered a second illusion that [Kokichi] did that relies on a similar trick.

Continue reading “Mirror, Mirror On The Wall, Do My Eyes Deceive Me After All”

That Clock On The Wall Is Actually A Network Ping Display

We’ve all been online from home a bit more than usual lately, in ways that often stretch the limits of what our ISP can muster. You know the signs — audio that drops out, video sessions that make you look like [Max Headroom], and during the off-hours, getting owned in CS:GO by pretty much everyone. All the bandwidth in the world won’t make up for high latency, and knowing where you stand on that score is the point of this ping-tracking clock.

This eye-catching lag-o-meter is courtesy of [Charl], who started the build with a clock from IKEA. Stripped of pretty much everything but the bezel, he added a coaxial clock motor and a driver board, along with a custom-printed faceplate with logarithmic scale. The motors are driven by an ESP32, which uses internet control message protocol (ICMP) to ping a trusted server via WiFi, calculates the proper angles for the hands, and drives the motors to show you the bad news. There’s also an e-paper display in the face, showing current server and WiFi settings.

We really like how this clock looks, and if it wasn’t for the fact that the numbers it displays would often be too depressing to bear, we’d build one in a snap. If facing the painful truth isn’t your style, there are other neat ICMP tricks that you can try instead.

Old Firewall Reborn As Retro PC

We like projects where old gear is given a new life. [Splashdust] has a twenty-year old business firewall that’s build like a tank. He cracks it open and finds a complete x86 embedded motherboard inside, and sets off to restore it and turn it into a retro gaming computer (see the video from his Odd & Obsolete YouTube channel below the break).

This business firewall and router box is from a small Swedish firm Clavister, part of their S-Series from the early 2000s. The motherboard appears to be a generic one used in other equipment, and is powered by a VIA Eden ESP 4000 running at 400 MHz. The Eden line of x86 processors were low-power chips targeting embedded applications. The graphics chip is a Twister T by S3 Graphics which was purchased by VIA in 2000. After replacing the electrolytic capacitors, and making a few cables, [Splashdust] pops in a PCI sound card and boots up into Windows 98 from a CF card (we like the compact PCB vise he uses).

In two follow-up videos (here and here), he builds an enclosure (instructions on Thingiverse) and tries out several other operating systems. He was able to get the Tiny Core Linux distribution running with the NetSurf browser, but failed to get Windows 2000 or XP to work. Returning to Windows 98, he tweaks drivers and settings and eventually has a respectable retro-gaming computer for his efforts. The next time you’re cleaning out your junk bins, have a peek inside those pizza-box gadgets first — you may find a similar gem.

Continue reading “Old Firewall Reborn As Retro PC”

A wall clock with exposed circuit boards

Drunk Wall Clock Uses Convoluted Circuits To Display Time

Here at Hackaday we can never get enough of odd clocks, and we’re delighted to see [Dan O’Shea]’s creation called the Wifi-Telnet-FPGA-NTSC Drunk Wall Clock. That mouthful is an accurate description of what it does: at the heart of the device is an ESP32 that uses WiFi to connect to a Raspberry Pi. It then telnets into the system, logs in, and requests the current time using the Linux date command. So far, so ordinary.

The “FPGA” part is where it gets weirder: the ESP32 is hooked up to a VGA1306 board. This is a little PCB with an FPGA that emulates an OLED display and outputs the image to a VGA connector. [Dan] could have simply hooked up a VGA display to this, but instead went for another layer of complexity by converting the VGA signal to something resembling composite video, using nothing more than three resistors. The resulting “NTSC” signal is then fed into a small TFT display that shows the time.

The clock got its “drunk” label because the process of repeatedly running the date command and parsing its output is slow and prone to hiccups, resulting in a display where the seconds advance in a somewhat unsteady manner. This fits well with the overall aesthetic of the clock, which consists of a heap of PCBs held together with cable ties and electrical tape. Mounted on a round panel of recycled wood, it makes a beautiful wall ornament for any hacker lab.

We love projects like this that accomplish a simple task in a convoluted way, and there’s no shortage of needlessly complicated clocks, whether physically drawing the time or using machine-learning data. But if you simply like your clocks with their electronics exposed, check out this free-form LED clock or this neat circuit sculpture clock.

Continue reading “Drunk Wall Clock Uses Convoluted Circuits To Display Time”