Printable Filament Spool Hub Skips The Bearings

When you really start fine-tuning your 3D printer, you might start to notice that even the smallest things can have a noticeable impact on your prints. An open window can cause enough of a draft to make your print peel up from the bed, and the slightly askew diameter of that bargain basement filament can mess up your extrusion rate. It can be a deep rabbit hole to fall down if you’re not careful.

One element that’s often overlooked is the filament spool; if it’s not rotating smoothly, the drag it puts on both the extruder and movement of the print head can cause difficult to diagnose issues. For his custom built printer, [Marius Taciuc] developed a very clever printable gadget that helps the filament roll spin using nothing but the properties of the PLA itself. While the design might need a bit of tweaking to work on your own printer, the files he’s shared should get you most of the way there.

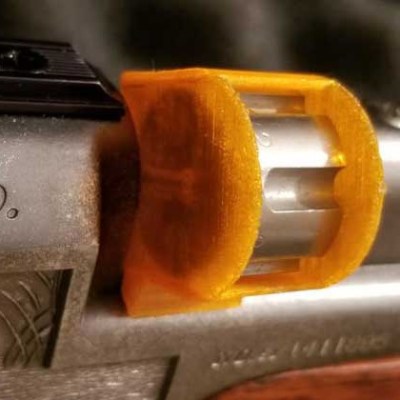
All you need to do is print out the hubs which fit your particular filament spools (naturally, they aren’t all a standard size), and snap them on. The four “claws” of the hub lightly contact a piece of 8 mm rod enough to support the spool while limiting the surface area as much as possible. The natural elasticity of PLA helps dampen the moment that would result if you just hung the hub-less spool on the rod.

The STL files [Marius] has provided for his low-friction hubs should work fine for anyone who’s interested in trying out his design, but you’ll need to come up with your own method of mounting the 8 mm rod in a convenient place. The arms he’s included are specifically designed for his customized Prusa Mendel, which is pretty far removed from contemporary desktop 3D printer design. Something to consider might be a piece of 8 mm rod suspended over the printer, with enough space that you could put a couple spools on for quick access to different colors or materials.

Hackers have been trying to solve the spool friction issue for years, and as you might expect we’ve seen some very clever designs in the past. But we especially like how simple [Marius] has made this design, and the fact that you don’t need to source bearings to build it. If you’re thinking of giving this new design a shot, be sure to leave a comment so we know how it worked out for you.

Continue reading “Printable Filament Spool Hub Skips The Bearings”

Tweetbot Expresses Twitter Emotions

When reading textual communications, it can be difficult to accurately acertain emotional intent. Individual humans can be better or worse at this, with sometimes hilarious results when it goes wrong. Regardless, there’s nothing a human can do that a machine won’t eventually do better. For just this purpose, Tweetbot is here to emotionally react to Twitter so you don’t have to.

The ‘bot receives tweets over a bluetooth link, handled by a PIC32, which also displays them on a small TFT screen. The PIC then analyses the tweet for emotional content before sending the result to a second PIC32, which displays emotes on a second TFT screen, creating the robot’s face. Varying LEDs are also flashed depending on the emotion detected – green for positive emotions, yellow for sadness, and red for anger.

The final bot is capable of demonstrating 8 unique emotional states, far exceeding the typical Facebook commenter who can only express unbridled outrage. With the ‘bot packing displays, multiple microcontrollers, and even motor drives, we imagine the team learned a great deal in the development of the project.

The project was the product of [Bruce Land]’s ECE 4760 course, which has shown us plenty of great hacks in the past – Bike Sonar being one of our favorites. Video after the break.

Continue reading “Tweetbot Expresses Twitter Emotions”

A Soap Film Photography How-To

Blowing bubbles is a pastime enjoyed by young and old alike. The pleasant motion and swirling colors of the bubbles can be remarkably relaxing. With the right tools and techniques, it’s possible to take striking photos of these soap film phenomena, and that’s exactly what [Eric] and [Travis] did.

Adding sugar to the soap solution increases the resilience of the film significantly. With enough added, the film no longer pops, but instead breaks and fails in interesting ways.

After beginning with a robotic arm and a computer fan blowing bubbles, the project moved towards a simple stepper motor setup. A thin frame is lowered into a solution of soapy water, then brought back up by the stepper motor. The resulting soap film is held in front of a black background and carefully lit with a softbox light.

Lens selection is critical for this sort of work – in this case, a TS-E 50mm Macro f/2.8 lens was the order of the day. [Eric] shares other tips for taking great shots, such as adding sugar to the solution to make the soap film last longer, and using a modified speaker to help “paint” the surface of the films.

The resulting images are beautiful examples of the art, showing vibrant colors from the interference patterns created by the light. [Eric] has done a great job of clearly documenting the development process and the final results, making it possible for others to recreate the project elsewhere.

We’ve seen other soapy projects before, like this automatic bubble blowing machine. Video after the break.

Continue reading “A Soap Film Photography How-To”

An Airbag Charge To Launch A Projectile

It’s not particularly easy to buy small explosive charges. At least, it’s not in the UK, from where [Turbo Conquering Mega Eagle] hails. But it is surprisingly easy to get your hands on one because most people drive around with one right in front of them in the form of their car airbag. In a burst of either genius or madness, we can’t decide which, he decided to use an airbag charge to launch a projectile.

As you can see in the video below, he launches straight into dismantling the centre of a Renault steering wheel before seemingly abandoning caution and taking a grinder to the charge inside. It’s a fascinating deconstruction though, because it reveals not one but two differently sized charges separated by a space which appears to contain some kind of wadding.

His projectile is a piece of steel tube with a turned steel point, spigot launched over a tube placed in front of a breech in which he places the charge. The launch tube has a piece of metal welded within it, he tells us to render it legal by being unable to launch a projectile from within it. Upon firing at a scrap jerry can it has enough energy to easily pass through both its steel walls, so it’s quite a formidable weapon.

He assures the viewer that with the spigot-launched design he’s not breaking the law, but we’re not sure we’d like to have to explain that one to a British policeman. He does make the point though that while it’s an impressive spectacle it’s also quite a dangerous device, so maybe don’t do this at home.

If ripping airbags to pieces isn’t your thing, how about making one from scratch?

Continue reading “An Airbag Charge To Launch A Projectile”

Spotting Scope Mount Makes For More Comfortable Target Scoring

One of the big bottlenecks in target shooting is the scoring process. Even if it’s not a serious match, it’s still important to know where holes have landed because it’s important feedback on technique and performance. A spotting scope, which is really just a kind of telescope optimized for getting a sharp view of a distant target, is often used to see hits on a target without leaving the firing line. Usually they’re mounted on tripods and optimized for seated use, but [Steve Thone] came up with a clever hack for more comfortable use and mounting that works better for him while engaging in bulls-eye shooting from the standing position.

[Steve] took a ratcheting bar clamp and drilled a few holes near the end of the bar. Using these holes, the spotting scope is mounted directly to the bar and the clamp grips a shooting table or bench in place of a stand. He also put a 90 degree twist in the bar so that the clamp and scope could be oriented perpendicular to one another.

The result is a quick and easy-to-use mounting solution that, unlike a tripod, doesn’t eat up precious table space. Stability may be inferior to a tripod, but it’s serviceable enough that other shooters showed up with their own versions the week after [Steve] used his. After all, target shooters tend to be DIY types with an interest in both low-tech hacks like this one as well as higher-tech projects like rifle-mounted sensors.

Home Brewing Rig Gets A Particle Upgrade

Home brewing is a pastime that can be as much an art or a science as you make it, depending on your predilections. [Brandon Satrom] is one who leans very much towards the science side. There’s plenty that can be done to monitor and control a brew, and [Brandon] is one of many who have built custom hardware to help get the best possible results. Now, that hardware was due for an upgrade.

[Brandon]’s original BrewBuddy system relied on the Particle Photon, a useful platform that was nonetheless getting on in years. With the launch of the new Particle Argon, [Brandon] set his sights on new features that were possible with the added horsepower available. Graphics were added to the LCD screen, and a piezo sensor to detect the start of the fermentation process. This is in addition to the original temperature monitoring and plotting features of the first build.

The upgrade from one microcontroller platform to another can be fraught with headaches, but in this case, only minor changes were needed. 3 lines of code were changed to account for different pin assignments, and the rest fell neatly into place. It’s a testament to the compatibility of the Particle platforms that this upgrade was so easy.

We’ve talked about the 3rd generation Particle boards before, and we expect to see them turning up in many more builds to come. Video after the break.

[Thanks to dcschelt for the tip!]

Continue reading “Home Brewing Rig Gets A Particle Upgrade”

Extracting Bismuth From Pepto Bismol

Bismuth is a very odd metal that you see in cosmetic pigments and as a replacement for lead, since it is less toxic. You will also see it — or an alloy — in fire sprinklers since it melts readily. However, the most common place you might encounter bismuth is Pepto Bismol — the ubiquitous pink liquid you use when your stomach is upset. [NileRed] tried extracting the bismuth from Pepto Bismol some time ago, but didn’t get good results. He decided that even though the process would not be cost-effective he wanted to try again, and you can see the crystals produced in the video below.

It turns out that you don’t need the pink liquid brand name. [Red Nile] started with ten boxes of generic chewable tablets — that’s 480 pills. A little bit of dilute hydrochloric acid eats the pills apart and generates a few reactions that he explains in the video.

Continue reading “Extracting Bismuth From Pepto Bismol”