Think IN18s Are Cool? Get A Load Of This Must-Have Custom Nixie Tube

Us: “I’ll take Retro style displays we absolutely have to have for $200, Alex.”

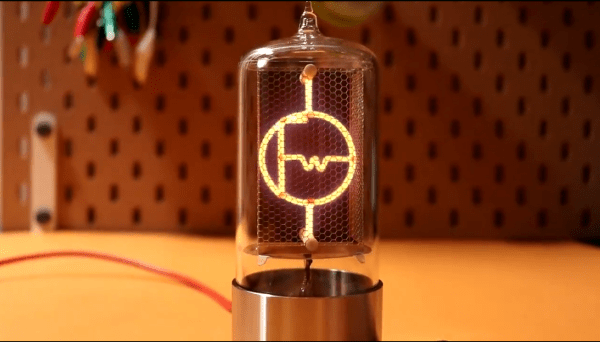
Trebek: “This nixie tube is unlike any conventional tube you’ve seen before, handbuilt and NOT numbers or letters.”

Us: “What is FriendlyWire’s new logo tube?”

Trebek: “Heck yeah.”

Nixie tubes are the vacuum technology that manages to do far less than a graphic LCD while looking about a million times cooler. Generally speaking, these tubes are no longer manufactured, and the old stock you can get your hands on usually contain a set of filaments shaped like numbers. But @FriendlyWire’s tweet of this Nixie tube by [Dalibor Farny] breaks both of those rules. This handmade tube isn’t just a numerical display or a colon display (the punctuation mark, get your head out of the gutter). It’s a custom logo, and it’s beautiful.

Continue reading “Think IN18s Are Cool? Get A Load Of This Must-Have Custom Nixie Tube”

When Does Moving To Resin 3D Printing Make Sense?

An Elegoo Mars resin 3D printer, straight to my doorstep for a few hundred bucks. What a time to be alive.

Resin-based 3D printers using digital light processing (DLP) and especially stereolithography (SLA) are getting more common and much more affordable. Prosumer-level options like Formlabs and the Prusa SL1 exist, but more economical printers like the Elegoo Mars, Anycubic Photon, and more can be had for a few hundred bucks. Many printers and resin types can even be ordered directly from Amazon, right at this moment.

Resin prints can look fantastic, so when does it make sense to move to one of these cheap resin printers? To know that, consider the following things:

  • The printing process and output of resin printers is not the same as for filament-based printers. Design considerations, pre-processing, and post-processing are very different.
  • Resin printing has a different workflow, with consumables and hidden costs beyond the price of resin refills.

Things may not be quite where fused deposition modeling (FDM) printers were just a few short years ago when we were extremely impressed with the quality of printer one could get for about $200, but it is undoubtedly far more accessible than ever before. Let’s look at how to inform a decision about whether to take the plunge. Continue reading “When Does Moving To Resin 3D Printing Make Sense?”

Interactive LED Dome Glows With The Best Of Them

With the price and availability of components these days, it’s easier than ever to throw a whole pile of LEDs at a build and get them flashing away. The hard part is doing it well. [Amy Goodchild] is an artist, and has a knack for producing rather beautiful LED projects. The When in Dome installation is no exception.

The build is based around a large geodesic dome, fitted with LED panels that glow and react to the occupants inside. Using the Microsoft Kinect as a sensor enables the dome to map out what’s happening in 3D space, and use this data to guide its animations. WS2812B LED strips were used, in combination with a Fadecandy controller along with Processing. This is a powerful combination which makes designing attractive LED effects easier, without forcing users to go to the effort of writing their own libraries or optimizing their microcontroller code.

For those more interested in the dome itself, you’ll be happy to know that [Amy] doesn’t skimp on the details there either. The build actually started as a commercially available kit, though there’s still plenty of manual cutting, screwing, and painting required. She does an excellent job documenting the dome build through a series of videos, and walks the reader through some of the design decisions she made (and would remake, if given the chance).

People love geodesic domes at the best of times; adding an interactive LED installation just takes things to the next level. We’ve seen them used as greenhouses too, and they make a great hackerspace project as well. Video after the break.

Continue reading “Interactive LED Dome Glows With The Best Of Them”

Where Did Pocket Computing Start?

A smartphone in 2019 is an essential piece of everyday equipment. Many of you are probably reading this page on one, and it will pack a very significant quantity of computing power into your hand. Pocket computing has a long history stretching back decades before the mass adoption of smartphones though, and Paleotronic has an interesting retrospective of that earlier history.

The piece starts with the Radio Shack PC-1, a rebadged Sharp with a calculator-style keyboard and a one-line alphanumeric LCD display, then continues through the legendary TRS-80 Model 100 to the era of the palmtop. It’s a difficult subject to cover in its entirety as there are so many milestones on the pocket computing path, but it’s an interesting read nevertheless as it successfully evokes the era when a 300 Baud connection via an acoustic coupler was a big deal. We might for example have mentioned the Atari Portfolio if only for its use by a young John Connor to scam an ATM in Terminator 2, and as any grizzled old sysadmin will tell you, there was a time when owning a Nokia Communicator might just save your bacon.

Of the classic pocket computing devices mentioned, only one has received significant coverage here. The TRS-80 model 100 still has a huge following, and among quite a few hacks featuring it we’ve seen one brought into the smartphone age by getting the ability to make a cellular connection.

TRS-80 Model 100 image: Jeff Keyzer from Austin, TX, USA [CC BY-SA 2.0]

How Do Those Component Testers Work?

Most people have at least seen those cheap component testers you can buy on the Chinese websites for $10 or so. If you haven’t seen them before, they usually have some kind of multi pin socket. You put a component in the socket and it will identify — with a push of a button — what the part is, which pin is which, and the value of the part. For example, you can insert a resistor, a capacitor, an inductor, a diode, or a transistor and get a readout of which pin is which. It seems like magic, but [Andreas Spiess] did the research on how it all works and summed up his findings in a recent video.

[Andreas] even quotes our earlier post on the topic and, as we did, dug into the original developers of the device which has been cloned over and over by Chinese sellers. Although there have been some divergence with all the different versions, the basic idea is the same. An AVR CPU uses some analog and digital trickery to make a lot of different measurements.

Continue reading “How Do Those Component Testers Work?”

Bouncing Signals Off The Moon

One of the great things about ham radio is that isn’t just one hobby. Some people like to chit chat, some like to work foreign countries, some prepare for emergencies, and there are several space-related activities. There are hundreds of different kinds of activities to choose from. Just one is moonbounce, and [Ham Radio DX] decided to replicate a feat many hams have done over the years: communicate with someone far away by bouncing signals from the moon.

The set up is pretty sophisticated but not as bad as you might imagine. You can see that they spend a lot of time getting the equipment aligned. A known reference point helps them set the position of the antenna. A GPS keeps both stations in sync for frequency and time.

Continue reading “Bouncing Signals Off The Moon”

Copper Coil Lamp Built With 3D Printed Tools

3D printing is a great way to create complex geometric forms. However, it can be very slow, and parts may lack strength compared to other alternatives. There are other ways to take advantage of this technology however, as shown in the build of this tidy voronoi lamp. 

The lamp is so-called for its voronoi-patterned base, named after the mathematical concept. 3D printing is used to create the base, which would be very difficult to create with traditional subtractive machining methods. A copper coil is then used to give the lamp some height, as well as act as protection for the filament bulb. Here, 3D printing helps out in a different way, being used to create a jig to allow the copper to be quickly wound into an accurate coil shape. The coil also serves to act as a conduit for the mains wiring, giving the lamp a neat finished appearance.

The project goes to show that even if 3D printing is appropriate to produce your final parts, it may be of help to create useful jigs or tools to get the job done. We’ve even seen similar applications before in the microcontroller space!