ESP8266 Adds WiFi Logging To IKEA’s Air Quality Sensor

Introduced back in June, the IKEA VINDRIKTNING is a $12 USD sensor that uses colored LEDs to indicate the relative air quality in your home depending on how many particles it sucks up. Looking to improve on this simplistic interface, [Sören Beye] tacked an ESP8266 to the board so it can broadcast sensor readings out over MQTT.
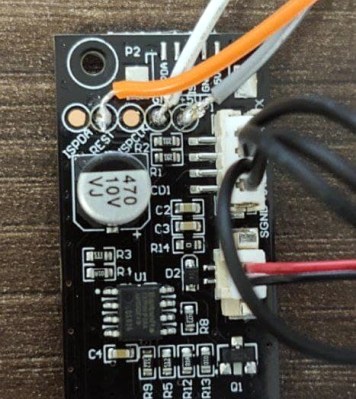
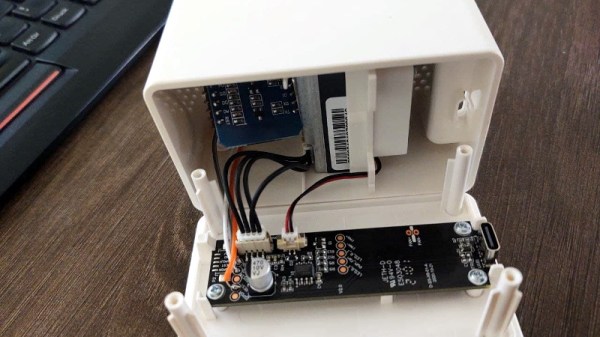
Just three wires link the ESP8266 to the PCB.

While some of us would have been tempted to gut the VINDRIKTNING and attach its particle sensor directly to the ESP8266, the approach [Sören] has used is actually quite elegant. Rather than replacing IKEA’s electronics, the microcontroller is simply listening in on the UART communications between the sensor and the original controller. This not only preserves the stock functionality of the VINDRIKTNING, but simplifies the code as the ESP doesn’t need to do nearly as much.

All you need to do if you want to perform this modification is solder a couple wires to convenient test pads on the VINDRIKTNING board, then flash the firmware (or write your own version), and you’re good to go. There’s plenty of room inside the case for the ESP8266, though you may want to tape it down so it doesn’t impact air flow.

While not required, [Sören] also recommends making a small modification to the VINDRIKTNING which makes it a bit quieter. Apparently the 5 V fan inside the sensor is occasionally revved up by the original controller, rather than kept at a continuous level that you can mentally tune out. But by attaching the sensor’s fan to the ESP8266’s 3.3 V pin, it will run continuously at a lower speed.

We’ve seen custom firmware for IKEA products before, but this approach, which keeps the device’s functionality intact regardless of what’s been flashed to the secondary microcontroller, is particularly appealing for those of us who can’t seem to keep the gremlins out of our code.

[Thanks to nexgensri for the tip.]

Who Flew Across The Atlantic First? The Airborne Boats Of 1919

Aviation history is a bit strange. People tend to remember some firsts but not others and — sometimes — not even firsts. For example, everyone knows Amelia Earhart attempted to be the first woman to fly around the globe. She failed, but do you know who succeeded? It was Jerrie Mock. How about the first person to do it? Wiley Post, a name largely forgotten by the public. Charles Lindbergh is another great example. He was the first person to fly across the Atlantic, right? Not exactly. The story of the real first transatlantic flight is one of aviation hacking by the United States Navy.

Continue reading “Who Flew Across The Atlantic First? The Airborne Boats Of 1919”

DIY Fume Extractor Keeps Air Clean While You Solder

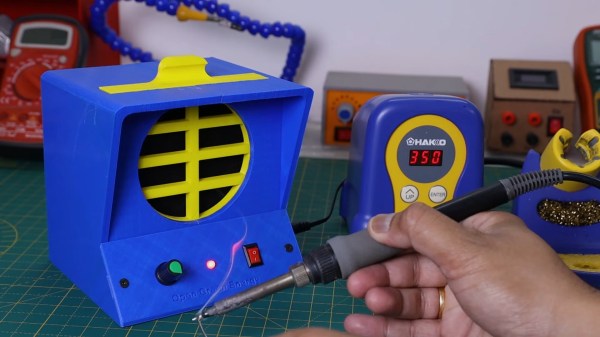
Soldering is a key skill to learn when building electronics, but it’s also a process that can put out a lot of fumes. The best way to deal with this is to use a fume extractor. Of course, you can always make your own, as [Open Green Energy] ably demonstrates. It’s a guided build of the design [rdmmkr] published on Thingiverse.

The build relies on a 120mm case fan for suction, and it’s combined with a activated carbon filter to best capture the harmful fumes from the soldering process. The fan is neatly installed inside a 3D printed enclosure of custom design, which also includes a removable tray which holds the filter material. The fan is run from a DC power supply via a barrel jack, and a basic speed controller is installed to allow the fan to be turned up higher for more suction, or lower to reduce noise.

It’s a useful item to have around the home workshop, and it’s something that you could easily whip up at home with parts from the junk bin if you’re so inclined. The benefit of 3D printing is that you can easily alter the design to suit whatever parts you have on hand.

We’ve seen a few fume extractor builds over the years, from the simple and basic to the very fancy. Video after the break.

Continue reading “DIY Fume Extractor Keeps Air Clean While You Solder”

3D Print In The Air With A Little Software Support

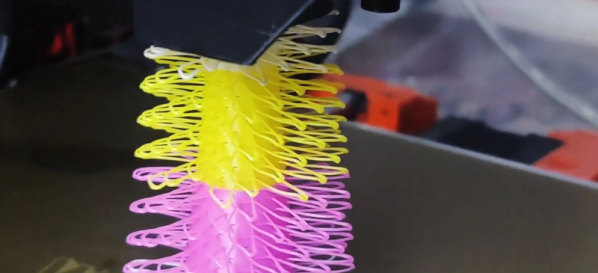
We all love 3D printing, but printing anything that has an overhang requires support, right? Maybe not. [Create Inc] has a video showing some 3D prints that seem to hang impossibly in the air — not bridges, but loops just floating in the air. You can see the effect in the video below.

The first part of the post covers gcode basics. Around the 5:30 mark, [Create] talks about his inspiration: FullControl Gcode Designer. You can do a lot with this tool and it inspired [Create’s] similar web-based version.

The point of these tools is to make it easier to create gcode directly instead of using a slicer. You can think of it as assembly language for 3D printing — you can do almost everything in the high-level language — 3D models — but if you want ultimate control you use assembly language, or, in this case, gcode.

The original tool uses Excel which didn’t visualize the output directly and could not provide proper error checking. The new tool solves those problems and is much easier to use.

If you know gcode, you can do a lot of interesting things. You can even put a spring in your step.

Continue reading “3D Print In The Air With A Little Software Support”

Repair Hack Saves Tesla Owner From Massive Bill

As expensive as a new car is, it almost seems like a loss leader now to get you locked into exorbitantly expensive repairs at the dealership’s service department. That’s the reason a lot of us still try to do as much of the maintenance and repairs on our cars as possible — it’s just too darn expensive to pay someone else to do it.

Case in point: this story about a hapless Tesla owner who faced a massive repair bill on his brand new car. [Donald]’s tale of woe began when he hit some road debris with his two-wheel-drive Model 3. The object hit penetrated the plastic shield over the front of the battery pack, striking a fitting in the low-pressure battery cooling plumbing. The plastic fitting cracked, causing a leak that obviously needed repair. The authorized Tesla service center gave him the bad news: that he needed a new battery pack, at a cost of $16,000. Through a series of oversights, [Donald]’s comprehensive insurance on the car had lapsed, so he was looking at funding the repair, approximately half the cost of a new Model 3, out of pocket.

Luckily, he got in touch with [Rich Benoit] of The Electrified Garage, one of the few independent garages doing Tesla repairs and customizations. The video below is queued up to the part where they actually do the repair, which is ridiculously simple. After cutting off the remains of the broken fitting with a utility knife, [Rich]’s tech was able to cut a thread in both the fitting and the battery pack, and attach them together with a brass nipple from the plumbing section of the local home store. The total bill for the repair was $700, which still seems steep to us, but a far cry from what it could have been.

Hats off to [Rich] and his crew for finding a cost-effective workaround for this issue. And if you think you’ve seen his EV repairs before, you’re right. Of course, some repairs are more successful than others.

Continue reading “Repair Hack Saves Tesla Owner From Massive Bill”

DIY Air Quality Sensor


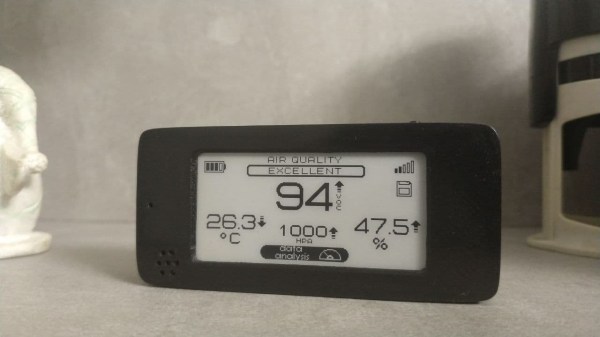
[Andrew Lamchenko], who has built a number of small e-ink-based sensors this year, released another design called the eON Indoor Air Quality Sensor. As his previous sensor designs, the eON boasts a striking appearance with all the spit and polish of a commercially made product. Except [Andrew]’s design is completely open-source.

Besides showing air quality, it also shows basic weather conditions, and there’s a built-in weather forecasting algorithm as well. It can operate standalone or use the radio module to send readings to a smart home system.

The core sensor is the SGP40, which detects volatile organic compounds (VOCs) in the air while consuming less than 3 mA (compared to the 48 mA of the previous generation). There’s a temperature, barometric pressure, humidity, and light sensors in the package as well. Like many projects these days, [Andrew] encountered parts supply issues along the way. Because of that, and to make the design more flexible, several versions of the board have been made to accommodate the different permutations of:

  • Displays
    • 2.13-inch e-ink display
    • DES e-ink display, coming soon
  • Radio, four flavors
    • MINEW MS88SF3 (nRF52833, nRF52840)
    • MINEW MS50SFA1 (nRF52810, nRF52811)
    • MINEW MS50SFA2 (nRF52832)
    • EBYTE E73-2G4M08S1C (nRF52833, nRF52840)
  • Temp / Pressure sensor:
    • BME280
    • BMP280
    • SHTC3

[Andrew] not only designed the sensor but has done a thorough job on the documentation. Check out the GitHub repository of the project for a complete data package covering all aspects of the design, including the weather forecasting app note by John Young (an NXP engineer, not the astronaut). Last week the design was named as a finalist of the 2021 Hackaday Prize. We’re excited to see where he goes with this between now and the end of October!

Do you use an air quality sensor in your home? If so, is it only for informational purposes or do you take action based on the data, such as automatically turning on a fan or escaping to the countryside? Let us know in the comments below.

Throne Of Dev: An Endgame Office Chair

They say you shouldn’t cheap out on anything that comes between you and the ground. Typically, that list includes shoes, tires, and mattresses. But it’s 2021, and it’s high time to add ‘office chair’ to that list. Take it from someone who bought a handful of hundred-dollar office chairs and finally invested in an Aeron. Your throne makes a difference.

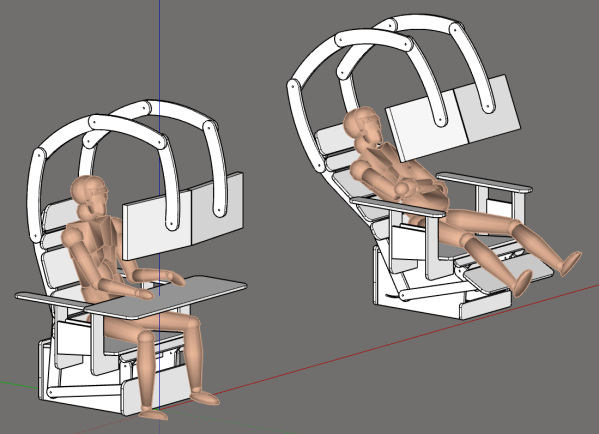
We’re not sure if there is conclusive evidence of this phenomenon, but it seems that for many people, the fastest way to get those creative juices flowing is to lean back and put your feet up. Now it’s one thing to lean back in an office chair and hold yourself there, but it’s quite another to sit in, say, a recliner that keeps the position for you. What if there was an office chair that could switch between the two? [Peter van der Walt] has been working from home for a decade now and will soon be moving to a new base of operations. The new space has a little office next to the main area, so it’s the perfect opportunity to build the dream chair — a day-to-night endgame throne for working, gaming, and everything in between.

[Peter] is working with some cyborg additions to his body and doesn’t care for the standard office chair fare. Currently, he splits his sits between a plastic chair like you’d find outside a coffee house (hey, whatever works best) and a cushy recliner. The idea is to find comfort and focus, and build something comfortable enough to accommodate the occasional afternoon siesta. It will be completely CNC-machineable from 18 mm plywood, and will probably have some upholstery eventually. Your ideas for feature creep are welcome below, or better yet, in the discussion area of the project page.

Some of us like to stand once in a while, but don’t want to go all in on a robotic desk. There are budget-friendly ways around that problem too, of course.