It used to be that designing hardware required schematics and designing software required code. Sure, a lot of people could jump back and forth, but it was clearly a different discipline. Today, a lot of substantial digital design occurs using a hardware description language (HDL) like Verilog or VHDL. These look like software, but as we’ve pointed out many times, it isn’t really the same. [Zipcpu] has a really clear blog post that explains how it is different and why.
[Zipcpu] notes something we’ve seen all too often on the web. Some neophytes will write sequential code using Verilog or VHDL as if it was a conventional programming language. Code like that may even simulate. However, the resulting hardware will — at best — be very inefficient and at worst will not even work.
Continue reading “FPGA Clocks For Software Developers (or Anyone)”

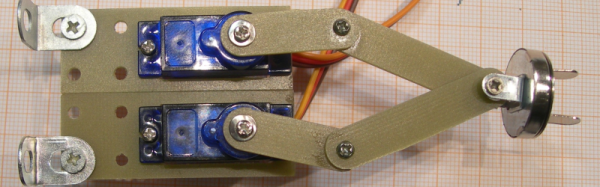
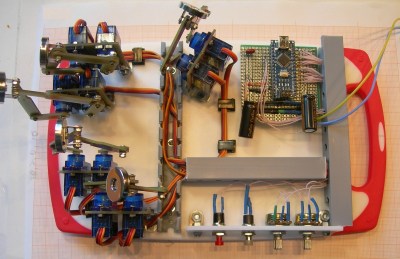 He’s using ten hobby micro servos connected to an Arduino Nano, all mounted on a kitchen chopping board, with a few other bits thrown in to round out the build. There’s one pair of servos for each finger. A five bar linkage converts the servo rotations to two-dimensional motion. The end of the linkage has a swiveling metallic disk. Patient fingers are attached to these discs via magnetic metal pads that are attached to the end of the fingers using adhesive plaster tape. Two push buttons cycle through a large number of exercise modes and two potentiometer’s help adjust the speed and smoothness (the number of points calculated for the desired motion). Two 7-segment LED display modules connected to the Arduino provides a visual interface showing program modes, speed, number of cycles and other relevant information. Replicating the project ought to be very straightforward since the device uses off-the-shelf parts which are easy to put together using the detailed build instructions, photos and code posted on [Sergei]’s project page. Check out the videos below to see the rehab helper in action.