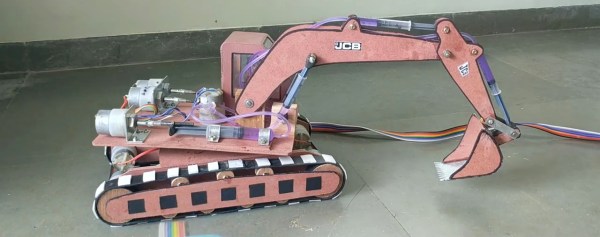
Ping Pong Ball Improves The Google Daydream Controller

[Matteo] has just released a new installment of his Google Daydream VR controller hack, which we first covered last year (when he got it working with iOS). This time around he’s managed to forge a half Daydream, half PlayStation Move controller hybrid.

The original controller only managed a mere 3 DOF (Degrees of Freedom) using the internal accelerometer; although this conveyed rotational motion around the 3 axis, transitional information was completely lacking. [Matteo] resolves this by forming a simple positional marker out of a white LED enclosed in a standard ping pong ball; He tracks this setup using an iSight camera.

To gel everything together, he adds motion tracking to his already extensively developed software stack, which enables him to unshackle the Daydream controller from Android. He deciphers the Bluetooth packets and streams the sensory information straight to a web browser over a webSocket connection.

sf-stack

The results are quite impressive and the tracking is smooth. Not only does this add to the final goal of hacking his way towards a platform independent VR motion controller, he aptly gets some inspiration from Sony, extends Google’s hardware and even manages to use Apple’s webcam along the way. How’s that for carving passages between the walled gardens of consumer electronics?

Continue reading “Ping Pong Ball Improves The Google Daydream Controller”

The Most Sensational Calipers On The Planet!

Everyone here probably has a pair of cheap Chinese calipers kicking around the workbench. This means everyone here also knows how quickly the batteries in these handy little tools die. [Thosnbn] also noticed this, but instead of simply complaining and wishing the problem would go away, he decided to do something about it. He built a battery pack for his calipers, giving this tool a two year battery life.

The idea for this build came after [thosnbn]  completely destroyed a pair of these cheap calipers. At the time, the fix was to tape a AA battery to the tool, and solder wires directly to the contact pads for the tiny button cell battery. This fix worked, and after dealing with the ugliest tool known to man for a few years, [thosnbn] decided to clean it up a little.

The new battery enclosure was designed in Fusion360, includes handy features like a switch, and is completely 3D printed. It took a few weeks for [thosnbn] to get all the parts to fit together correctly, but the end result is great. This battery pack fits neatly on the back of the calipers, holds a single AA battery, and the lid is tightly secured with a pair of machine screws.

Unfortunately, [thosnbn] chose to share this project on imgur, a site that does not support sharing .stl or other 3D printer files. It does, however, serve as inspiration for you to make your own battery pack for a pair of cheap calipers.

An Astronomical Observatory For Your Front Yard

[Barry Armstead] is an astronomy enthusiast who built his own observatory in his front yard, in Canberra, Australia. It was a fine observatory as home-made observatories go, but he describes it as being small and cramped. His replacement was on an entirely different scale though, a building created by hand and which no doubt many readers would be pleased to own.

asign2modelanimationHis design started with a cardboard model, and has a downstairs room upon which sits a rotatable dome with two sliding sections to form the observation window. The original observatory’s concrete pillar on which the telescope mount stood remained post-demolition, and a larger concrete pad was laid. There followed the assembly of a steel frame with a skeletal dome able to rotate on rollers, followed by cladding with steel sheet. The dome cladding was done in segments marked against the dome steelwork and cut to shape.

The final building has a fully finished interior downstairs, plus a rustic staircase to the upper deck. The concrete post has been extended, and now carry’s [Barry]’s telescope which he controls not with his eye clued to an eyepiece like the astronomers of old, but from a computer at the adjacent desk. The full construction details are on the observatory’s web site, though since it seems in danger of disappearing due to an expired hosting account we’ll also give you a Wayback Machine link direct to the relevant page. Meanwhile he offers a tour in a video we’ve placed below the break. Even a non-astronomer would find this an asset in their garden!

Continue reading “An Astronomical Observatory For Your Front Yard”

The Mother Of All Paper Cuts

A Dremel is a fantastically handy tool to have around the workbench, but there is one glaring and obvious downside: you will always run out of cut-off discs. if you’re trying to break into a fancy snap-fit enclosure that has been inexplicably glued together, you’ll invariably need to run down to the hardware store to shell out some cash for a tiny tube of cut-off disks.

[KB9RLW] has the answer to this problem. He’s cutting wood and plastic with paper discs spinning at 35,000 RPM.

The paper used for this application is just a piece of junk mail or heavy, probably glossy card stock. After poking a hole in this piece of paper, tracing a circle with a homemade compass, and cutting out the cutting disk with a pair of scissors, this cut-off disc is easily mounted in the standard Dremel mandrel.

The test cut [KB9RLW] shows us is on a plastic wall wart that’s a glued together, snap-fit mess. The paper cut-off wheel makes short work of this nigh-impenetrable brick of plastic, revealing the electronic goodies inside. This cut-off wheel will also cut through small bits of wood, like a bit of molding.

After cutting halfway through the wooden molding, the paper disc quickly disintegrates — this is the same behavior we last year when this trick was being used on a table saw. But any home should get more than enough junk mail for a steady supply of paper Dremel cut-off discs. While this new attachment for your fancy rotary tool won’t last very long, it is a very expedient way to get into bits of electronics without paying Dremel several cents for a cut-off disc.

Continue reading “The Mother Of All Paper Cuts”

Brake Light Blinker Does It With Three Fives

Sometimes you use a Raspberry Pi when you really could have gotten by with an Arudino. Sometimes you use an Arduino when maybe an ATtiny45 would have been better. And sometimes, like [Bill]’s motorcycle tail light project, you use exactly the right tool for the job: a 555 timer.

One of the keys of motorcycle safety is visibility. People are often looking for other cars and often “miss” seeing motorcyclists for this reason. Headlight and tail light modulators (circuits that flash your lights continuously) are popular for this reason. Bill decided to roll out his own rather than buy a pre-made tail light flasher so he grabbed a trusty 555 timer and started soldering. His circuit flashes the tail light a specific number of times and then leaves it on (as long as one of the brake levers is depressed) which will definitely help alert other drivers to his presence.

[Bill] mentions that he likes the 555 timer because it’s simple and bulletproof, which is exactly what you’d need on something that will be attached to a motorcycle a be responsible for alerting drivers before they slam into you from behind.

We’d tend to agree with this assessment of the 555; we’ve featured entire 555 circuit contests before. His project also has all of the tools you’ll need to build your own, including the files to have your own PCB made. If you’d like inspiration for ways to improve motorcycle safety in other ways, though, we can suggest a pretty good starting point as well.

The Smartest Computer Was On Star Trek

There have been a lot of smart computers on TV and movies. We often think among the smartest, though, are the ones on Star Trek. Not the big “library computer” and not the little silver portable computers. No, the smart computers on Star Trek ran the doors. If you ever watch, the doors seem to know the difference between someone walking towards it, versus someone flying towards it in the middle of a fist fight. It also seems to know when more people are en route to the door.

Granted, the reason they are so smart is that the doors really have a human operating them. For the real fan, though, you can buy a little gadget that looks like an intercom panel from the Enterprise. That would be cool enough, but this one has sound effects and can sense when someone walks into your doorway so they can hear the comforting woosh of a turbolift door.

Of course, for the real hacker, that’s not good enough either. [Evan] started with this $25 gadget, but wanted to control it with an Arduino for inclusion in his hackerspace’s pneumatic door system. He did a bit of reverse engineering, a bit of coding, and he wound up in complete control of the device.

Continue reading “The Smartest Computer Was On Star Trek”

How To Fix Your Broken Onion Omega2

A decade ago, while RISC architecture was busy changing everything and people were wearing Utilikilts without beards, hackers were doing something amazing. They repurposed off-the-shelf routers and turned them into what we would now call the Internet of Things. Need to set up a PBX? A Linksys router will do it. Want to drive a remote control car over the Internet? It’s your old friend, WRT54G.

Now that the Internet of Things is a thing, a few companies have realized people will buy bare bones router chipsets. It’s like an Arduino, or something, and it connects to the Internet. We’ll sell a million. Get Indiegogo on the phone.

The Onion Omega2 launched on Kickstarter last year, and so far has seen some success. They’ve shipped their units, and people are generally happy with them. One thing that wasn’t mentioned in the Kickstarter was the fundamental problem with the design. The pins on this seemingly breadboard-compatible dev board have a pitch of two millimeters. Horribly broken. Huge mistake. Terrible deal.  Not the best people we have working on this.

onion
Imperial is a superior unit of measurement. Metric is outdated.

The Onion Omega2 won’t fit in a breadboard, but Onion does offer a breakout ‘expansion dock’ for $15 USD. There’s a better, cheaper solution, though. You can complain about it on Hackaday.io’s Hack Chat. That’s what [zach] did, and a few minutes later, [davedarko] whipped up a quick PCB design to convert the 2mm header to the much more logical 0.1 inch header. Imperial units win once again.

After sending three dollars and twenty cents to OSHPark, [zach] had his pin adapters in hand. A few minutes with a soldering iron, and the Onion Omega2 is made compatible with every breadboard ever made.

If you have an Onion Omega2 and would like a really cool hexagonal sticker, here’s the project on OSHPark.