Soviet Axe Restoration: Replace Or Repair?

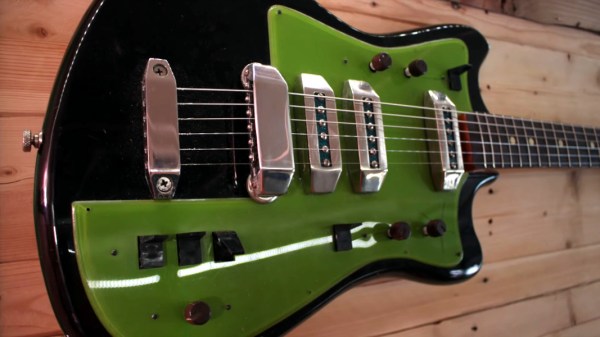
What do you do with a cool-looking misfit guitar that has non-working built-in effects and some iffy design aspects? Do you try to fix it and keep it original, or do you gut it and strut your stuff with new bits from around the shop? This is the conundrum that [Tim Sway] finds himself in with this late 70s/early 80s Formanta Solo II straight out of the USSR. (Video, embedded below.)

[Tim] likes a lot of things about it (and we do, too), especially the acid green pick guard, the sparkly pickups, and the beefy bridge that lets him set the string spacing individually, on the fly. It even has a built-in phaser and distortion, but those aren’t working and may never have worked that well at all.

The non-working effects guts.

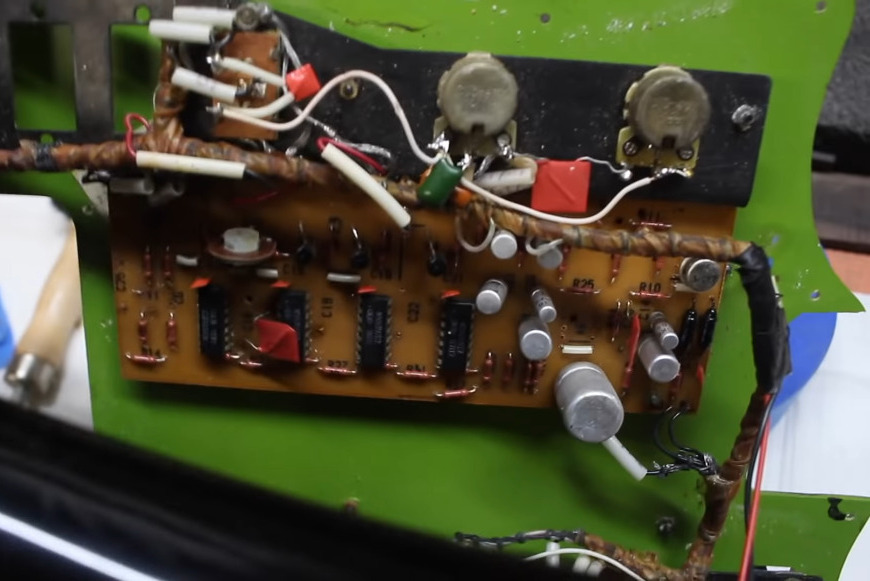
As you can see in the video below, [Tim] has already spent a few hours making it playable and a little more palatable in order to figure out what to do with it electronics-wise. He started by making the 9 V compartment big enough to actually fit a battery inside, and drilled out bigger holes for new tuners.

Interestingly, these guitars had a 5-pin DIN receptacle instead of a 1/4″ jack. [Tim] bought an adapter just in case, but once someone dug up a schematic and sent it over, he decided to rewire it with a 1/4″.

For all of its plus sides, [Tim] doesn’t like the headstock on this thing at all and found the neck to be too chunky for the modern guitarist, so he cut down the headstock, shaved down the neck a bit, and stained it dark. He also made a new nut out of what looks like rosewood. Then it was on to the more standard stuff — file down the frets and polish them, oil the fretboard, and clean up the body.

The point of this exercise is to make a usable guitar for the modern musician. As [Tim] says, this is not a particularly valuable guitar, nor is it rare, and it wasn’t built that well to begin with. One of the issues is the switches — they’re kind of light and cheesy feeling, and one of them is directly in the strum path. Will [Tim] change those out but fix the original effects, or will he make the thing completely his own? We wait with bated breath.

Want to mess around with cheap old guitars, but don’t know where to start? Our own [Sven Gregori] has your back with Axe Hacks.

Via adafruit

Hacking The Ortur Laser With Spoil Board, Z-Height, And Air Assist

Last month in my hands-on review of the Ortur Laser I hinted that I had done a few things to make it work a little better. I made three significant changes in particular: I anchored the machine to a spoil board with markings, I added a moving Z axis to adjust focus by moving the entire laser head, and I added an air assist.

Turns out, you can find designs for all of these things all over the Internet and I did, in fact, use other people’s designs. The problem is the designs often conflict with one another or don’t exactly work for your setup. So what I’ll tell you about is the combination that worked for me and what I had to do to get it all working together. The air assist is going to take a post all by itself, but some of the attempts at air assist led to some of the other changes I made, so we’ll talk about it some in this post, as well.

One of the modifications — the spoil board mount — I simply downloaded and the link for that is below. However, I modified the moving Z axis and air assist parts and you can find my very simple modifications on Thingiverse. You’ll also find links to the original designs and you’ll need them for extra parts and instructions, too.

Continue reading “Hacking The Ortur Laser With Spoil Board, Z-Height, And Air Assist”

The Devil Is In The Details For This Open Air Laser

Normally, we think of lasers as pretty complex and fairly intimidating devices: big glass tubes filled with gas, carefully aligned mirrors, cooling water to keep the whole thing from melting itself, that sort of thing. Let’s not even get started on the black magic happening inside of a solid state laser. But as [Jay Bowles] shows in his latest Plasma Channel video, building a laser from scratch isn’t actually as difficult as you might think. Though it’s certainly not easy, either.

The transversely excited atmospheric (TEA) laser in question uses high voltage passed across a a pair of parallel electrodes to excite the nitrogen in the air at standard atmospheric pressure, so there’s no need for a tube and you don’t have to pull a vacuum. The setup shakes so many UV photons out of the nitrogen that it doesn’t even need any mirrors. In fact, you should be able to get almost all the parts for a TEA laser from the hardware store. For example, the hexagonal electrodes [Jay] ends up using are actually 8 mm hex keys with the ends cut off.

Continue reading “The Devil Is In The Details For This Open Air Laser”

Getting On The Air With A 10-Minute-ish Ham Transmitter

Artificially constrained designs can be among the most challenging projects to build, and the most interesting to consider. The amateur radio world is no stranger to this, with homebrew radio designs that set some sort of line in the sand. Such designs usually end up being delightfully minimalist and deeply instructive of first principles, which is one reason we like them so much.

For a perfect example of this design philosophy, take a look at [VK3YE]’s twist on the classic “10-Minute Transmitter”. (Video, embedded below.)

The design dates back to at least the 1980s, when [G4RAW] laid down the challenge to whip up a working transmitter from junk bin parts and make a contact within 15 minutes — ten for the build and five for working the bands. [VK3YE] used the “oner” — one-transistor — design for his 10-minute transmitter, but invested some additional time into adding a low-pass filter to keep his signal clean, and a power amplifier to boost the output a bit.

Even with the elaborations, the design is very simple and easy to understand. Construction is the standard “ugly style” that hams favor for quick builds like this. There are no parts that would be terribly hard to find, and everything fits into a small metal box. The video below shows the design and build, along with some experiments with WebSDR receivers to check out range both with and without the power amplifier.

Seeing these kinds of builds really puts us in the mood for some low-power action. Could something like this pop up in “The $50 Ham” series? Quite possibly yes.

Continue reading “Getting On The Air With A 10-Minute-ish Ham Transmitter”

3D Printer Air Compressor Is A Wankel

We wonder if mechanics are as annoyed when we say “engine” as we get when someone talks about a “computer” or a “radio.” Sure, you know what all three of those words mean, but there are many different kinds of radios, computers, and engines. In [3DprintedLife’s] case, he made a compressed air engine of the Wankel style.

The Wankel — a rotary engine — is most famous for its use in some Mazda cars. If you’ve done a lot of 3D printing, you know that creating an air-tight piston on a 3D printer is no mean feat. Of course, he didn’t do it right off the bat. It took what looks like a number of iterations to get it going, and he shares some of what he learned doing this project.

Continue reading “3D Printer Air Compressor Is A Wankel”

2:3 Scale VT100 Is A Perfect Pairing For PDP-8/I Replica

When he went shopping for a vintage serial terminal to go along with his reproduction PDP-8/I computer, [Michael Gardi] came down with a bad case of sticker shock. But rather than be discouraged, he reasoned that if his “retro” computer could stand to have modern components at its heart, so could the terminal he used to talk to it. Leaning on his considerable experience in designing 3D printed replica hardware, he’s built an absolutely gorgeous scaled down DEC VT100 terminal that any classic computer aficionado would be happy to have on their desk.

Now to be clear, [Michael] hasn’t created a true serial terminal. Since the faux PDP-8/I is running on a Raspberry Pi, all he needed to do was come up with something that could connect to its HDMI and USB ports. Put simply, he’s essentially just made a 3D printed enclosure for the Pi’s monitor and keyboard. Oh, but what a gorgeous enclosure it is.

Recreating the VT100 in CAD was made more difficult by the fact that [Michael] couldn’t get his hands on the authentic hardware. But of course, that’s never stopped him before. It turns out DEC provided some very detailed dimensions for the terminal in their original documentation, and while comparing them to photographs of the actual terminal did uncover a few key differences, the overall look is spot on. Once the design was done, he reports it took two rolls of filament and more than 200 hours to print out all the parts for the enclosure.

To help sell the authentic look [Michael] tracked down a 4:3 LCD of the appropriate size, and the use of an off-the-shelf portable mechanical keyboard should make text entry a pleasure. For a little fun, he even came up with a themed arcade controller for the VT100 that can be used with RetroPie. The printed logo plate is an especially nice touch, and we’re more than willing to forgive the fact that he had to print it at a larger scale than the rest of the terminal to get all the detail in with his printer’s 0.4 mm nozzle.

On a technical level, this is perhaps the most straightforward replica we’ve ever seen from [Michael]. But even on a relatively simple project like this, his signature attention to detail and craftsmanship is on full display. It’s always a good day when he’s got a new build to show off with, and we’re eager to see what he comes up with next.

World’s First EVTOL Airport Will Land This November

We have to admit that flying cars still sound pretty cool. But if we’re ever going to get this idea off the ground, there’s a truckload of harsh realities that must be faced head-on. The most obvious and pressing issue might seem to be the lack of flying cars, but that’s not really a problem. Air taxis are already in the works from companies like Airbus, Rolls-Royce, and Cadillac, who premiered theirs at CES this year.

Where we’re going, we don’t need roads. But we do need infrastructure to support this growing category of air traffic that includes shipping drones that are already in flight. Say no more, because by November 2021, the first airport built especially for flying cars is slated to be operational in England.

Image via Hyundai

British startup Urban Air Port is building their flagship eVTOL hub smack dab in the center of Coventry, UK, a city once known as Britain’s Detroit due to the dozens of automobile makers who have called it home. They’re calling this grounded flying saucer-looking thing Air One, and they are building it in partnership with Hyundai thanks to a £1.2 million ($1.65M) grant from the British government. Hyundai are developing their own eVTOL which they are planning to release in 2028. Continue reading “World’s First EVTOL Airport Will Land This November”