Printing Soft Body Tissue

If you are like us, you tend to do your 3D printing with plastic or maybe–if you are lucky enough to have access to an expensive printer–metal. [Adam Feinberg] and his team at Carnegie Mellon print with flesh. Well, sort of. Printing biomaterials is a burgeoning research area. However, printing material that is like soft tissue has been challenging. In a recent paper, [Feinberg] and company outline a method called FRESH. FRESH uses a modified MakerBot or Printrbot Jr. printer to deposit hydrogel into a gelatin slurry support bath. The gelatin holds the shape of the object until printing is complete, at which point it can be removed with heat. If you don’t want to wade through the jargon in the actual paper, the journal Science has a good overview (and see their video below).

The gelatin is mixed with calcium chloride and gelled for 12 hours at low temperature. It was then turned into a slurry using an off-the-shelf consumer-grade blender. A centrifuge was used to remove most of the soluble gelatin. Printing inks were made with materials like collagen and fibrin. The FRESH process actually uses liquid  ink that gels in the gelatin.

The printer uses an open source syringe extruder found on the NIH 3D print exchange (they never say exactly  which one, though and we had trouble matching it from the pictures). In true hacker fashion, the printer prints its own syringe extruder using the stock one from ABS and PLA plastic. Then you simply replace the standard extruder with the newly printed one (reusing the stock stepper motor).

The paper describes printing items including a model of a 5-day-old embryonic chick heart, an artery, and a miniature human brain model. Another team of researchers in Florida have a similar system, as well.

We’ve talked about bioprinting before and even mentioned how to make your own inkjet-based bioprinter. The FRESH method looks like it is in reach of the hacker’s 3D printing workshop. We cringe to think what you will print when you can finally print body parts.


Continue reading “Printing Soft Body Tissue”

Creepy Van Parked Down The Street Is A Nomadic Sauna

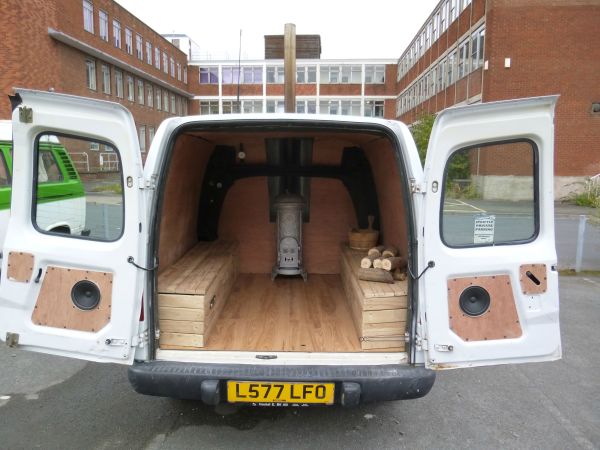
Sometimes you need a good sweat and if you’re like [JoeCMorgan] you can’t be bothered travelling to a sauna, it needs to come to you. He took care of that problem by building the SaunaVan.

Many moons ago, SaunaVan started life as a Vauxhall Combo van. At some point it was abbreviated from a Van to a trailer. You can’t tell from the picture above but this van no longer has a cab up front. Like many trailers, it eventually became a storage unit, which is how [Joe] found it. He cleaned out the old tires, tents, and detritus, and started planning out a mobile sauna. The van’s interior was already stripped, so the first order of business was to cut a hole in the front wall of the van. The hole became a steel “nose” which housed the chimney. All this allowed [Joe] to place his 1920’s Husqvarna stove as far forward as possible.

The van’s gas tank was cleaned out and became a water reservoir, complete with a pump that is safe to use with water. A shower placed outside allows for a quick cool down after a hot sauna. The biggest job was building the interior. [Joe] measured out the wheel wells and cut panels to form the interior walls of the van. Some fiberglass insulatisauna2on between the wood and the outside wall ensured the van would stay nice and toasty. [Joe] put in some pre-finished flooring and added benches to cover the wheel wells. The benches hide storage for wood, and the wiring for the van’s sound system. Speaking of which, your sweaty friends won’t be happy without some tunes so [Joe] added speakers and a radio. Check out the video after the break to see it all in action. This thing is just begging to be parked next to the Carpool DeVille.

One thing [Joe] didn’t mention was a fresh air intake, which is vital on a setup like this. We’d also add a carbon monoxide detector just to be sure combustion gasses don’t build up inside the van’s body.

The first firing of the antique stove was a complete success. The newly christened SaunaVan’s temperature got up over 90°C (194°F)! That might sound hot to some, but it’s not far outside the norm for a sauna. The low humidity helps keep things comfortable, but we wouldn’t recommend staying inside for more than a few minutes.

Continue reading “Creepy Van Parked Down The Street Is A Nomadic Sauna”

Mergers And Acquisitions: TI Looks To Snatch Up Maxim

BloombergBusiness is reporting rumors that Texas Instruments is in talks to acquire Maxim Integrated. Both companies have declined to respond to this leaked information. Earlier this year there were rumors that the two companies had been in talks in 2014 that didn’t result with an agreement.

We find it interesting that the article mentions Maxim doesn’t need to scale — yet we often find Maxim parts in short supply. If TI were to acquire the company this could change for some Maxium parts. Still, this move looks a lot like TI trying to bolster its hold on the portions of the analog chip market which both companies currently occupy.

Already this year we’ve seen Dialog acquire Atmel, Avago acquire Broadcom, and the merger agreement between Freescale and NXP. We probably missed a few, and this has us wonder who is next. Let us know what you think in the comments below.

[Thanks Kumar]

Programmable Logic: Build Yourself A CPLD Module

A Complex Programmable Logic Device (CPLD) is a great piece of hardware to have in your repertoire. As its name implies, you can program these chips to serve the logic functions you need. This might be replacing an obsolete chip, or maybe just a way to learn and try different techniques. What better way to learn than to get your hands on a CPLD and give it a try?

I created a CPLD module with the intent of being able to plug it into lots of things including solderless breadboards, but I screwed up. It seems that the plugin space available on a solderless breadboard is 1.1”, I had made the footprint 1” wide leaving no room for a row of wires on both sides. Duh.

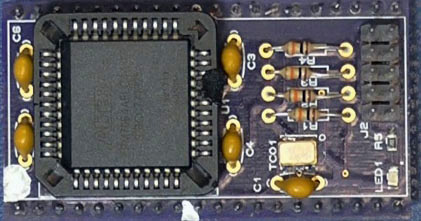
But let me back up and show more about what I’m doing , I wanted to make a programmable piece of logic that could be built as a kit one could easily solder at home, could be programmed in-circuit, and could work at 3.3 or 5 volts.

Image5bTo implement an easily solderable kit I went with an older CPLD part that also has 3.3v and 5v versions that will maintain its programming regardless of power. The logic itself is a CPLD IC from the Altera Max family with two versions that fit the board with either 32 or 64 macrocells. A macrocell is the basic logic building block and it is programmed with logic “terms” and then interconnected to other macrocells through a programmable interconnect.

Continue reading “Programmable Logic: Build Yourself A CPLD Module”

2015 Hackaday Prize Presentation Draws Near

The judges of the 2015 Hackaday Prize are hard at work right now to choose the five finalists who will receive the top prizes for the 2015 Hackaday Prize. The Judges for the Best Product have finished their work, and the announcements for all of these amazing engineering projects is just around the corner. We’ll be making the announcement in front of a live audience at the Hackaday SuperConference in just two weeks!

It has been amazing to see hundreds of people from the Hackaday Community who took time out of their lives to build something that matters and to document it as their entry. This has far-reaching benefits that will echo for years to come. No matter where your project finishes, standing up and saying “here’s something I built from an idea I had” is an amazing thing. Great work!

We are profoundly thankful for the visionary companies that sponsored the 2015 Hackaday Prize. Atmel, Freescale, Microchip, Mouser, and Texas Instruments made so much of this year’s prize possible. They recognize what it means to use Open Design; a philosophy that lets talented people pass on their skills by their engineering examples.

A big part of their support this year has gone to hosting live events. Hackaday Prize Worldwide was held in Chicago, Mumbai, Toronto, New York, Bangalore, Los Angeles, San Francisco, Shenzhen, New Delhi, Boston, Washington DC, Zurich, and Berlin. Their involvement continues with the presentation planned on Saturday November 14th at the Hackaday SuperConference.

Mouser Electronics has partnered with Grant Imahara of MythBusters fame. Grant is a talented roboticist who will have a talk and Q&A session at the SuperCon about his career. Microchip is giving away [Lucio Di Jasio’s] new book on microcontrollers to conference attendees. Atmel leapt at the opportunity to send development hardware for [Colin O’Flynn’s] workshop (he took Second Place in the 2014 Hackaday Prize), helping to lower the workshop cost for the participants.

Of course, it’s not just the events that were possible due to these sponsorship. Along with Supplyframe who presents the Hackaday Prize each year, these sponsors made the total prize package of about $500,000 a reality. It’s not everyday you can give away a trip into space as a Grand Prize and $100,000 for the Best Product. This is an amazing way to support the hardware ideals we live by and we applaud our sponsors for their meaningful involvement.

The 2015 Hackaday Prize is sponsored by:

Hacking When It Counts: Surviving The Burma Death Railway

In the early days of World War II, the Japanese army invaded Burma (now Myanmar) and forced an end to British colonial rule there. Occupying Burma required troops and massive amounts of materiel, though, and the Japanese navy was taking a beating on the 2,000 mile sea route around the Malay Peninsula. And so it was decided that a railway connecting Thailand and Burma would be constructed through dense tropical jungle over hilly terrain with hundreds of rivers, including the Kwae Noi River, made famous by the Hollywood treatment of the story in The Bridge on the River Kwai. The real story of what came to be known as the Burma Death Railway is far grislier than any movie could make it, and the ways that the prisoners who built it managed to stay alive is a fascinating case study in making do with what you’ve got and finding solutions that save lives.

Nutrition from Next-to Nothing

AWM_P00761_011-540
POWs in camp. [Source: The Thai-Burma Railway and Hellfire Pass]
Labor for the massive project was to come from the ultimate spoil of war – slaves. About 250,000 to 300,000 slaves were used to build the Burma-Siam Railway. Among them were about 60,000 Allied prisoners of war, primarily Australian, Dutch, British and American. POWs were singled out for especially brutal treatment by the Japanese and Korean guards, with punishment meted out with rifle butt and bamboo pole.

With the POWs was Doctor Henri Hekking, who had been born and raised in the former Dutch East Indies colony of Java (now Indonesia). He had spent his early years with his grandmother, a master herbalist who served as “doctor” for the native villagers. Inspired by his oma’s skill and convinced that the cure for any endemic disease can be found in the plants in the area, Dr. Hekking returned to Java as an officer in the Dutch army after completing medical school in the Netherlands.

After his capture by the Japanese, Dr. Hekking did everything he could to help his fellow POWs despite the complete lack of medical supplies, all the while suffering from the same miserable treatment. Hekking realized early on that the starvation rations the POWs endured were the main cause of disease in the camps; a cup of boiled white rice doesn’t provide much energy for men building a railway by hand in jungle heat, and provides none of the B vitamins needed by the body.

Continue reading “Hacking When It Counts: Surviving The Burma Death Railway”

We Didn’t Know The Sun Could Do Digital

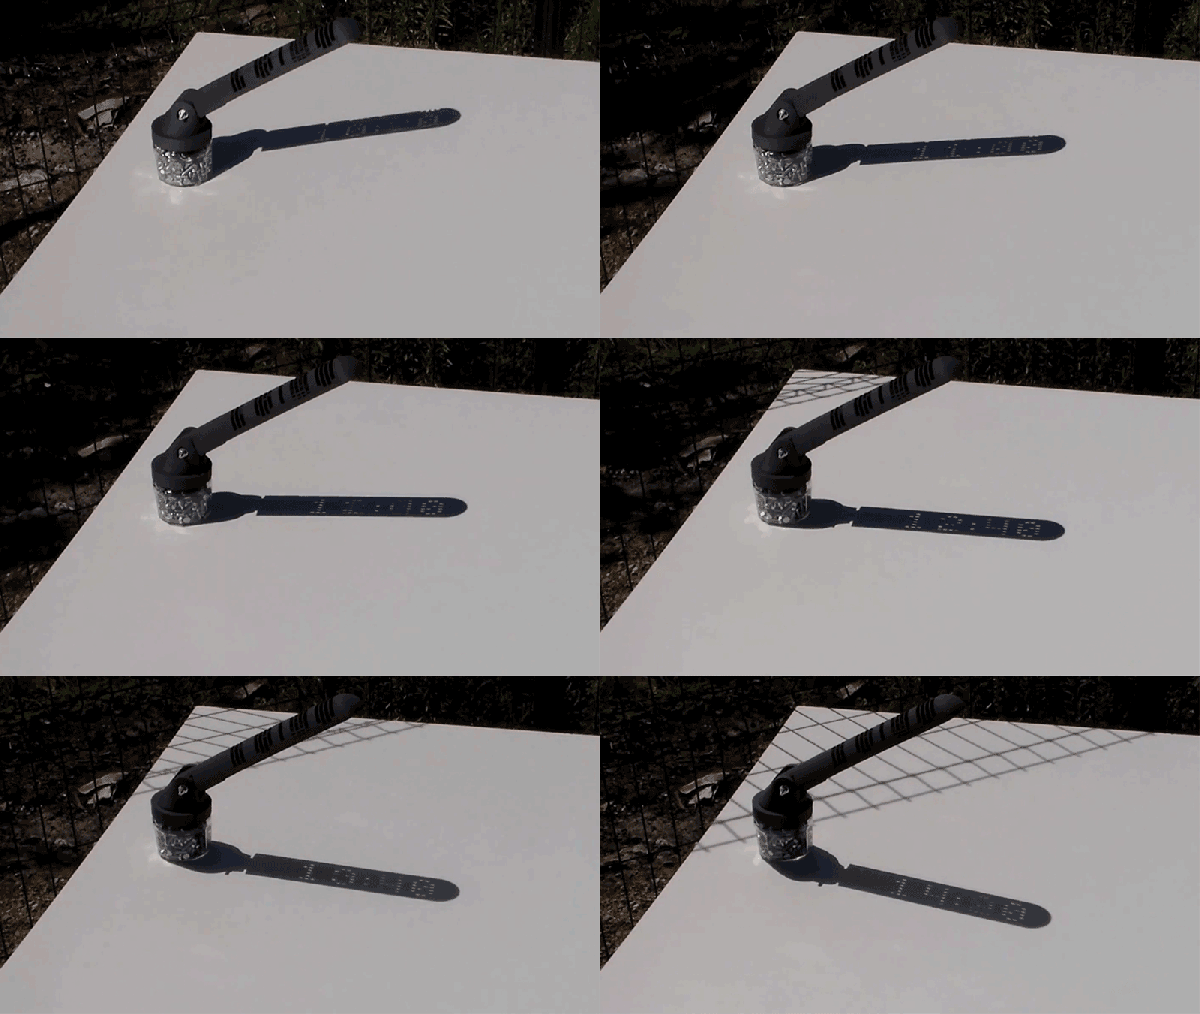
You don’t get much more old school than a sundial, and more new school than 3D printing. So, it is nice to see these two combined in this impressive project: the 3D printed digital sundial. We have seen a few sundial projects before, ranging from LED variants to 3D printed ones, but this one from [Julldozer] takes it to a new level.

In the video, he carefully explains how he designed the sundial. Rather than simply create it as a static 3D model, he used OpenSCAD to build it algorithmically, using the program to create the matrix for each of the numbers he wanted the sundial to show, then to combine these at the appropriate angle into a single, 3D printable model. He has open-sourced the project, releasing the OpenSCAD script for anyone who wants to tinker or build their own. It is an extremely impressive project, and there is more to come: this is the first in a new podcast series called Mojoptix from [Julldozer] that will cover similar projects. We will definitely be keeping an eye on this series.

Continue reading “We Didn’t Know The Sun Could Do Digital”