Custom Caliper Tracks For When You’re Going The Distance

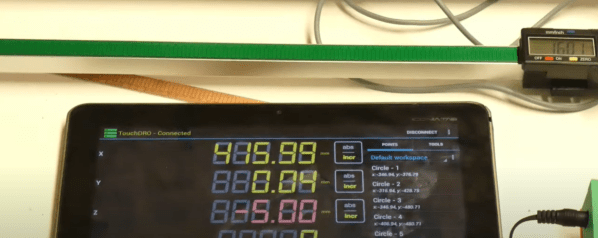
The working principle of digital calipers is mysterious enough that we’d never think to dismantle, much less improve them, right? Well, think again, as [Limi DIY] retrofits the processing element onto a custom track, extending the calipers measurement distance to a whopping 650 mm. Combined with a prior project to extract the measurement data, the result makes for a working multi-axis digital readout, a handy device for machine tools like a manual lathe or milling machine.

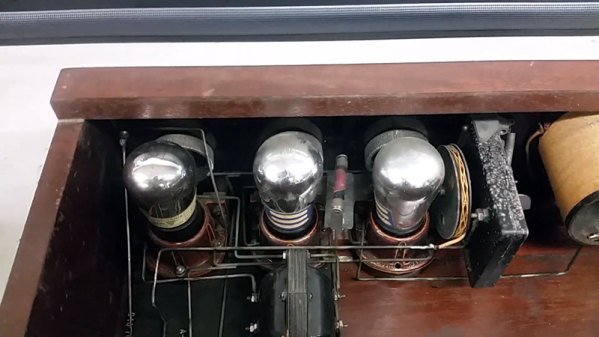
Digital calipers operate on the principle of measuring an array of variable capacitors. If we scratch our heads and look back at our physics notes, we’ll recall that the capacitance between two parallel conductive plates is linearly proportional to the surface area. By fixing one dimension of both plates and by sliding one plate over the other, we effectively change the area, giving ourselves a simple linear displacement sensor! (There are some classy error-correcting techniques too, and this [PDF] is a great place to look for more details.)

The theory takeaway is that this array of parallel plates can be embedded directly into a printed circuit board. We just need to know the dimensions. After some close measurement work, [Limi DIY] extracted the crucial measurements and fabbed a PCB with the pattern duplicated over 650 mm. After retrofitting the original processing element onto this new track, they had a working measurement device that’s far longer than the original!

If you’ve ever been tempted to disassemble your calipers but too nervous to bite off the investment, now’s your chance to follow along as [Lima DIY] demonstrates the gratuitous disassembly process for you in video format. And the fruits of their labor is also captured on a project post that includes the key dimensions if you’re looking to do the same thing.

If you’re looking for other ways to improve your calipers, why not start by giving them a major battery life boost.

Thanks to [absd] via [Jubilee Discord] for the tip!

Continue reading “Custom Caliper Tracks For When You’re Going The Distance”

A Superheterodyne Receiver With A 74xx Twist

In a world with software-defined radios and single-chip receivers, a superheterodyne shortwave radio might not exactly score high on the pizzazz scale. After all, people have been mixing, filtering, and demodulating RF signals for more than a century now, and the circuits that do the job best are pretty well characterized. But building the same receiver using none of the traditional superhet trappings? Now that’s something new.

In what [Micha] half-jokingly calls a “74xx-Defined Radio”, easily obtained discrete logic chips, along with some op-amps and a handful of simple components, take the place of the tuned LC circuits and ganged variable capacitors that grace a typical superhet receiver. [Micha] started by building an RF mixer out of a 74HC4051 analog multiplexer, which with the help of a 2N3904 phase splitter forms a switching mixer. The local oscillator relies on the voltage-controlled oscillator (VCO) in a 74HC4046 PLL, a chip that we’ve seen before in [Elliot Williams]’ excellent “Logic Noise” series. The IF filter is a simple op-amp bandpass filter; the demodulator features an op-amp too, set up as an active half-wave rectifier. No coils to wind, no capacitors to tune, no diodes with mysterious properties — and judging by the video below, it works pretty well.

It may not be the most conventional way to tune in the shortwave bands, but we always love the results of projects that are artificially constrained like this one. Hats off to [Micha] for the interesting trip down the design road less travelled.

Continue reading “A Superheterodyne Receiver With A 74xx Twist”

A One-Transistor Ham Transmitter Anyone Can Build

What attracts a lot of people to amateur radio is that it gives you the ability to make your own gear. Scratch-building hams usually start by making their own antennas, but eventually, the itch to build one’s own radio must be scratched. And building this one-transistor transmitter is just about the simplest way to dive into the world of DIY radio.

Of course, limiting yourself to eight components in total entails making some sacrifices, and [Kostas (SV3ORA)]’s transmitter is clearly a study in compromise. For starters, it’s only a transmitter, so you’ll need to make other arrangements to have a meaningful conversation. You’ll also have to learn Morse code because the minimalist build only supports continuous-wave (CW) mode, although it can be modified for amplitude modulation (AM) voice work.

The circuit is flexible enough that almost any part can be substituted and the transmitter will still work. Most of the parts are junk-bin items, although the main transformer is something you’ll have to wind by hand. As described, the transformer not only provides feedback to the transistor oscillator, but also has a winding that powers an incandescent pilot lamp, and provides taps for attaching antennas of different impedances — no external tuner needed. [SV3ORA] provides detailed transformer-winding instructions and shows the final build, which looks very professional and tidy. The video below shows the rig in action with a separate receiver providing sidetone; there’s also the option of using one of the WebSDR receivers sprinkled around the globe to verify you’re getting out.

This little transmitter looks like a ton of fun to build, and we may just try it for our $50 Ham series if we can find all the parts. Honestly, the hardest to come by might be the variable capacitor, but there are ways around that too.

Continue reading “A One-Transistor Ham Transmitter Anyone Can Build”

Manual Antenna Tuner Shows How Homebrewing Is Done

If there’s anything about amateur radio that has more witchcraft in it than the design and implementation of antennas, we don’t know what it would be. On the face of it, hanging out a chunk of wire doesn’t seem like it should be complicated, but when you dive into the details, building effective antennas and matching them to the job at hand can be pretty complex.

That doesn’t mean antenna topics have to remain a total mystery, of course, especially once someone takes the time to explain things properly. [Charlie Morris (ZL2CTM)] recently did this with a simple antenna tuner, a device used to match impedances between a transmitter and an antenna. As he explains in the first video below, his tuner design is really just a Wheatstone bridge where the antenna forms half of one leg. A toroidal transformer with multiple taps and a variable capacitor forms an LC circuit that matches the high impedance antenna, in this case a multi-band end-fed halfwave, with the nominal 50-ohm load expected by the transceiver. A small meter and a diode detector indicate when the bridge is balanced, which means the transceiver is seeing the proper load.

The second video below shows the final implementation of the tuner; as a fan of QRP, or low-power operation, [Charlie] favors simple, lightweight homebrew gear that can be easily taken into the field, and this certainly fits the bill. A final video shows the tuner in use in the field, with a NanoVNA proving what it can do. As usual, [Charlie] protests that he not an expert and that he’s just documenting what he did, but he always does such a good job of presenting the calculations involved in component selection that any ham should be able to replicate his builds.

Continue reading “Manual Antenna Tuner Shows How Homebrewing Is Done”

Circuit Sculpture Vibration Sensor

Here’s your useful and beautiful circuit for the day — [New Pew]’s vibration sensor takes manual control of the flip-flop inside a 555 timer and lights an LED in response. Use it to detect those vibrations you expect, like laundry machines, or those you only suspect, like the kind that might be coming from your engine. This gadget isn’t super-precise, but it will probably get the job done.

The vibration-detecting bit is a tiny ball bearing soldered to the spring from an old pen, which is tied between the trigger and ground pins of the 555. When the chip is powered with a 9 V battery, nearby vibrations will induce wiggle in the spring, causing the ball bearing to contact the brass rod and completing the circuit. When this happens, the internal flip flop’s output goes high, which turns on the LED. Then the flip flop must be reset with a momentary button. Check out the build video after the break.

Want to pick up Earthly vibrations? You can detect earthquakes with a homemade variable capacitor, a 555, and a Raspberry Pi.

Continue reading “Circuit Sculpture Vibration Sensor”

Credit Card Chip Used To Make Crystal Radio

Perhaps the simplest radio one can build is the crystal radio. Using a diode as a detector, the design generally uses less than 10 components and no battery, getting its power to run from the radio signal itself. [Billy Cheung] decided to build a crystal radio using a rather unconventional detector – the smart chip in a common credit card.

This is possible because the smart chip on many credit cards contains a diode. It’s then a simple matter of hooking up the right pads on the credit card to the rest of a crystal radio circuit, and you’re all set. Of course, [Billy] goes the whole hog, building the entire radio on a single credit card. Other cards are cut up to create bobbins for winding coils to form a variable inductor, used to tune the radio. Doing this allows for a much cleaner, thinner design, rather than using a variable capacitor which is comparatively hard to find. Turning the dial allows stations to be tuned in, and with a high impedance earbud hooked up, you’re listening to AM radio. Oh, and don’t forget an antenna!

[Billy] breaks down the details for anyone wishing to replicate the feat, going so far as to wind the coils in real time in his Youtube video. Cutting templates and other details are available on Github. While it’s not going to be the most replicated hack, as it requires the destruction of a credit card to achieve, we love the ingenuity. And, if society does collapse, we’ll all have a great source of diodes when the ATMs have all become useless. Video after the break.

[Thanks to Zane Atkins for the tip!]

Continue reading “Credit Card Chip Used To Make Crystal Radio”

Odd Crosley Radios From The 1920s

You may sometimes see the Crosley name today on cheap record players, but from what we can tell that company isn’t connected with the Crosley Radio company that was a powerhouse in the field from 1921 to 1956. [Uniservo] looks at two of the very early entries from Crosley: the model VIII and the XJ. You can see the video of both radios, below.

The company started by making car parts but grew rapidly and entered the radio business very successfully in 1921. We can only imagine what a non-technical person thought of these radios with all the knobs and switches, for some it must have been very intimidating.

Continue reading “Odd Crosley Radios From The 1920s”