Traditionally, capacitors are like really bad rechargeable batteries. Supercapacitors changed that, making it practical to use a fast-charging capacitor in place of rechargeable batteries. However, supercapacitors work in a different way than conventional (dielectric) capacitors. They use either an electrostatic scheme to achieve very close separation of charge (as little as 0.3 nanometers) or electrochemical pseudocapacitance (or sometime a combination of those methods).
In a conventional capacitor the two electrodes are as close together as practical and as large as practical because the capacitance goes up with surface area and down with distance between the plates. Unfortunately, for high-performance energy storage, capacitors (of the conventional kind) have a problem: you can get high capacitance or high breakdown voltage, but not both. That’s intuitive since getting the plates closer makes for higher capacitance but also makes the dielectric more likely to break down as the electric field inside the capacitor becomes higher with both voltage and closer plate spacing (the electric field, E, is equal to the voltage divided by the plate spacing).
[Guowen Meng] and others from several Chinese and US universities recently published a paper in the journal Science Advances that offers a way around this problem. By using a 3D carbon nanotube electrode, they can improve a dielectric capacitor to perform nearly as well as a supercapacitor (they are claiming 2Wh/kg energy density in their device).
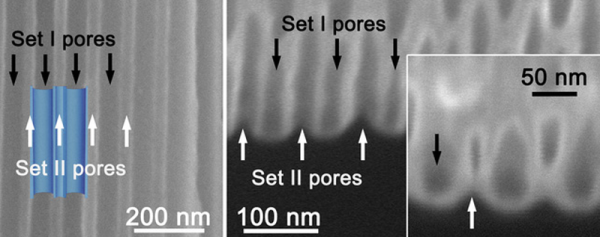
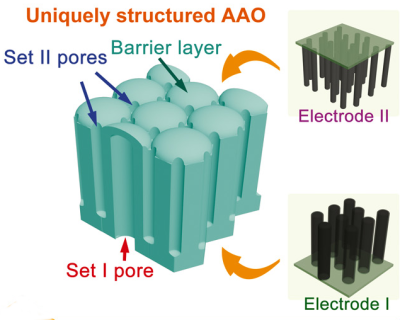 The capacitor forms in a nanoporous membrane of anodic aluminum oxide. The pores do not go all the way through, but stop short, forming a barrier layer at the bottom of each pore. Some of the pores go through the material in one direction, and the rest go through in the other direction. The researchers deposited nanotubes in the pores and these tubes form the plates of the capacitor (see picture, right). The result is a capacitor with a high-capacity (due to the large surface area) but with an enhanced breakdown voltage thanks to the uniform pore walls.
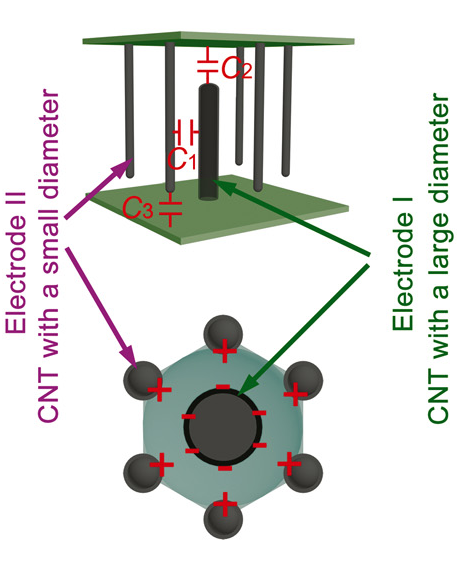
 To improve performance, the pores in the aluminum oxide are formed so that one large pore pointing in one direction is surrounded by six smaller pores going in the other direction (see picture to left). In this configuration, the capacitance in a 1 micron thick membrane could be as high as 9.8 microfarads per square centimeter.
For comparison, most high-value conventional capacitors are electrolytic and use two different plates: a plate of metallic foil and a semi-liquid electrolyte. You can even make one of these at home, if you are so inclined (see video below).
We’ve talked about supercapacitors before (even homebrew ones), and this technology could make high capacitance devices even better. We’ve also talked about graphene supercaps you can build yourself with a DVD burner.
It is amazing to think how a new technology like carbon nanotubes can make something as old and simple as a capacitor better. You have to wonder what other improvements will come as we understand these new materials even better.
Continue reading “Better Capacitors Through Nanotechnology” →


 your son has a Minecraft addiction. [Jim], however, is no stranger to the hacker community and began working on a solution. He broke out the #2 Philips screwdriver, fired up the soldering iron and


