Stupid Security In A Security System

alarm

[Yaehob]’s parents have a security system in their house, and when they wanted to make a few changes to their alarm rules – not arming the bathroom at night – an installer would come out, plug a box into the main panel, press a few buttons, and charge 150 €. Horrified at the aspect of spending that much money to flip a few bits, [yaehob] set out to get around the homeowner lockout on the alarm system, and found security where he wasn’t expecting.

Opening the main panel for the alarm system, [yaehob] was greeted with a screeching noise. This was the obvious in retrospect tamper-evident seal on the alarm box, easily silenced by entering a code on the keypad. The alarm, however, would not arm anymore, making the task of getting ‘installer-level’ access on the alarm system a top priority.

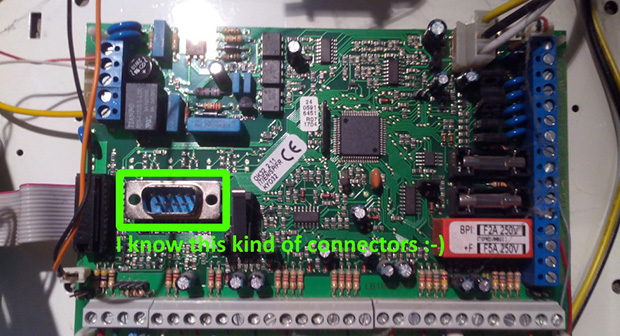
After finding a DE-9 serial port on the main board, [yaehob] went to the manufacturer’s website thinking he could download some software. The website does have the software available, but only for authorized distributors, installers, and resellers. You can register as one, though, and no, there is no verification the person filling out a web form is actually a distributor, installer, or reseller.dist

Looking at the installer and accompanying documentation, [yaehob] could see everything, but could not modify anything. To do that would require the installer password, which, according to the documentation was between four and six characters. The system also responded quickly, so brute force was obviously the answer here.

After writing up a quick script to go through all the possible passwords, [yaehob] started plugging numbers into the controller board. Coming back a bit later, he noticed something familiar about what was returned when the system finally let him in. A quick peek at where his brute force app confirmed his suspicions; the installer’s code was his postal code.

From the installer’s point of view, this somewhat makes sense. Any tech driving out to punch a few numbers into a computer and charge $200 will always know the postal code of where he’s driving to. From a security standpoint, holy crap this is bad.

Now that [yaehob]’s parents are out from under the thumb of the alarm installer, he’s also tacked on a little bit of security of his own; the installer’s code won’t work anymore. It’s now changed to the house number.

Droning On: Maiden Flights

do-55

When we last left off, the Hackaday Drone Testbed was just a box of parts on workbench. Things have changed quite a bit since then! Let’s get straight to the build.

With the arms built and the speed controls soldered up, it was simply a matter of bolting the frame itself together. The HobbyKing frame is designed to fold, with nylon washers sliding on the fiberglass sheets. I don’t really need the folding feature, so I locked down the nylock nuts and they’ve stayed that way ever since. With the arms mounted, it was finally starting to look like a quadcopter.

drone1

Using the correct screws, the motors easily screwed into the frames. I did have to do a bit of filing on each motor plate to get the motor’s screw pattern to fit. The speed controls didn’t have a specific mount, so I attached them to the sides of the arms with double-sided tape and used some zip ties to ensure nothing moved. In hindsight I should have mounted them on the top of the arms, as I’m planning to put LED light strips on the outside of edges of the quad. The LEDs will help with orientation and ensure a few UFO sightings during night flights.

Power distribution is a major issue with multicopters. Somehow you have to get the main battery power out to four speed controls, a flight controller, a voltage regulator, and any accessories. There are PCBs for this, which have worked for me in the past. For the Hackaday Testbed, I decided to go with a wiring harness. The harness really turned out to be more trouble than it was worth. I had to strip down the wires at the solder joint to add connections for the voltage regulator. The entire harness was a bit longer than necessary. There is plenty of room for the excess wire between the main body plates of the quad, but all that copper is excess weight the ‘bench’ doesn’t need to be carrying. The setup does work though. If I need to shed a bit of weight, I’ll switch over to a PCB.

Click past the break to read the rest of the story.

Continue reading “Droning On: Maiden Flights”

800IPM Linear Slide Control

800 Inches Per Minute At 0.00025″ Resolution

The folks over at PONTECH have just released a pretty impressive opensource PIC32 library for controlling a linear slide at speeds of 800 inches per minute!

PONTECH makes the Quick240 (Quick Universal Industrial Control Kard) which is based on the open source chipKIT platform. It was designed for industrial automation systems, where typically a ladder logic PLC might be used. The benefits to using a system like this is that because it is open, you are no longer stuck with proprietary hardware, and it is much more flexible to allow you to “do your own thing”. Did we mention it is also Arduino compatible?

Using this system they’ve successfully controlled two 8″ Velox slides at a whopping 800 inches per minute with a resolution of 0.00025″ — just take a look at the following video to appreciate how freaking fast that is.

Continue reading “800 Inches Per Minute At 0.00025″ Resolution”

Extrinsic Motivation: Integrated Room Sunrise Simulator

4544731407291141702

A Hackaday Prize entry that didn’t make the semifinal cut but deserves its own featured post is this wireless alarm clock that simulates a sunrise in the morning. It was created by [Ceady] and connects to an in-wall dimmer that slowly but surely increases the light over 10 minutes to help gently wake a sleeping person up . The Wireless Interface controls the speed of the illumination mechanism and has the ability to turn the lights off when the snooze button is pressed. Is is a neat little hack that brings together a typical alarm system and in-house lighting in a nice internet-of-things type of way. We foresee items like this being used in everyday household bedrooms in the near future.

Circuit schematics have been uploaded to the Hackaday.io page, along with detailed project logs and a list of the component’s parts. A video of the alarm clock being tested out comes up after the break:


SpaceWrencherThis project is an official entry to The Hackaday Prize that sadly didn’t make the quarterfinal selection. It’s still a great project, and worthy of a Hackaday post on its own.

Continue reading “Extrinsic Motivation: Integrated Room Sunrise Simulator”

Reverse Engineering A Huge LED Display

muchosLEDs
In a fit of awesome salvaging, [Piet] picked up a huge, 16 character, 2 line display. It’s monstrous, designed for outdoor installations; road signs, train stations, and the like. It also draws 23 Watts when nothing is being displayedmaking this the perfect piece of salvaged equipment to reverse engineer.

The display was originally connected to a computer running proprietary software. The protocol between the display and computer is also proprietary, giving [Piet] the choice of either reverse engineering the protocol, or reverse engineering the hardware and building a new driver board. For anyone with a soldering iron, the second option is the simplest.

Disassembling the display, [Piet] found each character in the display was its own board with a 7×14 array of pixels, each with four LEDs. The rows and columns of each character are addressed with a shift register, and with an Arduino, [Peit] got a single character working.

The Arduino would struggle to display all the characters in the display, so a Raspi was pulled out, a driver and frame generator written, and the whole thing connected to Twitter It’s a beautifully display that draws 200 Watts when its scanning the pixels, and a wonderful reuse of disused hardware. Video below.

Continue reading “Reverse Engineering A Huge LED Display”

3D Printed Prosthetic Hand

3D Printing A Beautiful Prosthetic Hand For A Stranger

Here’s a story that made us feel all warm and tingly on the inside. [Evan Kuester] is currently studying his Masters in Architecture with a specialty in digital fabrication. His program has access to some nice 3D printers, and he was itching for a good project to use them for. Why not a 3D printed prosthetic hand?

He got the idea after noticing a fellow student on campus who was missing her left hand, and did not have any kind of prosthetic. Eventually he worked up the nerve to introduce himself to her and explain his crazy idea. She thought it was brilliant.

Using Rhino, [Evan] began modeling the prosthetic hand using a plugin called Grasshopper. He wanted the hand to be functional as well as aesthetically pleasing, so he spent quite a while working with [Ivania] to make it just right. His first prototype, the Ivania 1.0 wasn’t quite what he imagined, so he redesigned it to what you see above. It’s a beautiful mixture of engineering and art, but unfortunately the fingers don’t move — perhaps an improvement for version 3.0? Regardless of functionality, [Ivania] loves it.

Oh, and [Evan] and [Ivania] are close friends now — in case you were wondering.

Homemade Nerf Blasters With 3D Printed Parts

esltcollagesuperawesome

This spectacular bullpup nerf gun was developed by the guys over at Mostly Harmless Arms. It is complete with 3D printed parts in a variety of colors. The Extension Spring/Latex Tubing (ESLT) Blasters were based off of [Kane]’s snapoid trigger design with 1/4″ aluminum for the plunger rods which worked out really well. [Prince Edward] adapted [Kane]’s work and modified it with 3D printing in mind. The original post from 2012 gave an in-depth look into where the idea started.

The documentation for all the printed part files and high quality photos can be found on Nerfhaven. It is really nice to see such a clean design that can be fashioned together on a relatively small budget. This makes these playful nerf blasters easy to duplicate, allowing for a full out office war. Granted, access to a 3D printer is needed, but additive manufacturing devices are getting more and more common these days. Now it’s just a matter of seeing how well they work, which can be deduced from the videos after the break:

Continue reading “Homemade Nerf Blasters With 3D Printed Parts”