A few months ago, we heard of a Kickstarter with an amazing goal: give everyone with $300 burning a hole in their pocket their very own satellite orbiting Earth. Time passes, the mothership has been launched, and in just a few short hours, over a hundred of these personal femtosatellites will be released into low Earth orbit.
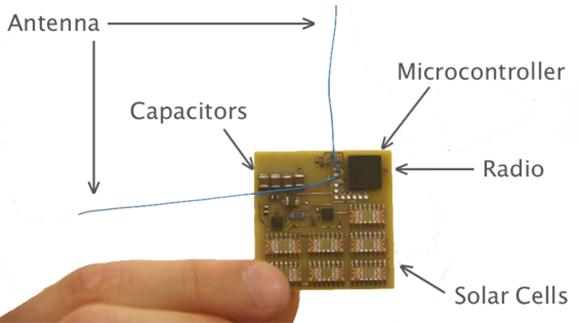
The Kicksat consists of a 3U cubesat that was recently launched aboard the SpaceX CRS-3 mission to the International Space Station. Inside this cubesat are over one hundred satellites called Sprites, loaded up with solar cells, magnetometers, a microcontroller and a radio to communicate with ground stations below. The current mission is a proof of concept, but if everything goes as planned, similar satellites can be deployed into the path of incoming asteroids, or whenever a mission calls for a swarm of small smart devices covering a huge area.
Already the Kicksat mothership has been tracked by a few enterprising amateur radio enthusiasts but the deployment of the Sprites isn’t scheduled until today at 4:00 PM EDT (20:00 GMT). After that, the Sprites will be on their own, spewing out data and the initials of kickstarter backers to most of the population of Earth.
For anyone worrying about these Sprites causing an ablation cascade or a Kessler syndrome, don’t. Orbital decay is a function of surface area and mass, and these extremely lightweight thin rectangles will burn up in the atmosphere in a few week’s time. The lack of radiation hardening on the Sprites won’t be a problem, either. This shouldn’t be a surprise, as they’re orbiting well within our wonderful, protective magnetosphere, and there are digital cameras, tablets, and other much more radiation sensitive electronics that have been working perfectly on the ISS for years now.
You can check out the current location of the orbiting Kicksat mothership on the project website, read the updates on the project blog, or check out our coverage of the Kicksat program from last year’s world maker faire in New York. Relevant videos below.
Oh, and if you have a USB TV tuner, a good antenna, LNA, and some experience with SDR, here’s what you need to listen in.
Continue reading “Listening To A Swarm Of Satellites In Orbit” →