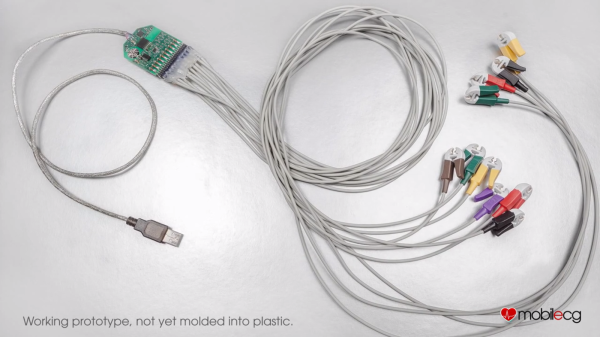
A Much More DYI Air Gap Flash Unit

In reaction to the other air gap flash unit we featured a few days ago, [Eirik] sent us a tip about another one he recently made. In his setup, the duration of the flash peak intensity is around 300ns (1/3,333,333 of a second). As a reminder, an air flash unit consists of a circuit charging a high voltage capacitor, a circuit triggering a discharge on demand, a high voltage capacitor and the air flash tube itself. The flash tube contains two wires which are separated just enough to not spark over at max potential. Isolated from the other two, a third wire is placed in the tube. This wire is connected to a trigger/pulse transformer, which will ionize the gap between the two capacitor leads. This causes the gap to breakdown and a spark to form, thereby creating a flash of light.

[Eirik] constructed his flash tube using an olive jar and a glass test tube. As you can see from the (very nice) picture above, the spark travels along the glass test tube, making the quenching much faster than in an open air spark. [Eirik] built his own high voltage capacitor, using seven rolled capacitors of roughly 2nF each made with duct-tape, tin foil and overhead transparencies. For ‘safety’ they are stored in a PP-pipe. A look at the schematics and overall circuit shown on the website reveals how skilled [Eirik] is, making us think that this is more a nice creation than a hack.

Disclaimer: As with the previous airgap flash, high voltages are used here, so don’t do this at home.

Hackerspacing In Europe: WhiteSpace In Gent

IMG_0751 (Custom)

Welcome to the White Space, or as it is more fondly known, 0x20.

We’re glad we made it out to this one — it wasn’t even planned, but after visiting HSBXL, one of the members got us in touch and so we took a chance and got on a train to Gent, Belgium — just in case someone could show us around. We were in luck, and two members showed up to give us the grand tour!

Continue reading “Hackerspacing In Europe: WhiteSpace In Gent”

Fail Of The Week: Flaming Brushless Motor Controller

Yep, smoke and flames are usually a sign that your electronics aren’t functioning as expected. This is actually the second failure encountered while learning about brushless motor controllers.

[Michael Kohn] purchase the motor while working on a different project and it went unused for quite some time. When he came across it again he decided he should learn the not-so-dark art of BLDC control.

The first hurdle was to figure out how to drive the three-wire motor when he had been expecting only two. The answer required him to come up with switching mechanism that allows three states for each wire: positive, negative, and not connected. His solution was to use MOSFETs. It’s a good idea, but unfortunately during the first iteration they were under-spec’d and he scared the crap out of himself when one of them blew up during testing (clip #1 below). After sourcing a more robust set of MOSFETs [Micheal] went back to testing which is when this little fire broke out. The 22 gauge wires connecting the Lithium battery to the driver just couldn’t cut it. See for yourself in the second clip.

It’s been awhile since we’ve said it: Please remember the Fail of the Week is not about ridiculing the hacker who was gracious enough to document his or her failure. It’s about learning from the mistake and discussing alternatives that can help others in the future. For instance, in this case some advice in determining MOSFET specs and wire gauge for any type of motor would be quite helpful. Have at it in the comments.

Continue reading “Fail Of The Week: Flaming Brushless Motor Controller”

Trinket Contest Update #1

hackaday-trinket-contest-update-1

Entries for the Trinket contest are starting to roll in. The challenge was to slap the Hackaday logo onto something, with 20 of Trinket dev boards which Adafruit put up for grabs. Here’s five of the early entries, which we’ll describe in more detail after the jump. Get your entry in by Friday, November 1st for a chance at a prize.

Continue reading “Trinket Contest Update #1”

Building A Ball-Balancing Robot

robotBallBalance

If you want a different kind of feedback systems challenge, ditch the Segway-style robots and build one that can balance on a ball. UFactory is a startup in Shenzhen, and this impressive little guy is a way of showing their skills applied to the classic inverted pendulum. At nearly 18 inches tall and weighing just over six pounds, the robot boasts a number of features beyond an accelerometer and gyroscope: it has both a WiFi module and a camera, and can be controlled via a homemade remote control or a Kinect.

The build uses plastic omni-directional wheels attached to 3 brushed dc motors, which attach to the base of the robot with custom-made aluminum brackets. The UFactory gang constructed the robot’s body out of three acrylic discs, which hold the electronics directly above the wheels. The brain seems to be an STM32 microcontroller that connects up to the motors and to the sensors.

You won’t find the code on their Instructable yet, but according to the comments they have plans to make the entire project open source. If you’re desperate for more details, the UFactory team seems willing to provide source code and other information via email. Make sure you see the video after the break, particularly the end where they demonstrate interference and carrying loads. This isn’t the first ball pendulum we’ve seen; take a trip down memory lane with the BallP ball balancing robot from 2010.

Continue reading “Building A Ball-Balancing Robot”

Hacking A Streetlight With Lasers

$20, some spare parts and a bit of mischief was a small price for [Chris] to pay for a reprieve from light pollution with this remote control laser hack. The streetlight in front of his house has a sensor that faces westward, and flips the lamp on once the sun has disappeared over the horizon. As it turns out, [Chris’s] third floor window is due west of this particular lamp, meaning he takes the brunt of its illumination but also conveniently places him in a prime location for tricking the sensor.

According to [Chris], the lamp’s sensor requires two minutes of input before it will switch off and stay off for around 30 seconds before cycling on again. The lamp does not zap straight to full brightness, though; it takes at least a minute to ramp up. [Chris] recalled a hack from a few years ago that essentially used LED throwies tacked onto the sensors with putty to shut off lamps for a guerrilla drive-in movie, but the sensors on those lamps were at the base and easily accessed. [Chris] needed to reach a sensor across the block and nearly three stories tall, so he dug around his hackerspace, found a 5V 20mA laser diode, and got to work building a solution.

[Chris] 3D printed a holder for the laser and affixed it via a mounting bracket to the wall near his third floor window, pointing it directly at the street lamp’s sensor. He plugged the laser’s power supply into an inexpensive remote control outlet, which allowed him to darken the street lamp at a touch of a button. This is certainly a clever and impressive hack, but—as always—use at your own risk. Check out a quick demo video after the break.

Continue reading “Hacking A Streetlight With Lasers”

Backseat USB Charger

backseatCharger

Whether you’re relegated to the backseat of your ride or just strapped for access to power, you may benefit from adding your own backseat USB charger. While this is a fairly straightforward hack, we’re surprised at how clean it turned out and at the convenience it provides.

[wongman2001] started by grabbing a socket wrench and unbolting his seat from the rails in the floor. He then disconnected the electrical plugs for the chair’s heating and power seat adjustment. With the chair disconnected and removed from the car, [wongman2001] further dissected its components, removing its back panel and test fitting a female cigarette adapter. Though this seat had plenty of room near the headrest, you may need to carve out some foam for a snug fit in your vehicle. To source the needed 12V, [wongman2001] tapped into the wiring for the seat’s motor, then soldered and insulated the connections to the cigarette lighter jack.

Check out some other clean-looking car hacks like the hidden MP3/USB Aux hack or the Nexus 7 double-DIN dashboard hack.