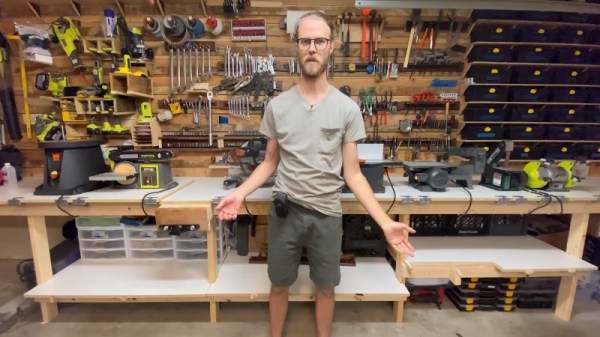
In a recent video, [SomeSkillStudio] created a tidy tool storage system for their slim garage workbench. We have seen the “five knuckle” 270 degree hinges used here before and knew they’d enable some cool hacks. Here you’ll see how he puts this unique type of hardware to work building a densely packed work surface. For anyone who’s set up shop in a garage that’s somehow also supposed to still regularly host vehicles, you’ll know how important it is to have a place to put everything away and make it easy to do so.
The video has several great tips on making sure everything fits together, something key for anyone reproducing this with their own tool collection. If you have even less space, we have some great past workshop builds from portable, to tiny, to elaborate. Even if you’ve already established a place to work, we have tips on organizing your shop, giving each tool a home in a shadow board or across an infinite grid. Clearly, making a work space is one of our favorite kinds of projects.
Plenty of potential, but a cozy hacking space it is not
To us hackers and makers, the tools of our trade are often as important and interesting as the details of the hacks themselves, but what about the most important tool of all — the very space you use to make your magic happen? That may be your bedroom, a nearby hackerspace, and if you have the resources, you may even own a place of your own, and get to build your perfect workspace.
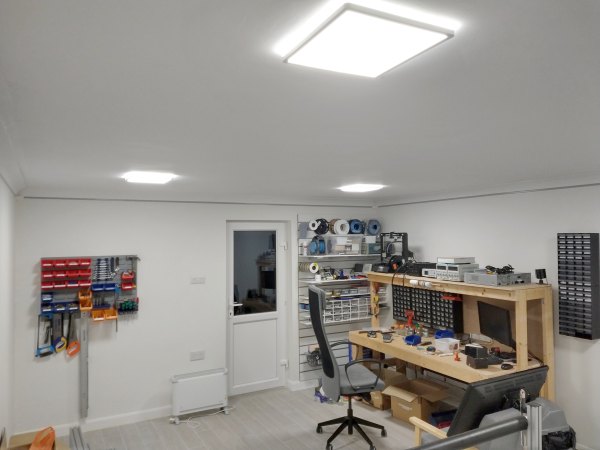
The latter situation is what [MichD] and partner [Brittany] found themselves in, having moved into their first place. Many couples focus on getting a hot tub in the garden or sorting the nursery, but these two are proper electronics nerds, so they converted a free-standing double wide garage into the nerdhub, learning as they went along, and documenting it in excruciating detail for your viewing pleasure.
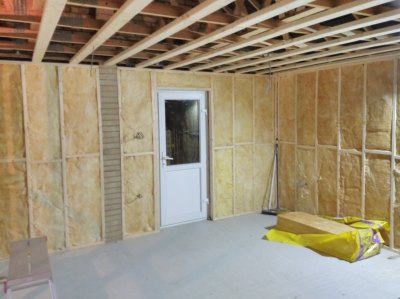
Door fitted, framed up, and insulation in place. All ready for plasterboarding.
The building structurally is a single-skinned brick-built box, with a raw concrete floor. Pretty typical stuff for the UK (we’ve seen much worse), but not ideal for spending an extended amount of time in due to our damp, cold climate, at least in winter.
The first order of business was partitioning the front section for bike storage, and screeding the floor. Once the floor was solid, the walls and ceiling joists could be framed up, ready for fitting insulation material and covering with plasterboard.
Electrics were next in order, with the wires clipped to the brickwork, well away from where the plasterboard would be, therefore making it less likely to accidentally drill into a live cable when adding external fixtures.
Since the front part of the room was to be partitioned off, another access door was needed. This involved cutting out the bricks to fit a concrete lintel. With that installed, and the bricks above supported, the area below was cut out to the required shape. A somewhat nerve-wracking experience, if you ask us!
As any self-respecting hacker will tell you — no room build is complete without a decent amount of RGB bling, so the whole room was decked out with APA102 addressable LED strips. Control of these was courtesy of WLED running on an ESP32 module, with LedFX used on a nearby PC to perform music visualisation, just because.
[Jay Carlson] has shared some fantastic guidance on how to optimize one’s home workspace, and you just might want to emulate some of his layout, especially if you routinely juggle multiple projects. He makes the important point that different people have different needs, so one size does not fit all. Optimizing one’s workspace must first take into account what kind(s) of work one does, and many of his tips and tricks are pretty broadly applicable.
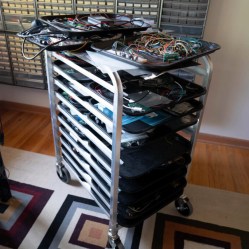
Looking online for these? A common industry term is “bun rack”. This one is “half-height” in size.
[Jay] works on embedded systems, and often switches between many different jobs and projects. Get your notepads ready, because there are plenty of great takeaways.
For example, to get a good top-down camera view of what’s on the workbench, he uses a camera mounted on an articulated arm (the kind that usually has a lamp attached to the end.) This makes the camera easy to deploy and easy to stow, and he can effortlessly save footage or share video with colleagues online.
Another great tip is using what most of us would call cafeteria trays and a matching rack. With each tray devoted to a different project or version of hardware, it makes switching between jobs as simple as sliding in one tray and pulling out another. It’s also a highly space-efficient way to store a lot of in-progress hardware. [Jay] gives a detailed walkthrough of his workspace and explains every decision, it’s well worth a read.
If you’re like us, you probably don’t finish a typical hardware project in one sitting. This doesn’t have to be a problem if you’re fortunate enough to have a dedicated workbench for your hacking activities; you simply leave your current project there, ready to continue when you have time again. But this is not always a workable option if you, or a housemate, needs to use the same desk for other tasks as well.
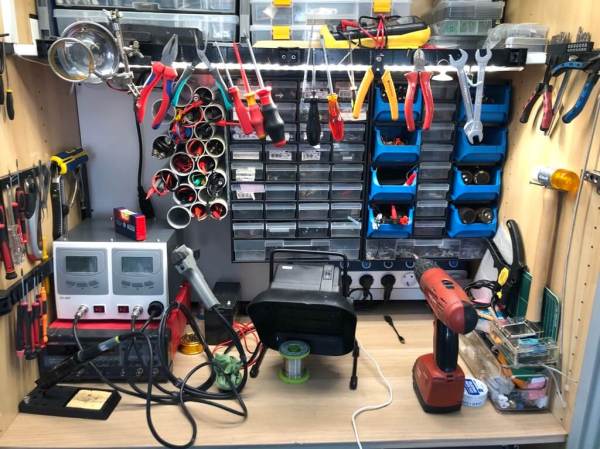
[!BATTA!] over at IKEAhackers ran into this problem, and solved it by building a complete electronics workstation inside a wardrobe. The base of this project is a storage unit called PAX, which is designed to store clothes and shoes but which also works just fine with project boxes. [!BATTA!] installed a variety of shelves and drawers to organize their collection of boxes and tools.
Not content with simple storage, [!BATTA!] decided to add a workbench, using a sturdy sliding tray that carries a working surface and a reinforced back panel to hold parts bins. Metal braces were added to prevent wobbliness, and the whole structure was bolted to a wall to prevent it from tipping over. When the workbench is not in use, the tray simply slides inside so the doors can be closed for a nice, clean look.
We really like the many clever storage solutions spread around the work area, such as a magnetic rail to hold hand tools and a “honeycomb” of PVC tubes for storing cables. Compact LED strips provide suitable lighting while a power strip with both mains and USB sockets brings juice to the tools and projects.
Modifying pieces of IKEA furniture is nothing new; we’ve seen them turned into arcade cabinets and MP3 players. We’ve also covered several well-organized workspaces, but none as compact as this one. Thanks to [IrregularShed] for the tip.
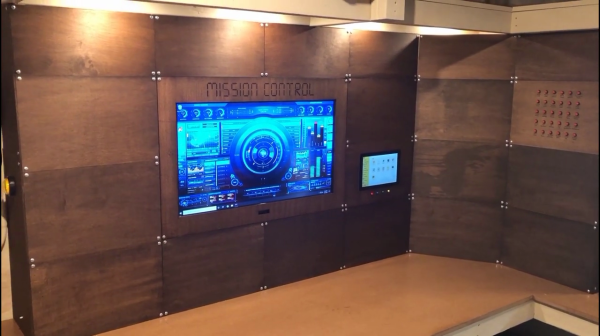
Tired of all your completed (or half-completed) projects cluttering up your workspace? Or you toss them in a box and later forget which box? Well [Another Maker] aka [Develop With Dan] came up with a solution which he dubs Mission Control — panelize your projects and store them in one of many cubbyholes which are provided by a false wall.
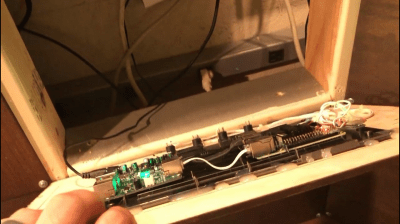
Back view of an example project panel
Each project gets a panel and is neatly stored away when not in use. For some project, this could be simply for storage. For other projects, this might serve as a showcase. Occupying the center of Mission Control is a large monitor, presumably a permanent installation. It looks like there are two different sizes of panels, but we wonder whether more and smaller panels might be more useful. As he’s putting this together, we particularly like one piece of advice that [Dan] offers regarding his custom tool, the Cornerator 3000:
Never hesitate to make a jig when you want to repeat something.
[Dan] will be posting this workspace on his GitHub repository along with code and documentation for various projects he posts on YouTube. He’s also proud to have built this system out of 100% recycled material, or as he says, he went dumpster diving. Do you have a good system for storing / displaying projects in your lab? Let us know in the comments below.
Electronics, metalwork, carpentry, sewing — however you express your inner hacker, you’ve got to have a place to work. Most of us start out small, assembling projects on the kitchen table, or sharing space on a computer desk. But eventually, if we’re lucky, we all move on to some kind of dedicated space. My first “shop” was a corner of the basement my Dad used for his carpentry projects. He built me what seemed at the time like a huge bench but was probably only about five feet long. Small was fine with me, though, and on that bench I plotted and planned and drew schematics and had my first real lesson in why you don’t reach for a soldering iron without looking first. My thumb still bears that scar as a reminder.
Many of us outgrow that first tiny space eventually, as projects (and accumulated junk) outpace the available space. Some of us go on to build workspaces to die for; personally, I feel wholly inadequate whenever I see Frank Howarth’s immense wood shop, with its high ceilings, huge windows for natural light, and what amounts to a loading dock. Whenever I see it I think The work I could do in there!
Or could I? Is bigger necessarily better when it comes to workspaces? Would more space make me a better craftsman?
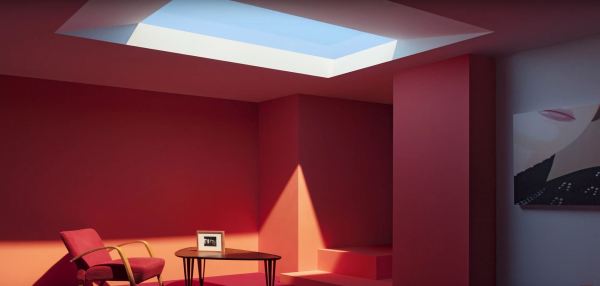
Humans aren’t supposed to be cooped up indoors all day, but who wants to be bothered by UV rays, insects, allergens, traffic, physical activity, and other people? On the other hand, a gloomy living space generally inhibits productivity — if not making it difficult to find what you’re looking for. So, if you’re looking to illuminate any room in your place, and you have the cash and the patience to wait for its widespread release, CoeLux is a skylight that needs no sky or sun — not that you’ll be able to tell the difference.
The Italian developers [CoeLux Srl] are perhaps wisely remaining tight-lipped on how the effect is achieved, but confirm that nanoparticles in the skylight mimic the effect of atmospheric fluctuations, compressing that vast deep blue into a few milimetres while maintaining the perception of infinite depth.