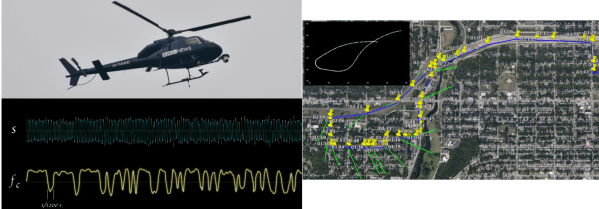
Retrotechtacular: Linotype Machines, Mechanical Marvels

For this week’s Retrotechtacular we’re looking at Linotype Machines; mechanical marvels that brought about the mass production of printed media.

It was a cold dreary day in 1876, when a German inventor living in America named [Ottmar Mergenthaler] was approached by [James O. Clephane], who required a faster way of producing legal briefs. Various patents existed for newspaper typewriters but they did not work very well, so [Mergenthaler] set to work on a new design. Traditionally type sets were cast on one machine, and stamped on another to create the text. On a train [Mergenthaler] thought, why not just combine the machines? And with that the idea for a revolutionary machine was born.

The Linotype Machine has a library of matrices, which are character molds that create the slug — the name for a cast line-of-type. The operator uses a keyboard to input the line of text, which then releases the matrices of the corresponding letters. These are then transferred to the casting station, where type metal is cast into the matrices in a process called hot metal typesetting. The matrices are then returned to the library, and the cast lines of text are cooled, removed, and used for stamping in the mass production of printed media. It sounds simple enough, but now realize the entire machine is mechanically automated; as long as you keep filling it with type metal, you can continue producing slugs simply by typing on the keyboard.

The machines were used from the late 19th century all the way up to the 60’s and 70’s until they were replaced by more efficient offset lithography and computer typesetting.

After the break, check out the fascinating documentary from the 1960’s, you will marvel at the mechanical workings of the machine. If you don’t have 35 minutes to blow, at least check out 1:30 to 6:45 for the basic overview. But you probably won’t be able to stop watching.

Continue reading “Retrotechtacular: Linotype Machines, Mechanical Marvels”

Stealth Peephole Camera Watches Your Front Door

In this week’s links post we mentioned an over-powered DSLR peephole that purportedly cost $4000. So when we saw this tip regarding a relatively inexpensive digital peephole, we thought some of you might be a bit more interested.

The hardware is quite simple; a decent webcam, a Raspberry Pi, and a powered USB hub. The camera gets stripped down to its PCB and hidden inside the door itself. Even if you see this from the inside it’s just a suspicious-looking wire which wouldn’t make most people think a camera was in use.

On the software side of things, [Alex] set up his Raspberry Pi as a 24/7 webcam server to stream the video online. Unlike using a cheap wireless CCTV camera, his video signals are secure. He then runs Motion, a free software motion detector to allow the camera to trigger events when someone comes sneaking by. It can be setup to send you a text, call you, play an alarm, take a picture, record a video… the list goes on. His blog has a full DIY guide if you want to replicate this system. We just hope you have a stronger door!

We covered a similar project back in 2011, but it had made use of real server instead of an inexpensive Raspberry Pi.

[Thanks Alex!]

High Pressure Air Compressor Using A Pair Of Refrigeration Compressors

[Ed] from Ed’s Systems, aka [Aussie50] took some time to demo his high pressure Frankenstein air compressor he stitched together from two refrigeration compressors. The two Danfoss SC15 compressors can produce upwards of 400psi and can run all day at the 300 psi range without overheating. The dual units may get up to pressure quickly considering the small accumulator “tank”, but high CFM isn’t the goal with this build. [Ed] uses the system to massacre some LCD panels with lead, ball bearings, and other high speed projectiles shot from a modified sandblasting gun. Just a bit of air at 400 psi is all you need for this terminator toy.

Don’t think the destruction is wasteful either; [Ed] strives to repair, rebuild, reuse, repurpose and a few other R’s before carefully separating and sorting all the bits for recycling. This modification included lots of salvaged hardware from older teardowns such as high pressure hoses, connectors, accumulator and pressure cutoff switches.

At first it seems strange to see something engineered for R22 refrigerant working so well compressing air. Morphing refrigeration systems into air compressor service is something [Ed] has been doing for a long time. In older videos, “fail and succeed”,  [Ed] shows the ins and outs of building silent air compressors using higher capacity storage tanks. Being no stranger to all variations of domestic and commercial refrigeration systems, [Ed] keeps home built air compressors running safe and problem free for years.

Don’t think this is the only afterlife for old refrigeration compressors, we’ve seen them suck too. You’ll get a few more tidbits, and can watch [Ed’s] video overview of his home built compressor after the break.

Continue reading “High Pressure Air Compressor Using A Pair Of Refrigeration Compressors”

Update: McHck’s Self Flashing Rig

A few weeks ago we featured the McHck project (pronounced McHack), a $5 Cortex M4 based platform which can be directly plugged into one’s computer. Recently, [Simon] announced that he made a firmware allowing a McHck to behave as a SWD adapter and also detailed his flashing rig.

Therefore, those who’d want to build their own McHck would only need to borrow an SWD programmer once to get started. When the first platform has been programmed with the SWD firmware, it can be used to flash and debug applications on the second McHck. Consequently, the microcontroller flashing rig [Simon] designed (shown in the picture above) is based on this. The few core elements are a TQFP48 ZIF programming socket, a push button and two LEDs. Simply push the Kinetis in the programming socket, close it and press the button. Success of the operation is indicated by the two LEDs. [Simon] used the Ragel State Machine Compiler to generate his flashing program and all the code he made can be downloaded from his github.

If you missed the original McHck post now’s your chance to go back and see what it is all about.

Octoscroller Takes The Hexascroller To The Next Level

octosc2

The folks at NYCResistor have a new toy in the Octoscroller. For a couple of years now the NYCResistor crew has used the HexaScroller as a clock and general alert system. Now that RGB LED panels are cheaply available, the group decided to upgrade both the number of sides and the number of colors.

Octoscroller uses eight 16×32 RGB LED panels. These panels are relatively easy to interface to, but require constant refresh even to display a static image. This makes them both memory and CPU intensive for smaller microcontrollers. Brightness control via PWM only increases the difficulty.

On the plus side, the panels are structurally strong. This allows the Octoscroller to avoid the plywood ring which made up the frame of the Hexascroller. 3D printed brackets and hardware were all that was needed to complete the Octoscroller frame.

The brain of the this beast is a BeagleBone Black running LEDscape along with some custom software. Imagery comes from the Disorient Pyramid.

If you’re in the New York area, NYCResistor plans to offer classes on building your own Octoscroller.  You can also see the Octoscroller in person at MakerFaire NYC this weekend.

One Man’s Microwave Oven Is Another Man’s Hobby Electronics Store

There are loads of Internet content depicting the usefulness of salvaged innards found in defunct microwave ovens. [Mads Nielsen] is an emerging new vblogger with promising filming skills and intriguing beginner electronics content. He doesn’t bring anything new from the microwave oven to the dinner table, yet this video should be considered a primer for anybody looking to salvage components for their hobby bench. To save some time you can link in at the 5 minute mark when the feast of parts is laid out on the table. The multitude of good usable parts in these microwave ovens rolling out on curbsides, in dumpsters, and cheap at yard sales all over the country is staggering and mostly free for the picking.

The harvest here was: micro switches, X and Y rated mains capacitors, 8 amp fuse, timer control with bell and switches, slow turn geared synchronous 4 watt motor 5 rpm, high voltage capacitor marked 2100 W VAC 0.95 uF, special diodes which aren’t so useful in hobby electronics, light bulb, common mode choke, 20 watt 68 Ohm ceramic wire-wound resistor, AC fan motor with fan and thermostat cutout switches NT101 (normally closed).

All this can be salvaged and more if you find newer discarded units. Our summary continues after the break where you can also watch the video where [Mads] flashes each treasure. His trinkets are rated at 220 V but if you live in a 110 V country such components will be rated for 110 V.

Continue reading “One Man’s Microwave Oven Is Another Man’s Hobby Electronics Store”

Robotic Tentacles For A Disturbing Haunted House

testicles

[ivorjawa] is putting on a haunted house this Halloween that we really don’t want to go to. His robot tentacle is already supremely creepy, and we’re assuming it will only be more frightening once it’s covered in fabric and foam rubber.

Each tentacle can move on two axes thanks to four steel cables running through this strange Geiger-esque contraption. In the base of the tentacle are two stepper-motor driven cylinders that take up slack on one cable and draw out another cable. Two of these control boxes, driven by a stepper motor and an Arduino motor shield, allow the tentacle to reach out and grab in any direction. You can check out the mechanics of the build on [ivorjava]’s flickr

On a semi-related note, even though we’re more than a month out from Halloween, we should have more Halloween builds in our tip line by now. If you’re working on one, don’t be afraid to send it in, even if you’re just showing off a work in progress.

Continue reading “Robotic Tentacles For A Disturbing Haunted House”