Since the adoption of Kernel 2.6, Linux has used the udev system to handle devices such as USB connected peripherals. If you want to change the behavior when you plug something into a USB port, this section is for you. As an example, we will use a USB thumb drive but these methods should translate to any device handled by udev. As a goal for this exercise we decided to create a symlink and execute a script when a specific thumb drive was loaded. The operating system we used for this exercise is Ubuntu 9.04 Jaunty Jackalope. Continue reading “How To Write Udev Rules”
ZPUI Could Be Your Tiny Embedded GUI
One of the most frustrating things to me is looking at a freshly-flashed and just powered up single board computer. My goal with them is always getting to a shell – installing packages, driving GPIOs, testing my proof of concept code, adjusting the device tree to load peripheral drivers. Before I can do any of that, I need shell access, and getting there can be a real hassle.
Time after time, I’ve struggled trying to get to a shell on an SBC. For best results, you’d want to get yourself a keyboard, monitor, and an Ethernet cable. Don’t have those, or there’s no space to place them? Maybe a UART connection will work for you – unless it’s broken or misconfigured. Check your pinouts twice. Sure, nowadays you can put WiFi credentials into a text file in /boot/ – but good luck figuring out the IP address, or debugging any mistakes you might make formatting the file. Nowadays, Pi 4 and 5 expose a USB gadget connection on the USB-C port, and that helps… unless you’re already powering the Pi from that port. There’s really no shortage of failure modes here.
If you put a Pi on your network and it goes offline, you generally just don’t know what happened unless you reboot it, which can make debugging into a living hell. I’ve dealt with single-board computers mounted above fiberglass lifted ceilings, fleets of Pi boards at workshops I organized, pocket-carried Pi boards, and at some point, I got tired of it all. A hacker-aimed computer is meant to be accessible, not painful.
Speed Up Arduino With Clever Coding
We love Arduino here at Hackaday; they’ve probably done more to make embedded programming accessible to more people than anything else in the history of the field. One thing the Arduino ecosystem is rarely praised for is its speed. That’s where [Playduino] comes in, with his video (embedded below) that promises to make everyone’s favourite microcontroller run 50x faster.
You might be expecting an unstable overclocking setup, with swapped crystals, tweaked voltages and a hefty heat sink, but no! This is stock hardware. The 50x speedup comes from one simple hack: don’t use digitalWrite();
If you aren’t familiar, the digitalWrite() function is one of the key functions Arduino gives you to operate its boards– specify the pin and the value (high or low) to drive it. It’s very easy, but it’s also very slow. [Playduino] takes a moment to show just how much is going on under the hood when you call digitalWrite(), and shows you what you can do instead if you have a need for speed. (Hint: there’s no Arduino-provided code involved; hardware registers and the __asm keyword show up.)
If you learned embedded programming in an earlier era, this will probably seem glaringly obvious. If you, like so many of us, got started inside of the Arduino ecosystem, these closer-to-the-metal programming techniques could prove useful tools in your quiver. Big thanks to [Stephan Walters] for the tip.
Of course if you prefer to speed things up by hardware rather than software, you can overclock an Arduino– with liquid nitrogen, even.
Displays We Love Hacking: LVDS And EDP
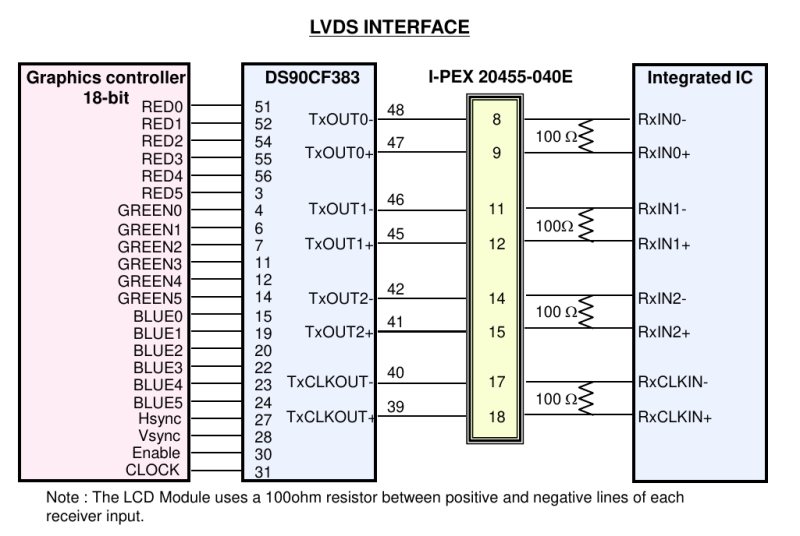
There are times when tiny displays no longer cut it. Whether you want to build a tablet or reuse some laptop displays, you will eventually deal with LVDS and eDP displays. To be more exact, these are displays that want you to use either LVDS or eDP signaling to send a picture.
Of the two, LVDS is the older standard for connecting displays, and eDP is the newer one. In fact, eDP has mostly replaced LVDS for things like laptop and tablet displays. Nevertheless, you will still encounter both of these in the wild, so let’s start with LVDS.
The name “LVDS” actually comes from the LVDS signaling standard (Low-Voltage Differential Signaling), which is a fairly generic data transfer standard over differential pairs, just like RS485. Using LVDS signaling for embedded display purposes is covered by a separate standard called FPD-Link, and when people say “LVDS”, what they’re actually talking about is FPD-Link. In this article, I will also use LVDS while actually talking about FPD-Link. Barely anyone uses FPD-Link except some datasheets, and I’ll use “LVDS” because that’s what people actually use. It’s just that you deserve to know the distinction so that you’re not confused when someone mentions LVDS when talking about, say, industrial machinery.

Both LVDS and eDP run at pretty high frequencies – they’re commonly used for color displays with pretty large resolutions, so speed can no longer be a constraint. eDP, as a successor technology, is a fair bit more capable, but LVDS doesn’t pull punches either – if you want to make a 1024 x 768 color LCD panel work, you will use LVDS, sometimes parallel RGB – at this point, SPI just won’t cut it. There’s a lot of overlap – and that’s because LVDS is basically parallel RGB, but serialized and put onto diffpairs. Let me show you how that happened, and why it’s cool.
Linux Fu: Getting Started With Systemd
I will confess. I started writing this post about some stupid systemd tricks. However, I wanted to explain a little about systemd first, and that wound up being longer than the tricks. So this Linux Fu will be some very fundamental systemd information. The next one will have some examples, including how to automount a Raspberry Pi Pico. Of course, by the end of this post, you’ll have only scratched the surface of systemd, but I did want to give you some context for reading through the rest of it.
Like many long-time Unix users, I’m not a big fan of systemd. Then again, I’m also waiting for the whole “windows, icon, mouse, pointer” fad to die down. Like it or not, systemd is here and probably here to stay for the foreseeable future. I don’t want to get into a flame war over systemd. Love it or hate it, it is a fact of life. I will say that it does have some interesting features. I will also say that the documentation has gotten better over time. But I will also say that it made many changes that perhaps didn’t need to be made and made some simple things more complicated than they needed to be.
In the old days, we used “init scripts,” and you can still do so if you are really motivated. They weren’t well documented either, but it was pretty easy to puzzle out the shell scripts that would run, and we all know how to write shell scripts. The systemd way is to use services that are not defined by shell scripts. However, systemd tries to do lots of other things, too. It can replace cron and run things periodically. It can replace inetd, syslog, and many other traditional services. This is a benefit or a drawback, depending on your point of view.
(Editor’s note: And this logging functionality was exactly what was abused in last week’s insane liblzma / ssh backdoor.)
Configuring systemd requires you to create files in one of several locations. In systemd lingo, they are “units.” For the purpose of this Linux Fu, we’ll look at only a few kinds of units: services, mounts, and timers. Services let you run programs in response to something like system start-up. You can require that certain other services are already running or are not running and many other options. If the service dies, you can ask systemd to automatically restart it, or not. Timers can trigger a service at a particular time, much like cron does. Another unit you’ll run into are sockets that represent — you guessed it — a network socket.
Bare-Metal STM32: Setting Up And Using SPI
The Serial Peripheral Interface (SPI) interface was initially standardized by Motorola in 1979 for short-distance communication in embedded systems. In its most common four-wire configuration, full-duplex data transfer is possible on the two data (MOSI, MISO) lines with data rates well exceeding 10 Mb/s. This makes SPI suitable for high-bandwidth, full-duplex applications like SD storage cards and large resolution, high-refresh displays.
STM32 devices come with a variable number of SPI peripherals, two in the F042 at 18 Mb/s and five in the F411. Across the STM32 families, the SPI peripheral is relatively similar, with fairly minor differences in the register layout. In this article we’ll look at configuring an SPI peripheral in master mode.
Continue reading “Bare-Metal STM32: Setting Up And Using SPI”
KittyOS: Writing A Toy OS For The ATmega168 From Scratch
Writing an operating system for a computing platform is one of those non-trivial tasks few people actually need to do, regardless of whether it’s for a small microcontroller or a larger general-purpose computer. Many of us spend a large amount of our time working on producing robust code for embedded systems, occasionally diving deeper into the abstraction when we’re stuck on a problem. Quite often this work is sitting on top of an RTOS, which we consider a solved problem. [Jonathan Diamond] had picked up a fair bit of knowledge of some of the low-level AVR black magic, as well as some details of how operating systems work internally, and so decided to have a crack a building a toy operating system called KittyOS, for the learning experience alone.
[Jonathan] hastens to add that this is not a practical OS, but a learning platform that needs a few more bells and whistles added to be useful. Aimed at the 8-bit AVR ATmega168 with its mere 16kB of flash and 1kB of SRAM, the diminutive chip can still perform more than well enough to host the rudimentary OS — up to four application tasks, and some basic system call support.
Already, KittyOS sports preemptive multitasking, with prioritization and support for applications written in C. Hardware support is a bit limited, with just serial I/O and a spot of GPIO, but that’s more than enough for a demonstrator. Applications can be loaded into any of the four available slots, with per-slot run state control, using the Python-based host interface. The post is a long one, with an absolute ton of the gory details we love around these parts, and we’re very glad [Jonathan] took the time to make a proper write-up as well as a demonstration video, which can be found after the break.
Continue reading “KittyOS: Writing A Toy OS For The ATmega168 From Scratch”


