Roll Your Own Simple Tube Tester

You can easily get carried away when trying to test things. For example, if you want to know if your car is working, you could measure the timing of the ignition and put the car on a dynamometer. Or you could just start it and figure that if it runs and moves when you put it in drive, it is probably fine.

When [Thomas Scherrer] wanted to test some tubes, he made the same kind of assumption. While tubes can develop wacky failure modes, the normal difference between a working tube and a failing tube is usually not very subtle. He made a simple test rig to test tubes at DC and one operating point. Not comprehensive, but good enough most of the time. Have a look at what he did in the video below.

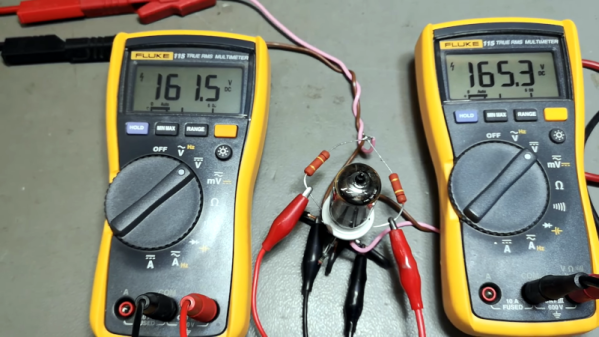
The tester is just a few resistors, a tube socket, and some bench power supplies. Of course, you may have to adapt it to whatever tube you are testing. If we had a lot of tubes to do, we might make the rig a bit more permanent, but for an afternoon of testing, what he has would be fine.

In addition to the power supplies, you’ll need at least one, preferably two, volt meters. He was able to validate his results with a proper tube tester. The results matched up well. While this won’t solve all your tube testing problems, it will give you a quick start.

You can build your own modern tube tester, of course. Or pick up a vintage one. Our favorite one uses punched cards.

Continue reading “Roll Your Own Simple Tube Tester”

Better Antennas Via Annealing (Simulated)

If you want to simulate a tic-tac-toe game, that’s easy. You can evaluate every possible move in a reasonable amount of time. Simulating antennas, however, is much harder. [Rosrislav] has been experimenting with using simulated annealing to iterate antenna designs, and he shares his progress in a recent blog post.

For many problems, it simply isn’t possible to try all possible inputs to determine what provides the “best” result. Instead of trying every single input or set of inputs, you can try random ones and discard all but the best guesses. Then you make small changes and try again. The only problem is that the algorithm may lock in on a “local maximum” — that is, a relatively high value that isn’t the highest because it forms a peak that isn’t the highest peak. Or, if you are looking for a minimum, you may lock on to a local minimum — same thing.

To combat that, simulated annealing works like annealing a metal. The simulation employs a temperature that cools over time. The higher the temperature, the more likely large changes to the input are to occur.

The Python program uses the PyNEC package to provide simulation. The program sets up random antenna lengths and finds the projected gain, attempting to optimize for maximum gain.

The post is long on code and short on details, so you will probably want to read the Python source to see exactly what it is doing. But it could probably serve as a template to do other simulated annealing simulations for other antennas or anything you had a simulation engine to evaluate.

Several techniques allow you to optimize things that are too hard to search exhaustively, and we’ve talked about simulated annealing and genetic algorithms before. However, lately, we’ve been more interested in annealing 3D prints.

BIOS POST Card Built Using Raspberry Pi Pico

A computer’s BIOS includes basic diagnostic tools for troubleshooting issues. Often, we rely on the familiar beeps from the POST system for this reason. However, error codes are also available via hardware “POST Cards” that were particularly popular in the 1990s. [Mr. Green] has now built a POST card using readily-available modern hardware.

[Mr. Green] built the device to help troubleshoot an x86 based firewall appliance that was having trouble. Like many x86 systems, it featured a Low Pin Count (LPC) bus which can be used to capture POST troubleshooting codes. By hooking up a Raspberry Pi Pico to the LPC bus on the firewall’s motherboard, it was possible to get it to display the POST error codes on some LEDs. This is of great use in the absence of a conventional PC speaker to sound the error out with beeps.

The build can be used for POST-based troubleshooting on any x86 system with an LPC bus. Files are on Github for those eager to replicate the build. We’ve seen similar work before, too. Video after the break.

Continue reading “BIOS POST Card Built Using Raspberry Pi Pico”

Exploiting Hardware-Level Parallelism In The Manticore Hardware-Accelerated RTL Simulator

Before a chip design is turned from a hardware design language (HDL) like VHDL or Verilog into physical hardware, testing and validating the design is an essential step. Yet simulating a HDL design is rather slow due to the simulator using either only a single CPU thread, or limited multi-threading due to the requirements of fine-grained concurrency. This is due to the strict timing requirements of simulating hardware and the various clock domains that ultimately determine whether a design passes or fails. In a recent attempt to speed up RTL (transistor) level simulations like these, Mahyar Emami and colleagues propose a custom processor architecture – called Manticore – that can be used to run a HDL design after nothing more than compiling the HDL source and some processing. Continue reading “Exploiting Hardware-Level Parallelism In The Manticore Hardware-Accelerated RTL Simulator”

Can You Use A POST Card With A Modern BIOS?

[Alessandro Carminati] spends the day hacking Linux kernels, and to such an end needed a decent compilation machine to chew through the builds. One day, this machine refused to boot leaving some head-scratching to do, and remembering the motherboard diagnostics procedures of old, realized that wasn’t going to work for this modern board. You see, older ISA-based systems were much simpler, with diagnostic POST codes accessible by sniffing the bus with an appropriate card inserted, but the modern motherboard doesn’t even export the same bus anymore.

See “out 0x80, al” in there? That’s a POST code being written

Do modern machines even run a POST test at all, or are there other standards? After firing up a Linux machine and dumping the first meg of memory address space, it clearly contained some of the BIOS code. [Alessandro] looked at a disassembly of the BIOS update image and saw a similar structure, with POST code data sent to port 0x80 just like machines of old.

But instead of an ISA CPU bus, we have the Low Pin Count (LPC) bus which is used to hook up the ‘super IO’ functions, controlling things such as fans, temp sensors, and other system management functions. It also serves as the connection for the TPM feature, which usually appears as one of the motherboard connectors intended to be user-accessible. It turns out that POST codes can be accessed from this point with an appropriate POST card that can talk LPC.

Continue reading “Can You Use A POST Card With A Modern BIOS?”

A cardboard wind tunnel

Optimize Your Paper Planes With This Cardboard Wind Tunnel

We at Hackaday are great fans of hands-on classroom projects promoting science, technology, engineering and math (STEM) subjects – after all, inspiring kids with technology at a young age will help ensure a new generation of hardware hackers in the future. If you’re looking for an interesting project to keep a full classroom busy, have a look at [drdonh]’s latest project: a fully-functional wind tunnel made from simple materials.

A styrofoam car model in a cardboard wind tunnelBuilt from cardboard, it has all the same components you’d find in a full-size aerodynamics lab: a fan to generate a decent stream of air, an inlet with channels to stabilize the flow, and a platform to mount experiments on. There’s even some basic instrumentation included that can be used to measure drag and lift, allowing the students to evaluate the drag coefficients of different car designs or the lift-generating properties of various airfoils. Continue reading “Optimize Your Paper Planes With This Cardboard Wind Tunnel”

FPS Game Engine Built In Ancient Macintosh HyperCard Software

Wolfenstein 3D and Doom are great examples of early FPS games. Back in that era, as Amiga was slowly losing its gaming supremacy to the PC, Apple wasn’t even on the playing field. However, [Chris Tully] has used the 90s HyperCard platform to create an FPS of his own, and it’s charming in what it achieves.

If you’re not familiar with it, HyperCard was a strange combination of database, programming language, and graphical interface system all rolled into one. It made developing GUI apps for the Macintosh platform simpler, with some limitations. It was certainly never intended for making pseudo-3D video games, but that just makes [Chris’s] achievement all the more impressive.

At this stage, [Chris’s] game doesn’t feature any NPCs, weapons, or items yet. It’s thus more of a First Person Walker than First Person Shooter. It features four small rooms with perpendicular, vertical walls, rendered either greyscale or 8-bit color. Now that he’s got the basic engine running, [Chris] is looking to recreate a bit of a Doom RPG experience, rather than copying Doom itself. He hopes to add everything from monsters to weapons, lava, and working HUD elements. If you want to dive in to the code, you can – HyperCard “stacks”, as they’re known, are made up of readily editable scripts.

[Chris] built the project to celebrate the aesthetic and limitations of the original Mac platform. While it could technically run on original hardware, it would run incredibly slowly. It currently takes several seconds to update the viewport on an emulated Mac Plus with 4MB of RAM. Thankfully, emulation on a modern PC can be sped up a lot to help the framerate.

We love seeing HyperCard pushed far beyond its original limits. We’ve seen it before, too, such as when it was used on a forgotten 90s Apple phone prototype. If you’ve been hacking away on retro software yourself, we’d love to see your projects on the tipsline!