Blinky Business Card Plays Snake And Connect Four

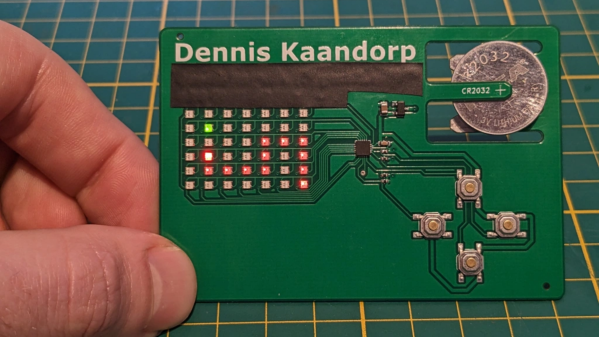
There’s no better way to introduce yourself than handing over a blinky PCB business card and challenging the recipient to a game of Connect Four. And if [Dennis Kaandorp] turns up early for a meeting, he can keep himself busy playing the ever popular game of Snake on his PCB business card.

The tabs are 19 mm long and 4 mm wide.

Quite wisely, [Dennis] kept his design simple, and avoided the temptation of feature creep. His requirements were to create a minimalist, credit card sized design, with his contact details printed on the silk legend, and some blinky LED’s.

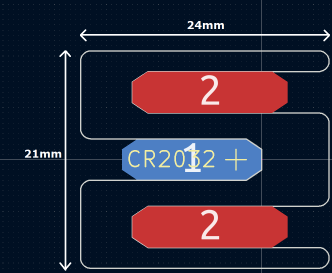
The tallest component on such a design is usually the battery holder, and he could not find one that was low-profile and cheap. Drawing inspiration from The Art of Blinky Business Cards, he used the 0.8 mm thin PCB itself as the battery holder by means of flexible arms.

Connect-Four is a two player game similar to tic-tac-toe, but played on a grid seven columns across and six rows high. This meant using 42 dual-colour LED’s, which would require a large number of GPIO pins on the micro-controller. Using a clever combination of matrix and charlieplexing techniques, he was able to reduce the GPIO count down to 13 pins, while still managing to keep the track layout simple.

It also took him some extra effort to locate dual colour, red / green LED’s with a sufficiently low forward voltage drop that could work off the reduced output resulting from the use of charlieplexing. At the heart of the business card is an ATtiny1616 micro-controller that offers enough GPIO pins for the LED matrix as well as the four push button switches.

His first batch of prototypes have given him a good insight on the pricing and revealed several deficiencies that he can improve upon the next time around. [Dennis] has shared KiCad schematic and PCB layout files for anyone looking to get inspired to design their own PCB business cards.

Continue reading “Blinky Business Card Plays Snake And Connect Four”

Cardboard Game Tokens Become Shiny Click-Clacks With DIY Treatment

Tabletop games and cardboard tokens go hand-in-hand for a good reason: they are economical and effective. However, their tactile attributes leave a little to be desired. There’s something really great about high-quality pieces possessing a shiny, pleasing smoothness and click-clack handling that cardboard simply can’t deliver, but that all changes with [Dzhav]’s simple method for converting cardboard tokens into deluxe versions of themselves with a little work and a resin coating.

The result is a token with a crystal-clear, smooth, and slightly-convex coating of hardened resin on it. They feel (and sound) like plastic, rather than cardboard. The resin used is a two-part clear jewelry resin, used for casting things like pendants. It benefits from a long working time and unlike UV-cured resin (like the SLA 3D printer resin) it won’t be affected by light.

Careful application of resin relies on surface tension to prevent messes.

Like with most things, good results come from careful preparation and technique. [Dzhav] suggests preparing the tokens by sanding the edges completely smooth with fine sandpaper, then using a black marker to color them. Then, tokens are coated one side at a time with a paintbrush and correctly-mixed resin: while holding a token down with a toothpick, resin is brushed right to (but not over) the edges. Then, additional resin can be dropped in the center of the token, and gravity and surface tension will work together to ensure an even coating that doesn’t drip.

After the resin has had plenty of time to cure, the tokens are flipped over and the process repeated. The end result are tokens with both sides coated in a nice, smooth, ever-so-slightly-convex shield of resin.

They look fantastic, and sound even better. Turn up your volume and play the two-second video embedded below to listen for yourself. And when you’re ready for another gamer that didn’t settle for what was in the box, check out this redesigned Catan version.

Continue reading “Cardboard Game Tokens Become Shiny Click-Clacks With DIY Treatment”

Hackaday supercon badge PCB showing illuminated activity lights after being loaded with a punch card

Supercon Badge Reads A “Punch” Card

This year’s Hackaday Supercon, the first since 2019 thanks to the pandemic, was a very similar affair to those of the past. Almost every hardware-orientated hacker event has its own custom electronic badge, and Supercon was no different. This year’s badge is a simulation platform for a hypothetical 4-bit CPU created by our own [Voja Antonic], and presented a real challenge for some of the attendees who had never touched machine code during their formative years. The challenge set was to come up with the most interesting hack for the badge, so collaborators [Ben Hencke] and [Zach Fredin] set about nailing the ‘expandr’ category of the competition with their optical punched card reader bolt-on.

Peripheral connectivity is somewhat limited. The idea was to build a bolt-on board with its own local processing — using a PixelBlaze board [Ben] brought along — to handle all the scanning details. Then, once the program on the card was read, dump the whole thing over to the badge CPU via its serial interface. Without access to theirPrinted paper faux punch card showing read LEDs and an array of set and reset bits of the encoding 
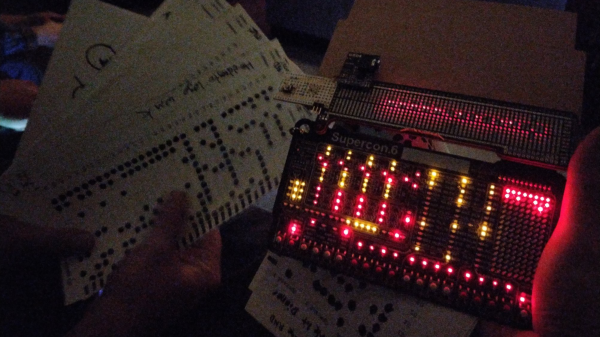
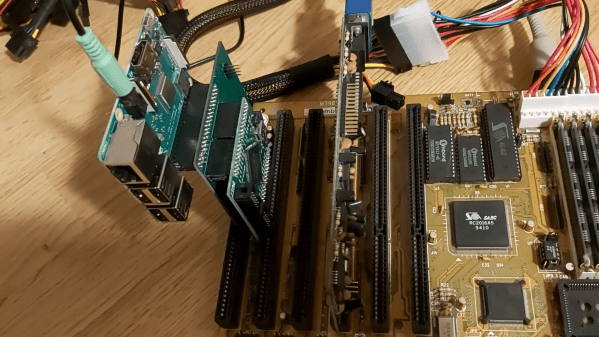
usual facilities back home, [Ben] and [Zach] obviously had to improvise with whatever they had with them, and whatever could be scrounged off other badges or other hardware lying around.

One big issue was that most people don’t usually carry photodiodes with them, but luckily they remembered that an LED can be used as a photodiode when reverse-biased appropriately. Feeding the signal developed over a one Meg resistance, into a transconductance amplifier courtesy of a donated LM358 there was enough variation for the STM32 ADC to reliably detect the difference between unfilled and filled check-boxes on the filled-in program cards.

The CPU required 12-bit opcodes, which obviously implies 12 photodiodes and 12 LEDs to read each word. The PixelBlaze board does not have this many analog inputs. A simple trick was instead of having discrete inputs, all 12 photodiodes were wired in parallel and fed into a single input amplifier. To differentiate the different bits, the illumination LEDs instead were charlieplexed, thus delivering the individual bits as a sequence of values into the ADC, for subsequent de-serialising. The demonstration video shows that it works, with a program loaded from a card and kicked into operation manually. Such fun!

Punch cards usually have a hole through them and can be read mechanically, and are a great way to configure testers like this interesting vacuum valve tester we covered a short while back.

Continue reading “Supercon Badge Reads A “Punch” Card”

A 386 motherboard with a custom ISA card plugged in

Emulate Any ISA Card With A Raspberry Pi And An FPGA

One of the reasons the IBM PC platform became the dominant standard for desktop PCs back in the mid-1980s was its open hardware design, based around what would later be called the ISA bus. Any manufacturer could design plug-in cards or even entire computers that were hardware and software compatible with the IBM PC. Although ISA has been obsolete for most purposes since the late 1990s, some ISA cards such as high-quality sound cards have become so popular among retrocomputing enthusiasts that they now fetch hundreds of dollars on eBay.

So what can you do if your favorite ISA card is not easily available? One option is to head over to [eigenco]’s GitHub page and check out his FrankenPiFPGA project. It contains a design for a simple ISA plug-in card that hooks up to a Cyclone IV FPGA and a Raspberry Pi. The FPGA connects to the ISA bus and implements its bus architecture, while the Pi communicates with the FPGA through its GPIO ports and emulates any card you want in software. [eigenco]’s current repository contains code for several sound cards as well as a hard drive and a serial mouse. The Pi’s multi-core architecture allows it to run several of these tasks at once while still keeping up the reasonably high data rate required by the ISA bus.

In the videos embedded below you can see [eigenco] demonstrating the system on a 386 motherboard that only has a VGA card to hook up a monitor. By emulating a hard drive and sound card on the Pi he is able to run a variety of classic DOS games with full sound effects and music. The sound cards currently supported include AdLib, 8-bit SoundBlaster, Gravis Ultrasound and Roland MT-32, but any card that’s documented well enough could be emulated.

This approach could also come in handy to replace other unobtanium hardware, like rare CD-ROM interfaces. Of course, you could take the concept to its logical extreme and simply implement an entire PC in an FPGA.

Continue reading “Emulate Any ISA Card With A Raspberry Pi And An FPGA”

Retrotechtacular: Programming By Card

The recent Supercon 6 badge, if you haven’t seen it, was an old-fashioned type computer with a blinky light front panel. It was reminiscent of an Altair 8800, a PDP-11, or DG Nova. However, even back in the day, only a few people really programmed a computer with switches. Typically, you might use the switches to toggle in a first-level bootloader that would then load a better bootloader from some kind of storage like magnetic or paper tape. Most people didn’t really use the switches.

What most people did do, however, was punch cards.  Technically, Hollerith cards, although we mostly just called them cards, punched cards, or IBM cards. There were a lot of different machines you could use to punch cards, but none were as popular, I would guess, as the IBM 029. Certainly, the models in the series were overwhelmingly what people used to punch cards.

For the uninitiated, a card was about the size of an old-fashioned dollar bill — the ones in style when Herman Hollerith invented them. The card was made of material not quite as thick as a standard file folder and was divided into 80 columns and 12 rows. Later cards had more columns, but those never really caught on to the same scale as the classic 80-column card. Continue reading “Retrotechtacular: Programming By Card”

Four M.2 cards of different sizes on a desk surface

M.2 For Hackers – Cards

Last time, I’ve explained everything you could want to know if you wanted to put an M.2 socket onto your board. Today, let’s build M.2 cards! There’s a myriad of M.2 sockets out there that are just asking for a special card to be inserted into it, and perhaps, it’s going to be your creation that fits.

Why Build Cards?

Laptops and other x86 mainboards often come with M.2 slots. Do you have a free B-key slot? You can put a RP2040 and bunch of sensors on a B-key PCB as an experimental platform carried safely inside your laptop. Would you like to do some more advanced FPGA experiments? Here’s a miniscule FPGA board that fits inside your laptop and lets you play with PCIe on this same laptop – the entire setup having a super low footprint. Are you looking for an extra PCIe link because you’re reusing your laptop as a home server? Again, your WiFi slot will provide you with that. Want to get some PCIe out of a SteamDeck? Building a M-key 2230 card seems to be your only hope! Continue reading “M.2 For Hackers – Cards”

Mastercard’s New Card: Safer From Quantum Attacks?

Quantum computers present a unique threat to many aspects of modern information technology. In particular, many cryptographic systems could be at risk of compromise in the event a malicious actor came into possession of a capable quantum computer.

Mastercard is intending to stay ahead of the game in this regard. It has launched a new contactless credit card that it says is impervious to certain types of quantum attack.

Continue reading “Mastercard’s New Card: Safer From Quantum Attacks?”