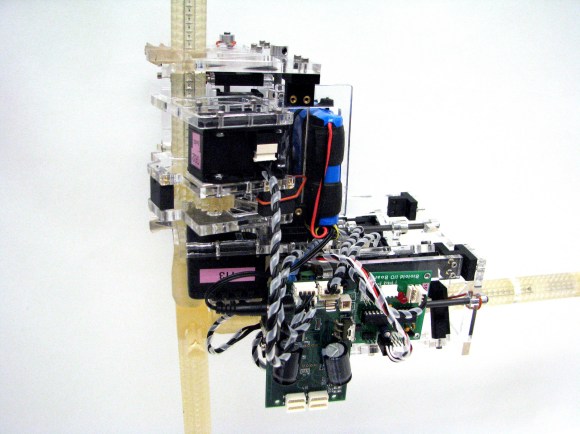
Loading Atari Games From An SD Card

Atari

They’re not a 2600, but the Atari 400, 800 and 1200 are awesome computers in their own right. With only BASIC built in to the ROM, they’re not especially useful or fun, as [Jeroen] found out when he acquired an 800 with a broken tape drive. There are options that allow you to load emulator files from a PC, but [Jeroen] wanted something more compact. He came up with a way to load games and apps off an SD card using a simple microcontroller.

The 400, 800, and 1200 each have a port that allows the computer to talk to printers, modems, disk drives, and load games. There are already a few circuits around that connect the SIO port to a computer so games can be loaded, but [Jeroen] wanted a more compact and portable solution for his 800.

What he came up with is actually pretty simple; just an Arduino, SD card, and an LCD display that allows him to browse the directory on the SD card and load it into the 800’s memory.

A lot of folks over on the Atariage forums are really impressed with [Jeroen]’s work, and would like to get their hands on one of these boards themselves. The project isn’t done just yet – [Jeroen] still needs to make a case for his device – but hopefully he’ll be spinning a few boards up in the coming months.

You can see a pair of videos of the device in action below.

Continue reading “Loading Atari Games From An SD Card”

Telegraph Sounder Clicks Out Email Messages

telegraph-box-together

[Patrick Schless] is excited to show off the project he took on about nine months ago. After finding an antique telegraph sounder he wired it up to an Arduino to see if he could make it tick. The successful experiment laid the ground work for different hardware that would make it into a morse code email reader.

He doesn’t know much about the background of the old hardware, but driving it is relatively simple. It’s basically a magnetic relay so you need to have a transistor for switching and a flyback diode for protection. Once those components are in place it’s just a matter of toggling a bit. [Patrick] knew he wanted to pull messages from an online source, so he set his Arduino aside and grabbed a Raspberry Pi. It worked like a charm. His plan was to put this on a bookshelf in perpetuity so he went the extra mile, designing his own PCB and having it spun using the OSH Park service. The project is finished with this low-profile laser-cut base which houses all of the electronics.

Now if he wants to respond to his emails in Morse code he needs to build this keyboard.

Continue reading “Telegraph Sounder Clicks Out Email Messages”

Giving An RC Tank A Fire Control Computer

tank

[Vincent] plays around with remote control tanks, and even though his current model is a WWII-era armor piece, he’d still like modern accoutrements such as a fire control computer and laser sighting for his main gun. His latest project did just that (French, Google translation) with the help of an Arduino, a few modifications to the receiver, and an IR rangefinder.

The stock RC tank includes servos to move the turret and the requisite electronics to fire an Airsoft gun. The precision of the mechanical movements inside the turret weren’t very precise, though, so [Vincent] had to gear down the servos to turn large movements into slight adjustments. After that, he installed an IR rangefinder and laser diode onto the barrel that allowed the gun to sight a target and read its distance.

After some experimentation with the rangefinder and laser, [Vincent] plotted data from firing a few BBs at a whole bunch of distances and targets. The graph came out fairly linear, and after plugging this into a graphing calculator, he was able to find an equation that took into account the distance and angle so the Arduino-powered fire control computer would hit its mark.

The accuracy of the gun is very impressive, all things considered. [Vincent] is able to accurately fire BBs downrange and hit an 8×12 cm target at five meters. You can check out that action below.

Continue reading “Giving An RC Tank A Fire Control Computer”

Building A WiFi Enabled Nixie Counter

wifi-nixie-counter

[Kevin Ballard] built this Nixie counter on the company dime. Tubes like this are getting more and more difficult to find since they’re no longer being manufactured. But when the Bossman hands you a corporate credit card those kinds of concerns take a back seat to your parts-shopping impulses. Start to finished this WiFi enabled counter took six weeks to build.

Connecting the board to the internet was very easy thanks to the Electric Imp that drives it. The difficult part comes in building a driver board and sockets for the tubes. We don’t see a lot of detail on how he’s generating the high voltage. But you can get a good feel for the tube connectors from the picture. He’s using an adapter PCB from Kosbo which breaks the tube pins out to two rows of 0.1″ pitch pin headers. The acrylic base has a port for each made of pin sockets spaced by a thick chunk of acrylic. Wiring harnesses wrap around the back side of the base to mate with the driver hardware. It’s programmed to count some type of company metric (it was funded by the corporation after all). They must be fairly successful because those numbers are flying by in the demo video.

Continue reading “Building A WiFi Enabled Nixie Counter”

3D Printed Hand-cranked Digital Computer

What a beautiful thing it is to see this digital computer in action. [Chris Fenton] did an amazing job of designing and printing this mechanical digital computer. If you’re interested in one to call your own check out the source files he published this week.

[Chris’] design inspiration came from some research into Victorian Era mechanical looms. He adjusted the concept to build a punch card reader, starting with a capacity of three holes and moving to this design which can read ten holes. It provides just enough bits to address all three of the counters pictured above. Program the computer by inserting a punch card that is the size of a business card and crank away. The video below shows the process from afar… hopefully he’ll post a follow-up video with closer views of each piece in action.

This isn’t his first basic computing machine. Check out the electromechanical version from last year.

Continue reading “3D Printed Hand-cranked Digital Computer”

Arc Reactor Replica Could Have Been Crafted In A Cave

arc-reactor-replica

Following in the footsteps of [Tony Stark] this Arc Reactor replica was hand crafted using almost no power tools. From what we can tell in his build gallery, a cordless drill was his only departure from using pure elbow grease.

[DJ Maller] started his build by cutting out a disc of acrylic for the base plate. While we might have reached for a hole saw, he grabbed a framing square and laid out a center point and square cuts on the stock. Kudos for his use of an awl (we often take the Luddite approach of hammer and nail) to make an impression for his compass point to rest in. After using a coping saw to rough out the shape he sands the round up to the line with the drill and a sanding wheel.

After drilling holes and inserting LEDs he begins to build up the replica piece by piece. What looks like a recessed handle for a sliding closet doors makes up the center. The spring-like copper coils was produced by wrapping wire around a pen then stretching to the desired shape. He added a bicycle spoke wrench wrapped with copper for some additional visual appeal before finishing the decoration off with some storm door clips.

[via Reddit]