GRBL Compatible Arduino CNC Shield

By the time you get to the point in a home CNC build where you’re adding control electronics you may be ready for the simplest means to an end possible. In that case, grab your Arduino and heat up that etching solution to make your own GRBL compatible shield.

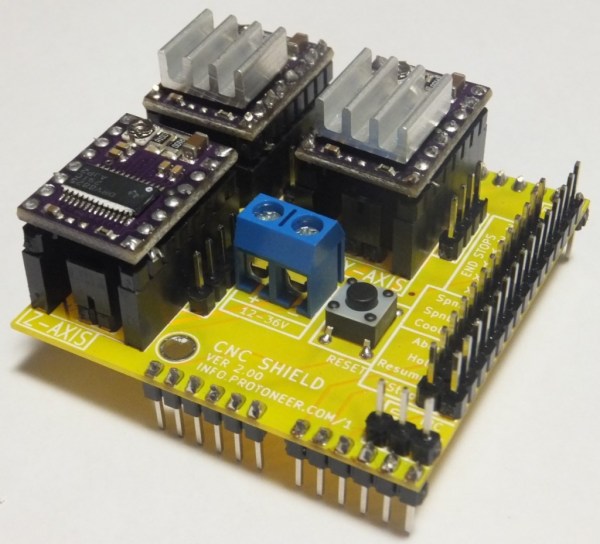
This familiar footprint manages to contain everything you need for a three-axis machine. The purple boards slotted into the pairs of SIL headers are Pololu Stepper motor drivers. Going this route makes replacing a burnt out chip as easy as plugging in a new module. The terminal block in the center feeds the higher voltage rail necessary for driving the motors. The DIL header on the right breaks out all of the connections to the limiting switches (two for each axis), spindle and coolant control, as well as three buttons for pause, resume, and abort. There’s even a header for SPI making it easier to add  custom hardware if necessary.

This is a dual-layer board which may not be ideal for your own fabrication process. [Bert Kruger] posted his Gerber files for download if you want to put in a small run with OSH Park or a similar service.


Rekindling Forth With A Propeller Jupiter Ace

Jupiter

The Jupiter Ace was a small membrane keyboard, cassette tape drive computer akin to the ZX Spectrum released in 1982. Priced at £90, it was a little more expensive than its home computer contemporaries, but had a very interesting feature: instead of BASIC, the Ace ran Forth. This interpreted stack-based language is far more capable than the BASIC variants found on home computers of the day, but unfortunately the Ace failed simply because Forth was so foreign to most consumers.

Not wanting to let a good idea die, [prof_braino] is bringing Forth back into the modern age. He’s using a Parallax Propeller to emulate a simple home computer running Forth. Instead of a book-sized computer, the new Propeller version runs on a single chip, with 8 CPU cores running 24 times faster than the original, with 32 times more RAM and an SD card for basically unlimited storage.

Electric Skillet Reflow Soldering Guide

skillet-reflow-tutorial

It’s no secret that we’re bizarrely drawn to macro videos showing solder paste during the reflow process. This electric skillet reflow guide provides the fix we’ve been jonesin’ for while including some helpful tips for first-timers and veterans alike. Not sure what we’re talking about? Look at the grey paste at the top of this image. As it heats up it’s drawn under each component as seen in the lower half of the image.

This particular guide is aimed at one-off assembly so a solder paste stencil is not used (we learned a lot about those earlier in the month). It instead uses the painstaking toothpick application technique. It takes time but the upside is that once you get the hang of it you’ll apply the perfect amount of solder each time. After placing all of the components [Count Spicy] carefully transfers the board to an electric skillet, covers it with the glass lid (so he can see what’s going on), and sets the temperature just above the solder’s specified melting point.

Since the skillet is cheap and easy to find you really just have to order the solder paste to get into this type of assembly. Our only gripe is that you can’t really follow a temperature profile with this rig. For that you need to move up to some PID controlled hardware.

Continue reading “Electric Skillet Reflow Soldering Guide”

Turning Kerbal Space Program Into A Proper Space Simulator

Kerbal

Kerbal Space Program – the game of freakin’ space Lego and incompetent little green men – has seen a lot of popularity since it was on the Steam Summer sale. Now, in a bid to out do the flight sim aficionados who build 737 cockpits in their garage, a few enterprising Kerbalnauts are building custom controllers for this wonderful introduction to [Tsiolkovsky], [Goddard], and [Evel Kinevel].

[vladoportos] thought KSP could use custom gaming controllers to provide switches for staging, attitude hold, and reaction control system commands. In the game, these are toggled by keyboard input, but this unfortunately destroys the immersion of being a rocket-powered angel of death for your Kerbal volunteers. He rigged up an Arduino Leonardo to send USB HID commands to his computer whenever he pressed one of the buttons connected to his breadboard controller. It’s a work in progress, but [vladoportos] has some big plans that include a physical nav ball to show his ship’s orientation in space.

USB input is one thing, but that’s only half the problem. If you want to build a real Kerbal ship simulator, you’ll need to get data out of the game, and into your glass or analog displays. [voneiden] over on the KSP subreddit has the solution for you. He’s been working on a ‘mission control’ app that runs in Python, connects to a Kerbal Space Program plugin over TCP, and displays flight information such as speed, altitude, longitude, latitude, apoapsis, and periapsis.  The code is up on his git, ready for some individual to bring this over to a Raspi and a character LCD display.

Propane Forge Built From A Soup Can

propane-forge-from-soup-can

It doesn’t look like much, but this easy to build propane forge is just what you need to try your hand at blacksmithing. [Code Cowboy] took on the build after watching this how-to video which shows the fabrication of a small knife after completing the forge build.

The first step is to eat all of the soup (or beans if you prefer). With an empty can in hand the stand — made of two angle brackets — and inlet are attached. Next comes the heat proofing for the walls of the forge. At first glance we thought that cat litter was one of the ingredients, but that’s just an empty container used to haul playground sand. The sand is mixed with equal parts of plaster of paris before adding water to achieve a clay-like consistency. This is packed into the can, with a small opening to receive the metal to be heated.

The torch itself can be used to cure the heat shield. After letting the mixture harden a 30 minute burn will force the rest of the water out of the heat proofing.

Continue reading “Propane Forge Built From A Soup Can”

Make Your Own Fume-extracting Glove Box

diy-clean-box

Here’s an easy to follow guide for building your own glove box. It’s a lab tool that contains the project you’re working on to keep things in or out. For instance, we could have used this a few years back when we tried to add an acrylic window to a hard drive. Instead, we ended up putting several hours of work into a cool-looking paperweight. But it will also come in handy for chemistry experiments that generate harmful or dangerous byproducts.

The picture above tells most of the story, but [Jason Poel Smith] does include several good tips about the construction in his video. He uses weather stripping along the edges of the clear container to ensure a seal. The hose is used to provide negative pressure so that no fumes leak out. We figure adding a smaller hole on the opposite side with a charcoal filter will help air pass into the chamber to serve as a fume extractor.

We’ve already seen a similar setup for a reflow oven. Perhaps this is the perfect solution to protect yourself from 3D printing fumes. We’re sure you saw the headlines about 3D printing being as bad as smoking cigarettes.

Continue reading “Make Your Own Fume-extracting Glove Box”

Hackaday Is Going To DEF CON!

EricEvenchick

This is Hackaday writer [Eric Evenchick]. He’s headed off to DEF CON, the annual hacking conference held every year at this time in Las Vegas. He’s hoping to see some cool stuff and make some networking connections that lead to a real job. If you’re not attending the conference here’s your chance to live vicariously. He’ll be writing on Thursday, Friday, and Saturday of next week (August 1-3) about all the stuff he encounters at the event.

If you are attending, keep your eyes open for him. We’re sorry that we didn’t manage to get any swag to him for handing out to loyal readers (not his fault, we’ve been a bit preoccupied). If you know of something he just shouldn’t miss email him: eric at hackaday.com. This includes invites to any awesome parties you’ve got planned.

Oh, and don’t be shy about making him pose with you for pictures…. just make sure to Tweet it to @hackaday if you do.