A Custom Cooler, Sewing Not Required

soduh

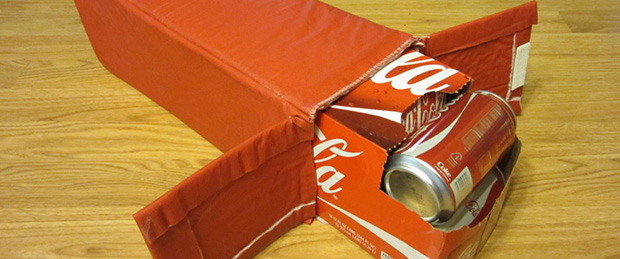
When you go to the beach or on a camping trip this summer, notice how you pack your cooler. Your beverages already come in a box, yet you remove them and put them in a larger, insulated box. [Jason] thought it would be a great idea to just add insulation to a case of soda (or other beverages, we assume) and ended up making a custom soda cooler.

The fabrication of this cooler is actually pretty simple. A layer of flexible foam is sandwiched between two layers of waterproof vinyl with spray glue. After tracing out a pattern, [Jason] then cut this fabric into panels and glued them together into a soda box-sized cooler. Simple, elegant, and something even hackers that didn’t take home ec can put together in a few hours.

As an aside, we at Hackaday seem to forget the ‘softer’ builds of fabric, foam, and paper far too often. That doesn’t mean we eschew these projects; I have a barely post-war Singer 15 sewing machine right above my workbench. Send us a tip if you have one of these soft hacks. We’d love to see it.

Video of the build below.

Continue reading “A Custom Cooler, Sewing Not Required”

24-hour Hackathon Project Adds Object-based Automation To Hackerspace

hackerspace-automation

[Jeremy Blum], [Jason Wright], and [Sam Sinensky] combined forces for twenty-four hours to automate how the entertainment and lighting works at their hackerspace. They commandeered the whiteboard and used an already present webcam as part of their project. You can see the black tokens which can be moved around the blue tape outline to actuate the controls.

MATLAB is fed an image from the webcam which monitors the space. Frames are received once every second and parsed for changes in the tokens. There are small black squares which either skip to the next track of music or affect pause/play. Simply move them off of their designated spot and the image processing does the rest. This goes for the volume slider as well. We think the huge token for the lights is to ensure that the camera can sense a change in a darkened room.

If image processing isn’t your thing you can still control your audio entertainment with a frickin’ laser.

Continue reading “24-hour Hackathon Project Adds Object-based Automation To Hackerspace”

737 Autopilot, Courtesy Of An Arduino

737

To start this off, no, we’re not looking at a piece of actual flight hardware. This is [Andrea Giudici]’s project to tie real-world hardware into Flight Simulator X. It’s an autopilot for simulated aircraft, so those of you looking at flying a 737 sometime in the near future need not worry about computers flying your plane. Airbus passengers, though…

[Andrea] didn’t want to dig around with the clunky point-and-click interface in FSX, so he created a virtual autopilot with a 2×16 LCD display and an Arduino to interact and set the most common autopilot settings such as altitude, speed, heading, and engagement. The physical interface is just three tact switches and a pot, while the interface to FSX is a custom driver that turns the USB out of the Arduino into actual flight commands.

It’s not a 737 cockpit in a garage, but it’s still a wonderful alternative to poking around in a completely computer-bound interface.

Video of the ‘duino in action after the break.

Continue reading “737 Autopilot, Courtesy Of An Arduino”

Best Practices To Include In Your Final Projects

electronic-best-practices

Making that final push to button up your projects can be a bit daunting. It’s kind of like the punch list on a construction project — add switch plates, fill nail holes in baseboards, screw in light bulbs, clean windows — that stuff adds up quickly. But having a set of best practices in mind throughout the development phase will cut down on that burden. [Caleb P.] just published a quick guide using a recent project as an example.

First and foremost is the label seen on the project box lid. How many times have you pulled out a circuit board from a year or two earlier and not been able to figure out the pinout? As with ancient televisions and radios, including the service schematic will save you big time! He also mentions that the size and orientation of the components in the case was in the back of his mind the whole time. That paid off because everything fits like a glove. [Caleb] makes sure the battery is easy to get to, and the each component has some type of connector so that it may be removed and serviced/replace without soldering. There’s certainly nothing groundbreaking in this guide. But ask yourself: have I been following all of these guidelines in my own work?

Hack It: In-refrigerator Egg Monitoring

Here’s a concept piece that monitors the eggs in your refrigerator. It’s still in development and we don’t think the general public is ready for digital egg monitoring quite yet. But we love the concept and want to hear from you to see if you could develop your own version.

What we know about the device is that — despite the image which makes smart phone proximity seem important — it connects to the Internet from inside your fridge. It will tell you how many eggs you have left, and even tracks the date at which each entered your refrigerator.

So, what’s inside this thing and who can build their own the fastest? We’ll cover some specs and speculate a bit to get you started: There’s a light sensor to detect when the door opens and an LED below each egg to illuminate the oldest. We think the light sensor triggers a microcontroller that uses each of the egg LEDs as a light sensor as well. If the threshold is too low then there is indeed an egg in that cup. We also like the fact that the tray has fourteen slots; as long as you don’t buy eggs until you have just two left you’ll always have room.

If you build one we want to know. We’re thinking 3D printed cups, low-power microcontroller, but we’re kind of stumped on the cheapest WiFi solution. Leave your thoughts in the comments.

[via Reddit via NY Daily News via Mind of Geek]

We’ve Found The Awesome Singularity

tardis

Yes, that’s exactly what you think it is. A Transformer. That transforms into the TARDIS.

This masterpiece of pop culture is the work of [Nonnef] over on Instructables. After the inspiration to create this work of art struck, [Nonnef] started modeling this Transformer and TARDIS in clay to make everything fit together just right. After a good bit of 3D modelling, the Doctor’s robotic wife was ready for printing.

If you’re going to print one of these for yourself, be prepared for a very long print. [Nonnef] says the latest version took about 30 hours on his RepRap with a .35 mm nozzle. In the end nearly the entire Transformer came directly from a 3D printer, the only additional parts needed being a pen spring and a small screw. Paint is, of course, optional.

All the files are available on the Instructable.

A Handful Of Parts Used To Form An Electrocardiogram

minimal-ecg

It’s difficult to image a more bare-bones approach to building an ECG. [Raul] used an Arduino nano to collect samples and push them to a computer for graphing.

An Electrocardiogram measures electrical activity around your heart. The white circles above are the sensors which he picked up in a box of fifty for 11 Euros (under $15). Stick them on your skin in just the right places and they’ll report back on what your heart is doing.

He used a AD8221 to amplify the signals. He mentions that this is an ins-amp, not an op-amp. We didn’t find a concise reference explaining what that is. It might be a good topic for the comments section. The signal from that chip feeds into an LM324 op-amp before being dumped into the Arduino.

Simplicity comes at a price. This measures very small electrical impulses and has very little in the way of shielding and filtering. Because of this you may need to do a rain dance, say a prayer, burn a candle, and stick needles into a doll to get a reliable signal on the other end.

Here’s another version that doesn’t require special sensors.