ElectronBot: A Sweet Mini Desktop Robot That Ticks All The Boxes

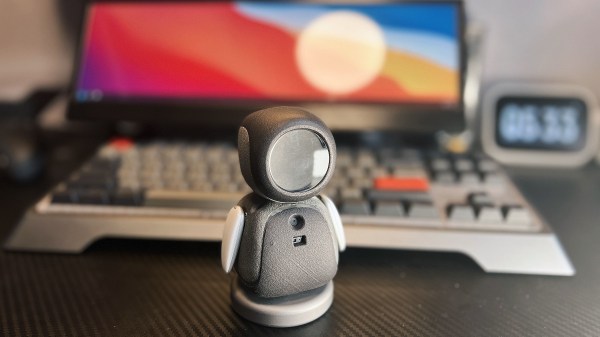
[Peng Zhihui] seems to have found some spare time and energy to crack out another sweet robot build, this time it’s a much smaller, and cuter emoji-bot (Original GitHub Link,) with the usual production-ready levels of attention to detail. With a lot of fine details in the 3D printed models, this is one for SLS printing in nylon, but that can be done for a reasonable outlay, in China at least. The electronics package consists of a few full custom, and tiny, PCBs designed with Altium Designer, with off-the-shelf modules for the circular LCD and camera. The main board hosts an STM32F405 and deals with the display and SD card, The reason for this choice of STM32 was due to the requirement for connecting to an external USB3300 high-speed USB PHY. There is a sensor PCB which handles the gesture sensor, a USB hub, MPU6050 9-axis sensor, and also the USB camera module. This board attaches to the USB-C connector in the base, via a FFC cable, allowing the robot to rotate on its base.

Cunning two-servo shoulder mechanism

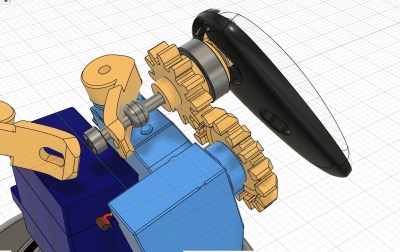
[Peng] clearly has exacting standards as to how things should work, and we guess wanted to have the arms back-driveable in a way that enabled the host computer to track and record the motor positions for replaying later on. The connection back to the controller is via I2C, allowing all five servos to hang on the same bus, saving previous resources. Smart! Getting a processor and motor driver in such a tiny space was a bit of challenge, but a walk in the park for [Peng] as is demonstrates in the video embedded below (We believe English subtitles are pending!) The arm mechanism is particularly interesting, and rather elegantly executed, and he does seem rather proud of this part of the design, and so he should! Like with [Peng’s] other projects, there is a lot to see, and plenty of scope for feature explosion. It was nice to see the ‘bot being used as an input device, not only with gesture sensing via the dedicated sensor, but also using the camera with OpenCV to track user posture and act accordingly. This thing could act as genuinely useful AI device, as was a being darn cute at the same time!

We know you come to Hackaday for your cute robot fix, and we’re not going to disappoint. Here’s a cute robot lamp, an obligatory spot (a robot dog) type project, and if you’re more of a cat person, then we got that base covered as well.

Continue reading “ElectronBot: A Sweet Mini Desktop Robot That Ticks All The Boxes”

High Tech Pancake Tesla Coil Brings The Lightning

For several years now we’ve been following [Jay Bowles] as he brings high-voltage down to Earth on his Plasma Channel YouTube channel. From spark gaps made of bits of copper pipe to automotive ignition coils driven by the stalwart 555 timer, he’s got a real knack for keeping his builds affordable and approachable. But once in a while you’ve got to step out of your comfort zone, and although the dedicated DIY’er could still replicate the solid state “pancake” Tesla coil he documents in his latest video, we’d say this one is better left for the professionals.

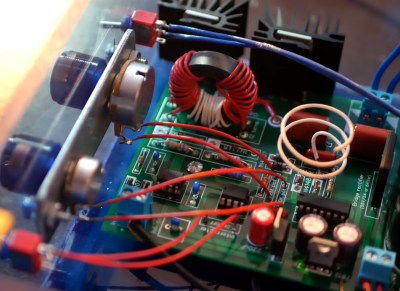
The story starts about nine months ago, when [Jay] was approached by fellow YouTuber [LabCoatz] to collaborate on a PCB design for a solid state Tesla coil (SSTC). Rather than a traditional spark gap, a SSTC uses insulated-gate bipolar transistors (IGBTs) triggered by an oscillator, which is not only more efficient but allows for fine control of the primary coil. The idea was to develop an AC-powered coil that was compact, easy to repair, and could be controlled with just a couple dials on the front panel. The device would also make use of an antenna feedback system that would pick up the resonant frequency of the secondary coil and automatically adjust the IGBT drive to match.

Being considerably more complex than many of the previous builds featured on Plasma Channel, it took some time to work out all the kinks. In fact, the majority of the video is [Jay] walking the viewer through the various failure modes that he ran into while developing the SSTC. Even for somebody with his experience in high-voltage, there were a number of headscratchers that had to be solved.

For example, the first version of the design used metal bolts to attach the primary and secondary coils, until he realized that was leading to capacitive coupling and replaced them with acrylic blocks instead. If his previous videos surprised you by showing how easy it could be to experiment with high-voltages, this one is a reminder that it’s not always so simple.

But in the end [Jay] does get everything sorted out, and the results are nothing short of spectacular. Even on the lower power levels it throws some impressive sparks, but when cranked up to max, it offers some of the most impressive visuals we’ve seen so far from Plasma Channel. It was a lot of work, but it certainly wasn’t wasted effort.

Fascinated by the results, but not quite ready to jump into the deep end? This affordable and easy to build high-voltage generator featured on Plasma Channel back in 2020 is a great way to get started. If you still need more inspiration, check out the fantastic presentation [Jay] gave during the 2021 Remoticon.

Continue reading “High Tech Pancake Tesla Coil Brings The Lightning”

The Open Source ASICs Hack Chat Redefines Possible

There was a time when all that was available to the electronics hobbyist were passive components and vacuum tubes. Then along comes the integrated circuit, and it changed everything. Fast forward a bit, and affordable programmable microcontrollers arrived on the scene. Getting started in electronics became far easier, and the line between hardware and software started to blur. Much more recently, the hobbyist community was introduced to field programmable gate arrays (FPGAs) and the tools necessary to work with them. While not as widely applicable as the IC or MCU, the proliferation of FPGAs among hardware hackers once again opened doors that were previously locked tight.

We’re currently on the edge of another paradigm shift, but it’s no surprise if you haven’t heard of it. After all, the last couple of years have been a bit unusual, so the 2020 announcement that Google was teaming up with SkyWater and Efabless to enable the design and manufacture of open source application-specific integrated circuits (ASICs) flew under the radar for many people. But not Matt Venn, the host of this week’s Hack Chat. For him, it was the opportunity he’d been waiting for.

Matt started like many of us, building electronic kits and building new gadgets out of old discarded hardware. He graduated to microcontrollers, and became particularly interested in FPGAs when the open source toolchains started hitting the scene. Of course by this point, it was much more than just a hobby for him. He was presenting a talk at the 2019 Week of Open Source Hardware in Switzerland when he saw Tim Edwards from Efabless demo a chip that had been made with open source tools. Unfortunately, the costs involved were still far too high for an individual to put their ideas into silicon.

So when Google and Skywater announced they would be footing the bill to have selected open source ASIC designs manufactured a few months later, Matt says he was in a good position to jump in. He has since started running the Zero to ASIC Course which aims to teach you how to produce your own chips using the open source Process Development Kit, and so far 160 people have taken him up on the offer.

As you might expect, many of the questions in the Chat had to do with what kind of designs you can actually produce using the 130 nm process. Especially given the limits on the physical space each creator’s circuit can take up on each multi-project wafer (MPW). Others wanted to know how difficult it would be to port over existing FPGA designs, or how well the process worked with analog applications. With the number of designs Matt has seen go through his course, he could answer many of the questions just by pointing to a particular individual’s ASIC. For instance, he held up the digital-to-analog converter from Harald Pretl and Thomas Parry’s 5 GHz satellite transceiver as prime analog examples.

So let’s say you put the work in to design an ASIC and it gets approved to be produced on a future MPW, what then? Well, first you have to hope everything goes according to plan. Matt explains that the initial run was almost a total write-off due to timing problems in the toolchain, though in the end, he was largely able to recover his own chip. But they’ve done several runs since then, so let’s assume there’s no production problems. What exactly ends up on your doorstep?
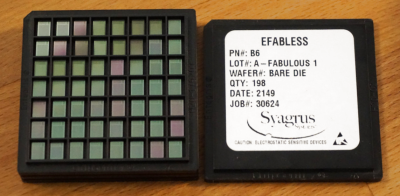
If you were expecting a handy DIP8, you might be disappointed. While some DIY friendly packages would be nice, right now the ASICs ship as wafer level chip scale package (WLCSP) with an unforgiving 0.5 mm pitch. If you can believe it, that’s actually an improvement over the first run, which shipped out as a bare die. Of course as Matt pointed out, anyone who’s gotten to the point of designing their own custom ASIC probably won’t be scared off by the prospect of some fine-pitch soldering. Some in the Chat wondered about the difficulty in getting compatible PCBs produced, but Matt said that in his experience OSH Park has been up to the challenge.

Like the Metal 3D Printing Hack Chat before it, this week’s session went over a topic that’s on the absolute cutting edge of what’s possible for hardware hackers and hobbyists. Truth be told, the vast majority of the people reading Hackaday are no more likely to send away for their own custom ASIC as they are to battle x-rays in an attempt to sinter metal with a homebrew electron gun. But that doesn’t make the fact that some folks out there doing it any less important, or inspiring. That said, if you do end up being one of those select few that can boast they’ve designed a custom chip of their own — don’t forget to send one of them our way.

We’re grateful Matt Venn was able, once again, to share his valuable experience in the realm of open source application-specific integrated circuits with us. If you haven’t checked them out already, the Zero to ASIC workshop he ran for Remoticon 2020 and his talk Open Source ASICs – A Year in Perspective from Remoticon 2021 are required viewing if you want to learn more about this fascinating new frontier in hardware hacking.


The Hack Chat is a weekly online chat session hosted by leading experts from all corners of the hardware hacking universe. It’s a great way for hackers connect in a fun and informal way, but if you can’t make it live, these overview posts as well as the transcripts posted to Hackaday.io make sure you don’t miss out.
Render HTML And CSS On An ESP32

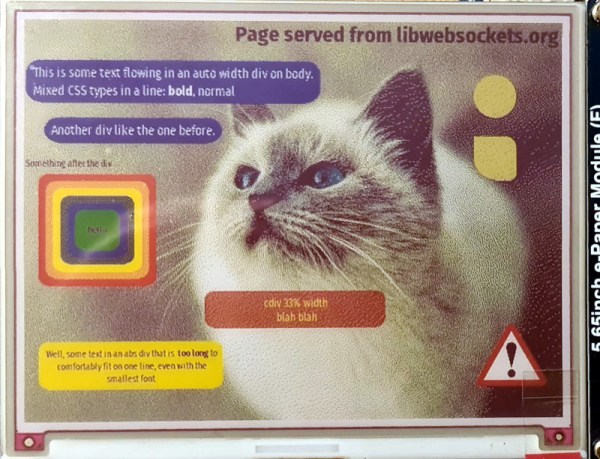
As the available computing power from affordable microcontrollers continues to increase, there is an inevitable blurring of the line between them and the lower tier of application processors capable of running Linux-based operating systems. For the most part a microcontroller busies itself with behind-the-scenes tasks, but as so many projects here have demonstrated, they can be pretty capable when it comes to user-facing applications too. Now [Andy Green] has extended the possibilities with affordable silicon, by producing a proof-of-concept HTML + CSS renderer over h2 on ESP32 for libwebsockets. Surf the web on a microcontroller without settling for a text-only experience? Why not!

He freely admits that this is far from being a complete HTML rendering engine, in that while it parses and renders HTML and CSS with JPEG and PNG image support, it does so only with a subset of HTML and is not tolerant of any malformations. There is also no JS support, which is hardly surprising given the available resources.

Even with those limitations it remains an impressive piece of work, which we hope will one day be able to make some effort at displaying Hackaday on ESP32 devices such as the badge.team European conference badges. Definitely a project to watch!

Illustrated Kristina with an IBM Model M keyboard floating between her hands.

Keebin’ With Kristina: The One With The Really Tall Keycaps

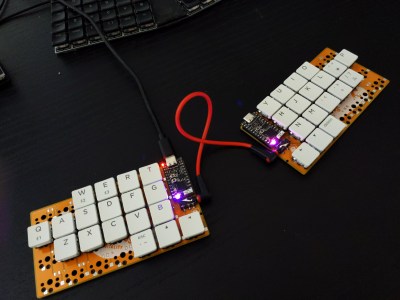
About a month ago, [Unexpected Maker] finished their TinyS3, an ESP32-S3 development board. Since the chip supports both true USB and Bluetooth, [deʃhipu] wondered how well it would work in a keyboard.

Thus, the Vegemite Sandwich was made, perhaps while [deʃhipu] was dreaming of traveling in a fried-out Kombi. But really, it was named so because [Unexpected Maker] hails from Australia.

This is [deʃhipu]’s first time using switch sockets, which is (as far as we know) the only choice when it comes to hot-swappable Kailh chocs. We’ll be watching this one with hungry eyes.

Continue reading “Keebin’ With Kristina: The One With The Really Tall Keycaps”

5-Axis 3D Printing For The Rest Of Us

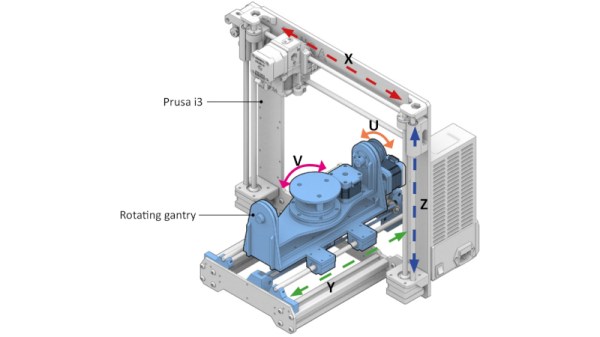
By now we’re all used to the idea of three dimensional printing, as over the last fifteen years or so it’s become an indispensable tool for anyone with an interest in making things without an industrial scale budget. There are still a few limitations to the techniques used in a common 3D printer though, in particular being tied to layers in a single orientation. It’s something that can be addressed by adding tilt and rotational axes to the printer to deliver a five-axis device, but this has not been available in an affordable form. [Freddie Hong] and colleagues have tackled the production of an affordable printer, and his solution fits neatly on the bed of a Prusa i3 to convert it to five-axis machine without breaking the bank.

The quantity and quality of the work is certainly impressive, with suitable slicing software being developed alongside the 3D printed parts to fit the two extra axes. For now all we can do is look at the pictures and the video below the break, but once the work has been presented the promise that all the necessary files will be made public. We can see versions of the hardware finding their way onto printers other  than the Prusa, and we can see this becoming yet another piece of the regular armory available to those of us who make things.

Continue reading “5-Axis 3D Printing For The Rest Of Us”

The Metal 3D Printing Hack Chat Brings The Heat

At this point, it’s safe to say the novelty of desktop 3D printing has worn off. The community has largely come to terms with the limitations of extruded plastics, and while we still vehemently believe that it’s a transformative technology, we’ll admit there aren’t too many applications where a $200 USD printer squirting out PLA is truly the best tool for the job.

But rather than looking at today’s consumer 3D printer market as the end of the line, what if it’s just the beginning? With the problems of slicing, motion control, and extrusion more or less solved when it comes to machines that print in plastic, is it finally time to turn our attention to the unique problems inherent in building affordable metal printers? Agustin Cruz certainly thinks so, which is why he took to the Hack Chat this week to talk about his personal vision for an open source 3D printer that can turn powdered metals into solid objects by way of a carefully controlled electron beam.

To be clear, Agustin isn’t suggesting you toss out your Creality anytime soon. Metal 3D printing will always be a niche within a niche, but for applications where even advanced engineering plastics like PEI and PEEK simply won’t do, he argues the community needs to have a cheap and accessible option. Especially for developing and low income countries where traditional manufacturing may be difficult. The machine he’s been working on wouldn’t be outside the capabilities of an individual to build and operate, but at least for right now the primary target is hospitals, colleges, and small companies.

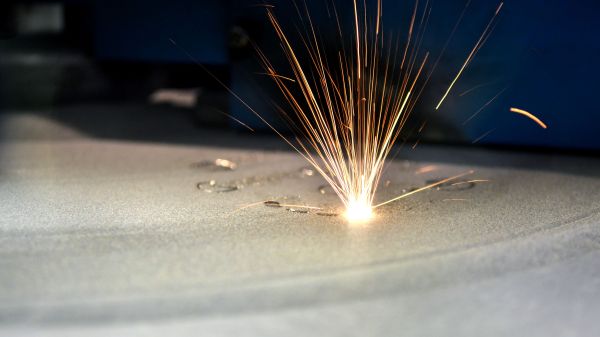
The Chat was full of technical questions about Agustin’s design, and he wasn’t shy about tackling them. Some wondered why he decided to sinter the metal powder with an electron gun when solid-state lasers are cheap, easily available, and relatively straightforward to work with. But while the laser might seem like the easier solution on the surface, Agustin points out that using a magnetically focused electron beam gives his printer some unique capabilities.

For example, he can easily defocus the beam and pass it over the entire build plate to pre-heat the powder. The steerable beam doesn’t require mirrors either, which not only reduces the weight and complexity of the machine, but in theory should allow for faster print speeds. The beam can be moved in the X/Y dimensions with an accuracy of 0.01 mm, and while the beam diameter is currently a respectable 0.5 mm, Agustin says he’s working on bringing that down to 0.1 mm for high detail work. The temperature at the focal point of the beam is between 1,400 and 1,500 °C, which he notes is not only hot enough to melt the powdered metal, but can also weld stainless steel.

Continue reading “The Metal 3D Printing Hack Chat Brings The Heat”