A sequence of pictures with arrows between each other. This picture shows a Wokwi (Fritzing-like) diagram with logic gates, going to a chip shot, going to a panel of chipsGA footprint on a KiCad PCB render with DIP switches and LEDs around the breakout. Under the sequence, it says: "Tiny Tapeout! Demystifying microchip design and manufacture"

Design Your Own Chip With TinyTapeout

When hackers found and developed ways to order PCBs on the cheap, it revolutionized the way we create. Accessible 3D printing brought us entire new areas to create things. [Matt Venn] is one of the people at the forefront of hackers designing our own silicon, and we’ve covered plenty of his research over the years. His latest effort to involve the hacker community, TinyTapeout, makes chip design accessible to newcomers – the bar is as low as arranging logic gates on a web browser page.

Six chip shots shown, with various densities of gates being used - some use a little, and some use a the entire area given.
Just six of the designs submitted, with varying complexity

For this, [Matt] worked with people like [Uri Shaked] of Wokwi fame, [Sylvain “tnt” Munaut], [jix], and a few others. Together, they created all the tooling necessary, and most importantly, a pipeline where your logic gate-based design in Wokwi gets compiled into a block ready to be put into silicon, with even simulations and compile-time verification for common mistakes. As a result, the design process is remarkably straightforward, to the point where a 9-year-old kid can do it. If you wanted, you could submit your Verilog, too!

The first round of TinyTapeout had a deadline in the first days of September and brought 152 entries together – just in time for an Efabless shuttle submission. All of these designs were put on a single instance of a chip, that will be fabbed in quantity, tested, soldered onto breakouts, and mailed out to individual participants. In this way, everyone will be getting everyone’s design, but thanks to the on-chip muxing hardware, they’re able to switch between designs using on-breakout DIP switches.

More after the break…

Continue reading “Design Your Own Chip With TinyTapeout”

The BGA chip in question flipped onto a piecce of breadboard, all its pins broken out with magnet wire.

Heroic Efforts Give Smallest ARM MCU A Breakout, Open Debugger

In today’s episode of Diminutive Device Technology Overview, [Sprite_TM] is at it again – this time conquering the HC32L110. A few weeks ago, we have highlighted the small ARM Cortex M0+ microcontroller, which is outstanding because of its exceptionally small size. We also pointed out a few hurdles, among them – hard-to-approach SDK and documentation, and difficulties making and assembling a PCB for such a small BGA. Today, we witness how [Sprite_TM] bulldozed through all of these hurdles for all of us, and added a few pictures to our collective “outrageous soldering” galleries while at it.

First, he figured out an example layout for this MCU that’s achievable for us even on a cheapest 2-layer board from JLCPCB, keeping distances within the generic tolerance standards by snubbing out a few pins. As a result, we only lose access to four GPIOs – those will have to be kept as inputs, so that nothing burns out. However, that’s the kind of tradeoff we are okay making if it helps us keep our PCB small and lightweight for projects where these factors matter. After receiving the resulting board, he also recorded a short tutorial on soldering such packages at home with a mere hot air gun and a few bare necessities like flux and tweezers – embedded below.

It doesn’t end there, however, as he decided to work around the GPIO fanout limitation in a non-intended way. Evidently, [Sprite_TM] decided to have some fun, taking a piece of regular 0.1″ spacing protoboard and deadbugging the chip with magnet wire, much to our amusement. The resulting contraption, pictured above, worked – and this is ever something you’d like to be able to achieve yourself in times of dire need, whether you make something work or simply to be entertained by making use of a cursed mounting technique, there’s an one-hour-long livestream recording of how this magnet wire contraption came to be. And, of course, that wasn’t the last thing to be shared.

Continue reading “Heroic Efforts Give Smallest ARM MCU A Breakout, Open Debugger”

The Open Source ASICs Hack Chat Redefines Possible

There was a time when all that was available to the electronics hobbyist were passive components and vacuum tubes. Then along comes the integrated circuit, and it changed everything. Fast forward a bit, and affordable programmable microcontrollers arrived on the scene. Getting started in electronics became far easier, and the line between hardware and software started to blur. Much more recently, the hobbyist community was introduced to field programmable gate arrays (FPGAs) and the tools necessary to work with them. While not as widely applicable as the IC or MCU, the proliferation of FPGAs among hardware hackers once again opened doors that were previously locked tight.

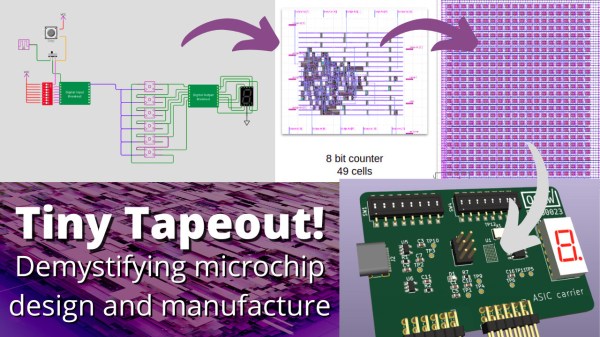
We’re currently on the edge of another paradigm shift, but it’s no surprise if you haven’t heard of it. After all, the last couple of years have been a bit unusual, so the 2020 announcement that Google was teaming up with SkyWater and Efabless to enable the design and manufacture of open source application-specific integrated circuits (ASICs) flew under the radar for many people. But not Matt Venn, the host of this week’s Hack Chat. For him, it was the opportunity he’d been waiting for.

Matt started like many of us, building electronic kits and building new gadgets out of old discarded hardware. He graduated to microcontrollers, and became particularly interested in FPGAs when the open source toolchains started hitting the scene. Of course by this point, it was much more than just a hobby for him. He was presenting a talk at the 2019 Week of Open Source Hardware in Switzerland when he saw Tim Edwards from Efabless demo a chip that had been made with open source tools. Unfortunately, the costs involved were still far too high for an individual to put their ideas into silicon.

So when Google and Skywater announced they would be footing the bill to have selected open source ASIC designs manufactured a few months later, Matt says he was in a good position to jump in. He has since started running the Zero to ASIC Course which aims to teach you how to produce your own chips using the open source Process Development Kit, and so far 160 people have taken him up on the offer.

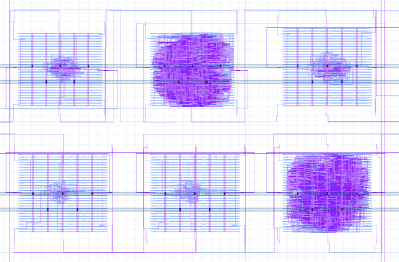
As you might expect, many of the questions in the Chat had to do with what kind of designs you can actually produce using the 130 nm process. Especially given the limits on the physical space each creator’s circuit can take up on each multi-project wafer (MPW). Others wanted to know how difficult it would be to port over existing FPGA designs, or how well the process worked with analog applications. With the number of designs Matt has seen go through his course, he could answer many of the questions just by pointing to a particular individual’s ASIC. For instance, he held up the digital-to-analog converter from Harald Pretl and Thomas Parry’s 5 GHz satellite transceiver as prime analog examples.

So let’s say you put the work in to design an ASIC and it gets approved to be produced on a future MPW, what then? Well, first you have to hope everything goes according to plan. Matt explains that the initial run was almost a total write-off due to timing problems in the toolchain, though in the end, he was largely able to recover his own chip. But they’ve done several runs since then, so let’s assume there’s no production problems. What exactly ends up on your doorstep?

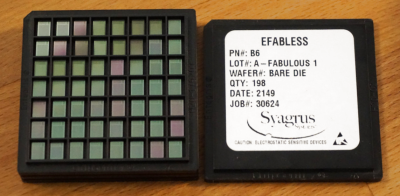
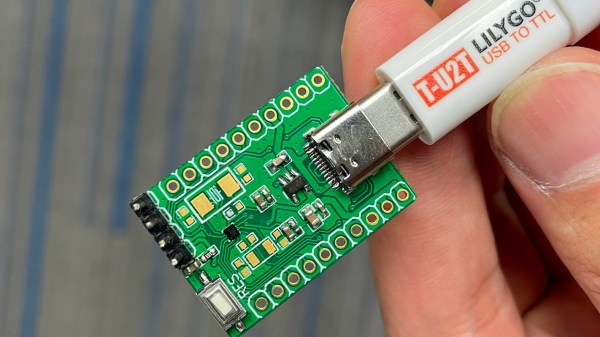
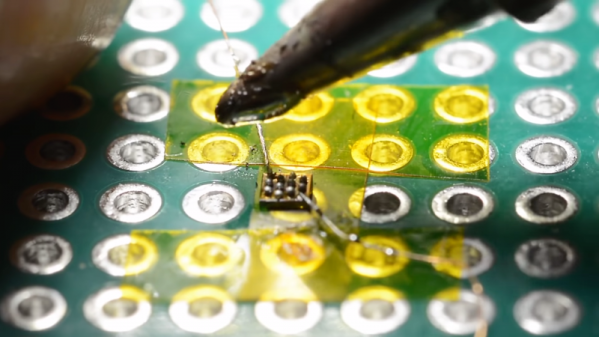
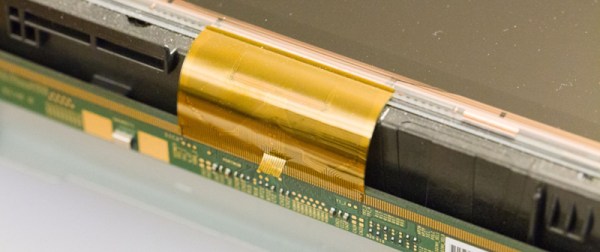
If you were expecting a handy DIP8, you might be disappointed. While some DIY friendly packages would be nice, right now the ASICs ship as wafer level chip scale package (WLCSP) with an unforgiving 0.5 mm pitch. If you can believe it, that’s actually an improvement over the first run, which shipped out as a bare die. Of course as Matt pointed out, anyone who’s gotten to the point of designing their own custom ASIC probably won’t be scared off by the prospect of some fine-pitch soldering. Some in the Chat wondered about the difficulty in getting compatible PCBs produced, but Matt said that in his experience OSH Park has been up to the challenge.

Like the Metal 3D Printing Hack Chat before it, this week’s session went over a topic that’s on the absolute cutting edge of what’s possible for hardware hackers and hobbyists. Truth be told, the vast majority of the people reading Hackaday are no more likely to send away for their own custom ASIC as they are to battle x-rays in an attempt to sinter metal with a homebrew electron gun. But that doesn’t make the fact that some folks out there doing it any less important, or inspiring. That said, if you do end up being one of those select few that can boast they’ve designed a custom chip of their own — don’t forget to send one of them our way.

We’re grateful Matt Venn was able, once again, to share his valuable experience in the realm of open source application-specific integrated circuits with us. If you haven’t checked them out already, the Zero to ASIC workshop he ran for Remoticon 2020 and his talk Open Source ASICs – A Year in Perspective from Remoticon 2021 are required viewing if you want to learn more about this fascinating new frontier in hardware hacking.


The Hack Chat is a weekly online chat session hosted by leading experts from all corners of the hardware hacking universe. It’s a great way for hackers connect in a fun and informal way, but if you can’t make it live, these overview posts as well as the transcripts posted to Hackaday.io make sure you don’t miss out.

The teeny tiny MCU mentioned in the article, merely a blimp on a giant devboard

New Part Day: Smallest ARM MCU Uproots Competition, Needs Research

We’ve been contacted by [Cedric], telling us about the smallest ARM MCU he’s ever seen – Huada HC32L110. For those of us into miniature products, this Cortex-M0+ package packs a punch (PDF datasheet), with low-power, high capabilities and rich peripherals packed into an 1.6mm x 1.4mm piece of solderable silicon.

This is matchstick head scale computing, with way more power than we previously could access at such a scale, waiting to be wrangled. Compared to an 8-bit ATTiny20 also available in WLCSP package, this is a notable increase in specs, with a way more powerful CPU, 16 times as much RAM and 8-16 times the flash! Not to mention that it’s $1 a piece in QTY1, which is about what an ATTiny20 goes for. Being a 0.35mm pitch 16-pin BGA, your typical board house might not be quite happy with you, but once you get a board fabbed and delivered from a fab worth their salt, a bit of stenciling and reflow will get you to a devboard in no time.

Drawbacks? No English datasheet or Arduino port, and the 67-page PDF we found doesn’t have some things like register mappings. LILYGO promised that they will start selling the devboards soon, but we’re sure it wouldn’t be hard for us to develop our own. From there, we’d hope for an ESP8266-like effect – missing information pieced together, translated and made accessible, bit by bit.

When it comes to soldering such small packages, we highly recommend reflow. However, if you decide to go the magnet wire route, we wouldn’t dare object – just make sure to send us pictures. After all, seems like miniature microcontrollers like ATTiny20 are attractive enough of a proposition that people will pick the craziest route possible just to play with one. They say, the madness of the brave is the wisdom of life.

We thank [Cedric] for sharing this with us!

No Caffeine, No Problem: A Hand-Soldered Chip-Scale Package

It’s said that the electronic devices we use on a daily basis, particularly cell phones, could be so much smaller than they are if only the humans they’re designed for weren’t so darn big and clumsy. That’s only part of the story — battery technology has a lot to do with overall device size — but it’s true that chips can be made a whole lot smaller than they are currently, and are starting to bump into the limit of being able to handle them without mechanical assistance.

Or perhaps not, if [mitxela]’s hand-soldering of a tiny ball-grid array chip is any guide. While soldering wires directly to a chip is certainly a practical skill and an impressive one at that, this at least dips its toe into the “just showing off” category. And we heartily endorse that. The chip is an ATtiny20 in a WLCSP (wafer-level chip-scale package) that’s a mere 1.5 mm by 1.4 mm. The underside of the chip has twelve tiny solder balls in a staggered 4×6 array with 0.4 mm pitch. [mitxela] tackled the job of soldering this chip to a 2.54-mm pitch breakout board using individual strands from #30 AWG stranded wire and a regular soldering iron, with a little Kapton tape to hold the chip down. Through the microscope, the iron tip looks enormous, and while we know the drop of solder on the tip was probably minuscule we still found ourselves mentally wiping it off as he worked his way across the array. In the end, all twelve connections were brought out to the protoboard, and the chip powers up successfully.

We’re used to seeing [mitxela] work at a much larger scale, like his servo-plucked music box or a portable Jacob’s Ladder. He’s been known to get small before though, too, like with these tiny blinkenlight earrings.

Continue reading “No Caffeine, No Problem: A Hand-Soldered Chip-Scale Package”

Fixing Broken Monitors By Shining A Flashlight

[dyril] over on the EEVblog has a broken LED TV. It’s a fairly standard Samsung TV from 2012 that unfortunately had a little bit of corrosion on the flexible circuit boards thanks to excessive humidity. One day, [dyril] turned on his TV and found about one-third of the screen was glitchy. After [dyril] took the TV apart, an extremely strange fix was found: shining a light on the corroded flexible circuit board fixed the TV.

The fix, obviously, was to solder a USB light to a power rail on the TV and hot glue the light so it shines on the offending circuit. Solving a problem is one thing, though, understanding why you’ve solved the problem is another thing entirely. [dyril] has no idea why this fix works, and it’s doubtful anyone can give him a complete explanation.

The TV is fixed, and although you can’t argue with results, there is a burning question: how on Earth does shining a light on a broken circuit board fix a TV? Speculation on the EEVblog thread seems to have settled on something similar to the photonic reset of the Raspberry Pi 2. In the Raspberry Pi 2, a small chip scale package (CSP) used in the power supply section would fail when exposed to light. This reset the Pi, and turned out to be a very educational introduction to photons and energy levels for thousands of people with a Pi.

The best guess from the EEVblog is that a chip on the offending board handles a differential signal going to the flex circuit. This chip is sensitive to light, and shutting it down with photons allows the other half of the differential signal to take over. It’s a hand-wavy explanation, but then again this is a very, very weird problem.

You can check out [dyril]’s video demonstration of the problem and solution below. Thanks [Rasz] for sending this one in.

Continue reading “Fixing Broken Monitors By Shining A Flashlight”