Getting Started With USB-C And Common Pitfalls With Charging And Data Transfer

USB-C is one of those things that generally everyone seems to agree on that it is a ‘good thing’, but is it really? In this first part of a series on USB-C, [Andreas Spiess] takes us through the theory of USB-C and USB Power Delivery (PD), as well as data transfer with USB-C cables. Even ignoring the obvious conclusion that with USB-C USB should now actually be called the ‘Universal Parallel Bus’ on account of its two pairs of differential data lines, there’s quite a bit of theory and associated implementation details involved.

The Raspberry Pi 4B's wrong USB-C CC-pin configuration is a good teaching example.
The Raspberry Pi 4B’s wrong USB-C CC-pin configuration is a good teaching example.

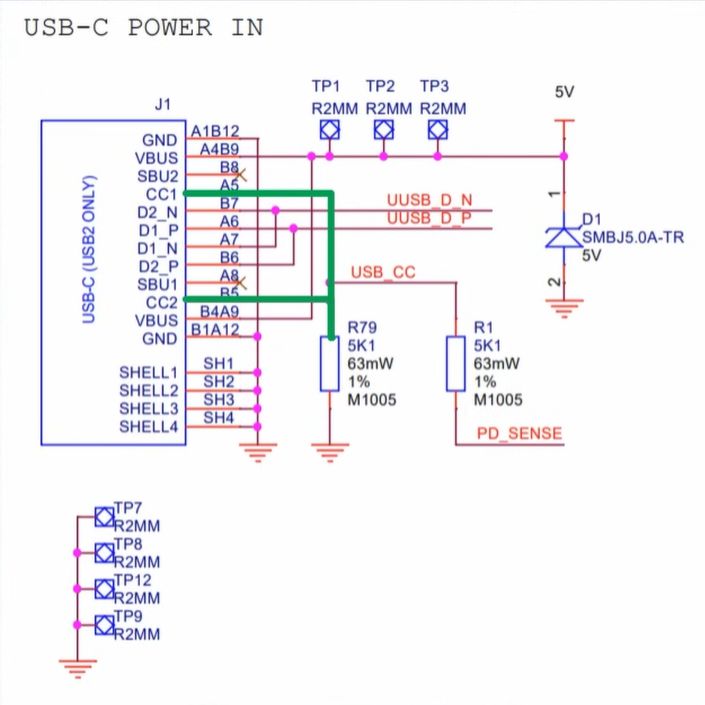
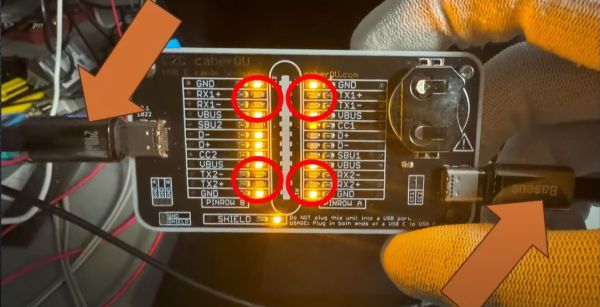
Starting with the USB 2.0 ‘legacy mode’ and the very boring and predictable 5 V power delivery in this mode, [Andreas] shows why you may not get any power delivered to a device with USB-C connector. Most likely the Downstream Facing Peripheral (DFP, AKA not the host) lacks the required resistors on the CC (Configuration Channel) pins, which are both what the other USB-C end uses to determine the connector orientation, as well as what type of device is connected.

This is where early Raspberry Pi 4B users for example saw themselves caught by surprise when their boards didn’t power up except with some USB cables.

The saga continues through [Andreas]’s collection of USB-C cables, as he shows that many of them lack the TX/RX pairs, and that’s before trying to figure out which cables have the e-marker chip to allow for higher voltages and currents.

On the whole we’re still excited about what USB-C brings to the table, but the sheer complexity and number of variables make that there are a myriad of ways in which something cannot work as expected. Ergo Caveat Emptor.

Continue reading “Getting Started With USB-C And Common Pitfalls With Charging And Data Transfer”

3D Printed RC Kart Actually Made Entirely By Hand

If we told you somebody built a 3D printed go-kart, you’d expect to see a certain sequence of events. A bit of work in CAD, a printer montage, then some assembly. That’s not the case here. [3D Sanago] is an artist that works with 3D printing pens, creating 3D objects entirely by hand. It’s an impressive skill, all the more so when it’s used to build something functional like this gorgeous little go-kart.

Just filling in the front wing of this build took approximately four hours. Thus, [3D Sanago] used foam boards to cover much of the chassis.
The build recreates the kart from the KartRider Rush+ game. The first step was to purchase a basic RC car frame to serve as the basis for the kart. [3D Sanago] then set about building a kart skeleton over the unpainted body of the basic RC car. It starts with a wireframe and individual flat panels that are eventually fused together into 3D trusses using the 3D pen.

The trusses are then mounted to the RC car chassis underneath with some wood plates serving as a supporting structure. [3D Sanago] has been known to surface his creations by tediously filling in the wireframes with the 3D pen, but not so this time. He took the easy way out of affixing sections of foam board to create the outer skin of the kart. He also demonstrates neat techniques like forming over a pen to create long plastic pipes and other tubular features. His acrylic-and-mousepad wheel and tire package is also pretty neat.

It’s as much craft as anything else, but it’s amazing to see what can be done when a human takes on the role of a 3D printer.  We’ve featured other great builds from [3D Sanago] before, like this awesome Pokemon-themed humidifier.

Continue reading “3D Printed RC Kart Actually Made Entirely By Hand”

No Dish? Try A Portable Weave Helix Antenna

When you think of satellite communications, you probably think of a dish. But that’s not the only option — a new device from the American University of Beruit and Stanford created a portable antenna made of woven materials that packs easily, weighs little, and can reconfigure for ground-to-space or ground-to-ground communications. The antenna reminded us of a finger trap and you can see it for yourself in the video below.

Because of the antenna’s construction, it can fold up and also adjust to different lengths for different purposes. The antenna collapses to a ring that is five inches across and 1 inch tall. The weight? Under two ounces. The actual paper in Nature Communications is available to read online.

Stretched out to about a foot, the antenna is omnidirectional. The size, of course, also changes the resonant frequency. Tuning is no problem, though, since you can easily change the size as needed. The antenna may also find use on satellites where it’s low weight, and compact storage would be a definite advantage.

The antenna’s weave is actually two separate helixes, one conductive and the other insulating. The antenna normally operates in a vertical configuration. It looks like it might be simple to make some version of this without anything exotic. Let us know if you try!

Helical antennas aren’t new, but this is an unusual construction. They are popular as satellite antennas because of their polarization characteristics among other things.

Continue reading “No Dish? Try A Portable Weave Helix Antenna”

Hotshot 3D Printed Hovercraft Is Devastatingly Fast

These days, it’s pretty cheap and easy to build your own little RC hovercraft. [ValRC] demonstrates just that with a hovercraft build that is surprisingly nimble, and fast to boot.

The build started with a design [ValRC] found online. It was simple enough to print and assemble, needing only a pair of a brushless motors, a speed controller, a receiver, and a servo to run the show. The design uses a plastic bag as a skirt, assembled around a 3D printed frame. That proved to be the hardest part of the build, as hot glue didn’t want to play nice with the thin garbage bag.

Even despite the challenges, once assembled, the hovercraft performed well. It readily slid around on a cushion of air, drifting across asphalt with abandon. Upgrades included a better rudder and a skirt made of thicker and more resilient plastic.  The final craft looked mesmerizing as it glided over the smooth concrete of a parking garage with ease.

A hovercraft is, honestly, one of the cooler printable projects for beginners. All you need is a simple design, some powerful motors, and you’re good to go.

Continue reading “Hotshot 3D Printed Hovercraft Is Devastatingly Fast”

Harvesting Electricity From High-Voltage Transmission Lines Using Fences

When you have a bunch of 230 kV transmission lines running over your property, why not use them for some scientific experiments? This is where the [Double M Innovations] YouTube channel comes into play, including a recent video where the idea of harvesting electricity from HV transmission lines using regular fences is put to an initial test.

The nearly final measurement by [Double M Innovations].
The nearly final voltage measurement by [Double M Innovations].
A rather hefty 88 µF, 1200 V capacitor, a full bridge rectifier, and 73 meters (240 feet) of coax cable to a spot underneath the aforementioned HV transmission lines. The cable was then put up at a height consistent with that of fencing at about 1.2 m (4 ft), making sure that no contact with the ground occurred anywhere. One end of the copper shield of the coax was connected to the full bridge rectifier, with the opposite AC side connected to a metal stake driven into the ground. From this the capacitor was being charged.

As for the results, they were rather concerning and flashy, with the 1000 VAC-rated multimeter going out of range on the AC side of the bridge rectifier, and the capacitor slowly charging up to 1000 V before the experiment was stopped.

Based on the capacity of the capacitor and the final measured voltage of 907 VDC, roughly 36.2 Joule would have been collected, giving some idea of the power one could collect from a few kilometers of fencing wire underneath such HV lines, and why you probably want to ground them if energy collecting is not your focus.

As for whether storing the power inductively coupled on fence wire can be legally used is probably something best discussed with your local energy company.

Continue reading “Harvesting Electricity From High-Voltage Transmission Lines Using Fences”

A Look At 3D Printed Professional LED Signage

Customer perception is everything when you’re running a business, particularly in retail. High-quality signage can go a long way into creating a good impression in this respect. [king process] decided to show us how professional-grade LED signage is made in a Korean shop that specializes in the work.

The signs we’re shown are custom builds that are matched to the shape of a company’s logo. No rectangular printed lightboxes here, this is fully custom stuff. To that end, a 3D printer is the perfect tool for the job, as it lets the shop produce signs in any shape desired with no need for custom tooling.

The 3D printers that build up the signs have seriously large build volumes, though more so in the X and Y dimensions rather than the Z. We see a whole fleet of printers working away to allow multiple signs to be produced quickly. The first step is to produce the outline of a sign, which serves as a base for the build. Cavities in the sign are then filled with a translucent silicone solution to act as diffuser material. Once cured, these various sections are colored by hand as required. LED strips are then installed on a backing plate to illuminate the sections of the sign.

The final result is a sign with clean, bright glowing lines. It’s vaguely reminiscent of a neon sign, but without any of the limitations of the glass tubes influencing how it looks. It’s also neat to see the techniques a professional shop uses to make things right the first time, without dinging or marring any of the parts along the way.

Indeed, it seems the classical neon sign is, these days, bested by a variety of alternative technologies.

Continue reading “A Look At 3D Printed Professional LED Signage”

A Hydroelectric Dam, Built Out Of LEGO

Hydroelectric dams are usually major infrastructure projects that costs tens of millions of dollars to construct. But they don’t have to be — you can build your own at home, using LEGO, as [Build it with Bricks] demonstrates!

The build is set up in an aquarium with a pump, which serves to simulate flow through a river system. The LEGO dam is installed in the middle of the aquarium, blocking the flow. It has a sluice gate in the lower section to feed water to a turbine for power generation. The gate is moved via a rack and pinion. It’s driven by a LEGO motor on a long shaft to keep it a safe distance from the wet stuff. The dam also gets a spillway to allow for overflow to be handled elegantly. Meanwhile, a second motor acts as a generator, fitted with a fairly basic turbine.

Hilariously, the first build fails spectacularly as the hydrostatic pressure of the water destroys the LEGO wall. A wider base and some reinforcements help solve the problem. There’s a better turbine, too.  It’s all pretty leaky, but LEGO was never designed to be water tight. As you might imagine, it doesn’t generate a lot of power, but it’s enough to just barely light some LEDs.

It’s a fun way to learn about hydroelectric power, even if it’s not making major amounts of electricity. Video after the break.

Continue reading “A Hydroelectric Dam, Built Out Of LEGO”