Printed Centrifugal Dust Separator Stays On Budget

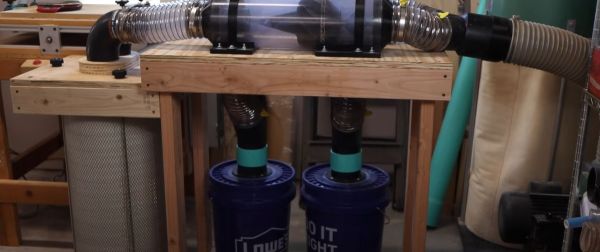
Anyone who’s ever spent time in a woodworking shop knows how much dust is produced when cutting, sanding, and so on. [Tim] of Pilson Guitars was looking to outfit his shop with centrifugal dust separators to combat the problem, which are supposed to remove over 99% of the sawdust particles right out of the air. Unfortunately, they can cost thousands of dollars. So he decided to try making his own.

Centrifugal dust separator design, by Tim at Pilson Guitars.

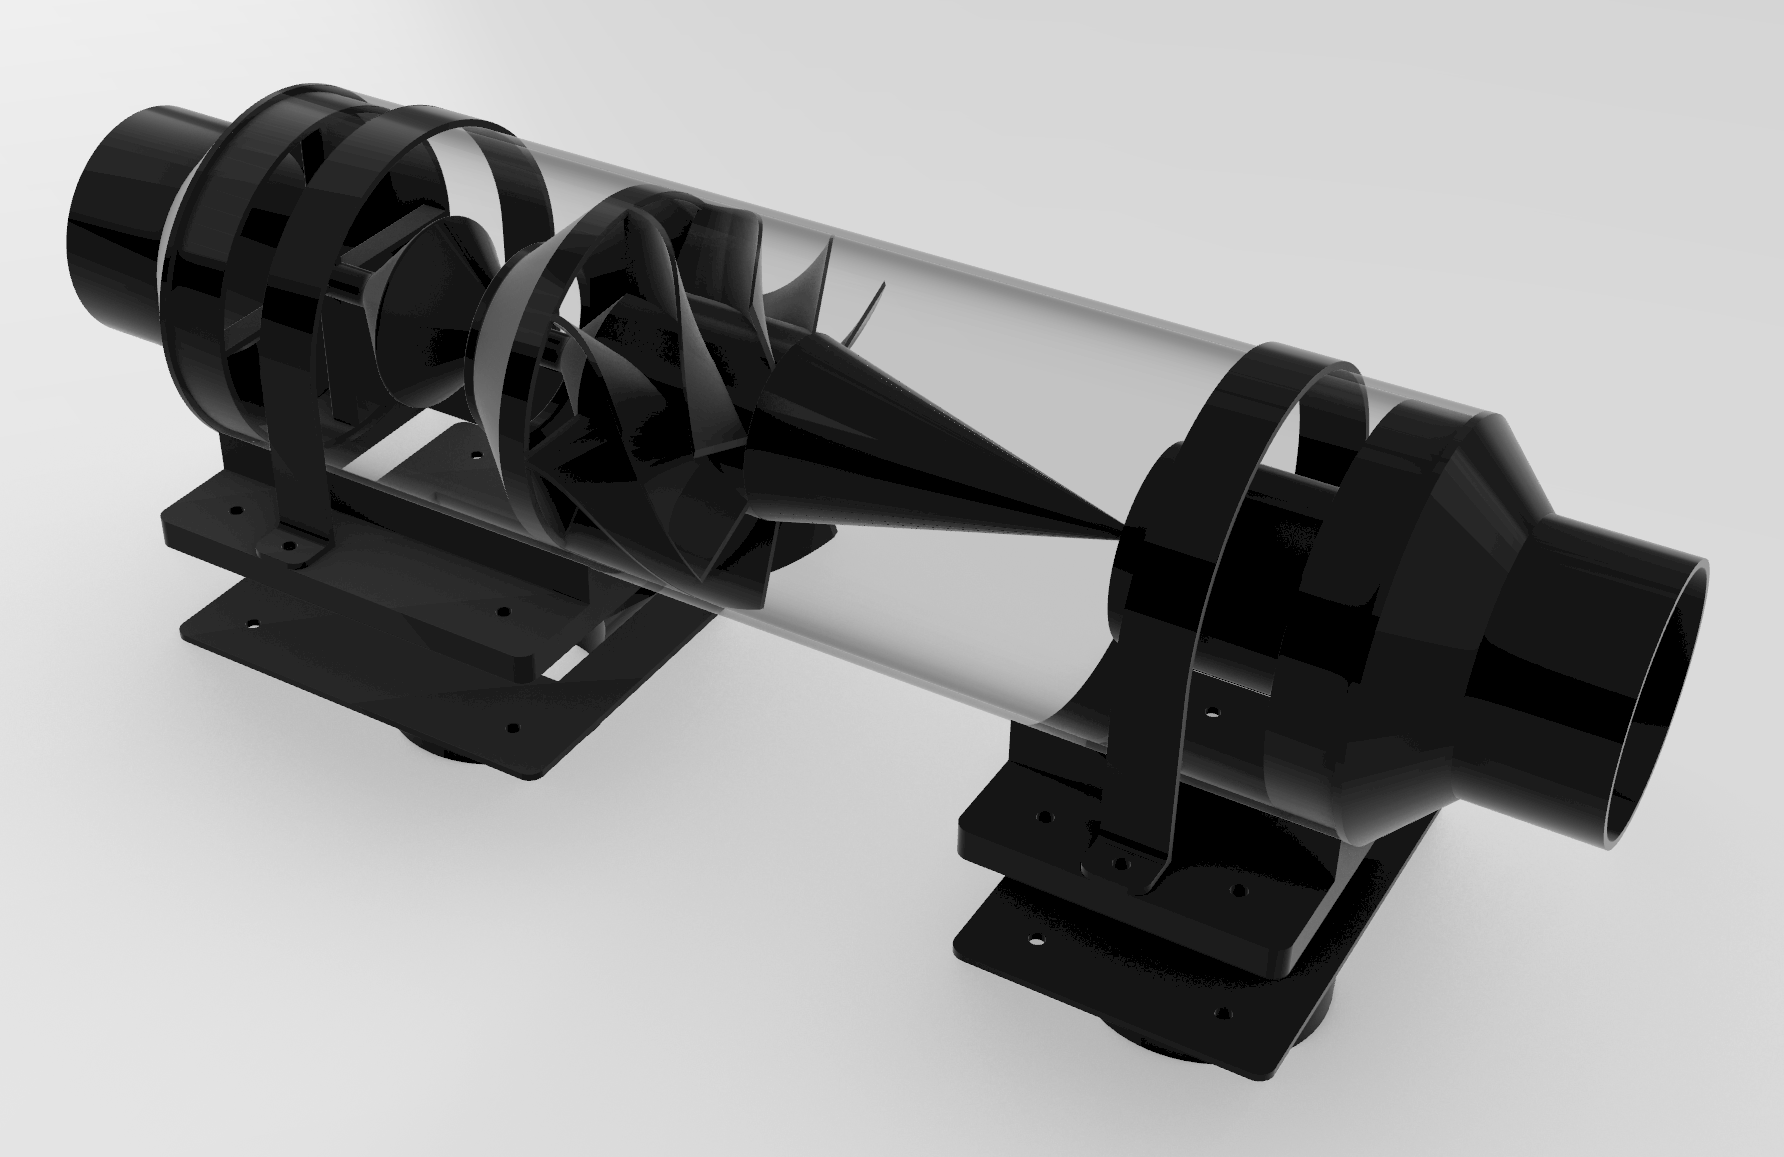
Using a clear PVC tube and 100 hours of printing on his Prusa i3 MK3, his CAD file had come to life, ready to use the power of centrifugal air to leave just enough fine dust in the output port to have a HEPA filter handle the remainder. Unfortunately, initial testing showed that a single dust separator filtered out far less than 90%, and even adding a second unit bumped that up to only 94.2%. Still impressive, but this would clog up a HEPA filter in no time. Thus [Tim] had a second try at it, after a range of helpful comments to the first video.

Changes included a different design for the impeller blades to improve the vortex, as well as attempting to run the system in series. Sadly more issues cropped up, with apparently the air also seeking a way via the collection bins that has [Tim] rethinking more aspects of the design. He has made the design files (STEP and more) available on GitHub for perusal by the community and hopefully some constructive input on how to DIY such dust separation system.

Over the years, we’ve seen many different approaches to the problem of dust collection. We’ve covered other 3D printed solutions if your printer is looking for something to do, but if you’d prefer something a little more low-tech, this traffic cone dust separator is particularly clever.

Continue reading “Printed Centrifugal Dust Separator Stays On Budget”

Check Out This PDP-11 Running Unix With A Teletype Terminal

If you’ve spent a few years around Hackaday, you’ve probably seen or heard of the DEC PDP-11 before. It was one of the great machines of the minicomputer era, back when machines like the Apple ][ and the Commodore 64 weren’t even a gleam in their creator’s eyes. You’ve also probably heard of Unix, given that so many of us use Linux on the regular. Well, now you can see them both in action, as [HappyComputerGuy] fires up real Unix on a real PDP-11/73… with a real Teletype Model 33 to boot!

It’s a fascinating dive into the tech of yesteryear, with a rich dose of history to boot. It’s mindboggling to think that video terminals were once prohibitively expensive and that teletype printers were the norm for interacting with computers. The idea of interacting with a live machine via a printed page is alien, but it’s how things were done! We’re also treated to a lesson on how to boot the PDP-11 with 2.11BSD which is a hilariously manual process. It also takes a very long time. [HappyComputerGuy] then shows off the Teletype Model 33 rocking the banner command to great effect.

It’s awesome to see this hardware as it would really have been used back in its heyday. Computing really was different before the microcomputer format became mainstream. It’s not the only PDP-11 we’ve seen lately, either! Video after the break.

Continue reading “Check Out This PDP-11 Running Unix With A Teletype Terminal”

Need A Refresher On RMS?

If you mostly deal with DC current, you might not think much of root mean square or RMS measurements. Sure, you’ve seen meters that have “true RMS” settings, but what does it mean? If you don’t know — or you want a refresher — watch [Prof MAD’s] recent video explaining the topic.

There are two things to remember when working with RMS. If you put, say, 100VDC through a 100-ohm resistor, you’ll draw 1A and use 100W of power. However, since AC gradually makes its way to a peak value and then starts ramping down immediately, you can’t use the peak value or anything like it to figure out AC power. After all, the voltage is only at that peak for an instant. That’s where RMS comes in. 100 VAC RMS through a 100-ohm resistor will also consume an average of 100W over time.

Continue reading “Need A Refresher On RMS?”

Reverse-Engineering A Russian Tornado-S Guidance Circuit Board

With Russian military hardware quite literally raining down onto the ground in Ukraine, it’s little wonder that a sizeable part of PCBs and more from these end up being sold on EBay. This was thus where [msylvain] got a guidance board from a 300 mm Tornado-S 9M542 GLONASS-guided projectile from, for some exploration and reverse-engineering. The first interesting surprise was that the board was produced in February of 2023, with the Tornado-S system having begun production in 2016.

Presumed location of the PCB under investigation in the Tornado-S rocket.

The 9M542 and similar rocket projectiles are designed to reach their designated area with as much precision as possible, which where the guidance system comes into play. Using both GLONASS and inertial navigation, the rocket’s stack of PCBs (pictured) are supposed to process the sensor information and direct the control system, which for the 9M542 consists out of four canards. The board that [msylvain] is looking at appears to be one of the primary PCBs, containing some DC-DC and logic components, as well as three beefy gate arrays (ULAs). While somewhat similar to FPGAs, these are far less configurable, which is why the logic ICs around it are needed to tie everything together. For this reason, gate array technology was phased out globally by the 1990s due to the competition of FPGAs, which makes this dual-sided PCB both very modern and instantly vintage.

This is where a distinct 1980s Soviet electronics vibe begins, as along the way of noting the function of each identified IC, it’s clear that these are produced by the same Soviet-era factories, just with date stamps ranging from 2018 to more recent and surface-mount DIP-sized packages rather than through-hole.

Continue reading “Reverse-Engineering A Russian Tornado-S Guidance Circuit Board”

Kinetic Clock Is A Clean Modern Way To Tell Time

Hackers and makers aren’t usually too interested in basic round analog clocks. They tend to prefer building altogether more arcane and complicated contraptions to display numbers for the telling of time. [alstroemeria] did just that with this nifty kinetic clock build.

The basic concept of the kinetic clock is to have a flat plate, which individual segments raise out of to create a physical (instead of illuminated) 7-segment display. This is achieved with servos which push the segments in and out using a small rack mechanism. It’s not a sophisticated build; it simply uses 30 servos to handle all the segments needed to tell time. Thus, the Arduino Mega was the perfect tool for the job. With a sensor shield added on, it has an abundance of IO, driving a ton of servos is a cinch. There’s also a DS3231 real time clock to help it keep accurate time.

Incidentally, it’s a hefty thing to print, according to YouTuber [Lukas Deem] who replicated the project. It took around 85 hours to print, and a total of 655 grams of filament – not counting mistakes and trashed parts.

And if you think you’re having deja-vu, you might well be. We’ve seen a take on this exquisite design before. We liked it then, and we like it now.

Overall, it’s a stylish build that looks as good as your 3D printer’s output will allow. A resin printer would be a massive boon in this regard. Video after the break.

Continue reading “Kinetic Clock Is A Clean Modern Way To Tell Time”

PDP-11 Trouble With A Ruthless Power Supply Issue

After [David Lovett] of [Usagi Electric] was donated a few cars full of DEC PDP-11 minicomputers of various flavors and vintages, he passed on most of them to loving homes, but kept a few of them himself. One goal of this being to put together a PDP-11 system that could be more easily taken to vintage computer shows than the ‘rollable’ PDP-11s he had access to prior. Of 1980s PDP-11s, the first-generation Large Scale Integration (LSI) PDP11/03 system (so-called Q-Bus models) is among the smallest, taking up about as much space as a 1980s desktop PC, while supporting the second generation LSI PDP-11/23 cards. It all seemed so easy until [David] tried testing the PDP-11/03’s PSU and everything went south.

Despite having access to the circuit diagrams of the PSU, figuring out what was going wrong was an absolute nightmare for [David], after some easy fixes involving replacing a blown fuse and bulging capacitors failed to deliver salvation. Reading through the comments to the video, it would seem that people are generally confused about whether this PSU is a linear, switching or some other configuration. What is clear is that with the absolutely massive transformer, it looks more like a linear power supply, but with a lot of protections against over current and other failure modes built-in, all of which rely on transistors and other components that could have gone bad.

Although in round 1 the PDP-11/03 PSU won the battle, we hope that once round 2 commences [David] will have had the proverbial training montage behind him (set to ‘Eye of the Usagi’, probably) and will manage to get this PSU working once more.

Continue reading “PDP-11 Trouble With A Ruthless Power Supply Issue”

Feeding The Fire By Robot

It might seem a little bit counterintuitive, but one of the more carbon-neutral ways of heating one’s home is by burning wood. Since the carbon for the trees came out of the air a geologically insignificant amount of time ago, it’s in effect solar energy with extra steps. And with modern stoves and well-seasoned wood, air pollution is minimized as well. The only downside is needing to feed the fire frequently, which [Anders] solved by building a robot.

[Anders]’ system is centered around a boiler, a system which typically sits in a utility area like a basement and directs its heat to the home via another system, usually hot water. An Arduino Mega controls the system of old boat winches and various motors, with a grabber arm mounted at the end. The arm pinches each log from end to end, allowing it to grab the uneven logs one at a time. The robot also opens the boiler door and closes it again when the log is added, and then the system waits for the correct set of temperature conditions before grabbing another log and adding it. And everything can be monitored remotely with the help of an ESP32.

The robot is reportedly low-maintenance as well, thanks to its low speed and relatively low need for precision. The low speed also makes it fairly safe to work around, which was an important consideration because wood still needs to be added to a series of channels every so often to feed the robot, but this is much less often than one would have to feed logs into a boiler if doing this chore manually. It also improves on other automated wood-burning systems like pellet stoves, since you can skip the pellet-producing middleman step. It also eliminates the need to heat your home by burning fossil fuels, much like this semi-automated wood stove.

Continue reading “Feeding The Fire By Robot”