Ballpoint Switch Is Oh-So Satisfying

Alright, here’s your quick and dirty hack for the day. The astute among you may recall [Peter Waldraff]’s bookshelf train build of a few days ago, and the fact that he used a switch made from a dead ballpoint pen to light up the scene. Fortunately, [Peter] wrote in to give us the details of this low-voltage sub-build, which you can see in the video after the break.

Essentially, [Peter] starts by making a shortened version of the pen. He modifies nearly every bit of it, including cutting down the ink cartridge, so if you try this, make sure the thing is all dried up first. Then, as he is screwing the point holder back on the barrel, he wraps elastic cord around the inside barrel in lieu of having sewing thread lying around. This cord along with some hot glue will hold a pair of paper clips to the sides of the point holder. When the pen is clicked into the writing position, it makes a connection between the paper clips and closes the circuit on whatever is wired into it.

What types of little hacks like this have gotten you through the build? Let us know in the comments, or better yet, write it up and drop us a tip. By the way, here is that bookshelf train build in case you missed it.

Continue reading “Ballpoint Switch Is Oh-So Satisfying”

Lorenz Attractor Analog Computer With Octave Simulation

[Janis Alnis] wanted to build an analog computer circuit and bought some multiplier chips. The first attempt used apparently fake chips that were prone to overheating. He was able to get it to work and also walked through some Octave (a system similar to Matlab) simulations for the circuit. You can follow along in the video below.

Getting the little multiplier chips into the breadboard was a bit of a challenge. Of course, there are a variety of ways to solve that problem. The circuit in question is from the always interesting [Glen’s Stuff] website.

From that site:

The Lorenz system, originally discovered by American mathematician and meteorologist, Edward Norton Lorenz, is a system that exhibits continuous-time chaos and is described by three coupled, ordinary differential equations.

So, the circuit is an analog solution to the system of differential equations. Not bad for a handful of chips and some discrete components on a breadboard. We’ve seen a similar circuit on Hackaday.io.

Check out our recent competition winners if you want to see op amps do their thing. Analog computers were a thing. They aren’t always that complicated, either.

Continue reading “Lorenz Attractor Analog Computer With Octave Simulation”

Hackaday Links Column Banner

Hackaday Links: January 28, 2024

From the “No good deed goes unpunished” files, this week came news of a German programmer who probably wishes he had selected better clients. According to Heise Online (English translation), a freelance programmer — referred to only as “defendant” in the article — was retained by a company to look into a database problem in their system. His investigation revealed that the customer’s database was being filled with log messages from a third-party service called Modern Solution GmbH & Co. KG. over a MySQL connection to a remote server. Assuming this connection was dedicated for his client’s use, the programmer looked at the executable used to make the connection with a text editor, which revealed a password in plain text. Upon connecting to the remote database, he found that it not only contained data for all of Modern Solution’s customers, but also data for all the end users of their customers.

Realizing he’d unintentionally wandered into verboten territory, the programmer immediately backed out and contacted Modern Solutions. They quickly fixed the issue, and then just as quickly reported him to the police. Their “investigation” revealed that the programmer had “decompiled” the executable to obtain the password, in violation of German law. The judge agreed, stating that merely looking at and using the password constituted a criminal offense, regardless of intent and despite the fact that Modern Solution had provided the password to the programmer’s client when they sold them the software. The upshot of all of this nonsense? A €3,000 fine for the programmer, if the verdict stands on appeal. It could have been worse, though; German law allows for up to three years in prison for such offenses.

Continue reading “Hackaday Links: January 28, 2024”

Building Nanoleaf-Inspired Wall Panels That Look Great

Nanoleaf is well-known as being that company that makes those lovely glowing tiles that you can hang on your wall. The only thing is, they’re not cheap. So if you want a really cool layout, you have to spend a great amount of money. [Projects with Red] was inspired by the basic concept, though, and whipped up their own gem-shaped wall tiles along similar lines.

The devices can work as a big clock if you so desire.

The irregular hexagon shape of each gem has ten connection points to attach the segments together. Physical connections are made using the 3D printed housings of each segment, while connections are simply made with wires and connectors hanging out the back for flexibility.

Each segment features a black printed housing with a solid lid and a translucent acrylic sheet to act as a diffuser. An addressable LED strip is mounted to the lid for illumination, with Dupont connectors for hooking them up to power and data. An ESP32 is used to drive the addressable LED chain, running the WLED.me software for easy control of the lights and animations. The video below also explains how to configure the segments into a giant colorful 7-segment display.

It’s a neat way to build some LED wall art, with plenty of scope to reconfigure it to suit your own needs. We’ve seen some other fun LED tile projects before, too.
Continue reading “Building Nanoleaf-Inspired Wall Panels That Look Great”

Bringing An IBM Butterfly Laptop Back From The Dead

Among all the laptops produced over the last few decades, there is one which rises above the rest and which has retained an appeal long after its meager computing resources became obsolete. It’s the IBM 701c, the famous “Butterfly” laptop, whose fold-out keyboard still gives it star  quality, and [John Graham-Cumming] has documented the restoration of one from the tattered remains of two scrap examples.

The two laptops in question were someone else’s never-started project, and were in a sorry state. The flexible cables were in poor condition, and the 1990s Ni-MH batteries had leaked and damaged both circuits and case. We were unaware that NiMH leakage could damage plastic, but the parts of these machines were significantly damaged.

One had a working mainboard, the other a working modem card. One keyboard was in pretty bad shape, the other was complete. Of the pair there was a double super twisted nematic (DSTN) display and a more contemporary thin film transistor (TFT) panel. Be thankful if you have never had to use a DSTN laptop, as they were truly awful. From this pile of parts a working machine could be made, and with a new CMOS battery, that cable repair, and a repaint, he was ready. Or at least, as he says, ready for 1995.

This isn’t the first 701c restoration we’ve seen, and within reason, it’s even possible to give them a retro processor upgrade.

Getting Started With USB-C And Common Pitfalls With Charging And Data Transfer

USB-C is one of those things that generally everyone seems to agree on that it is a ‘good thing’, but is it really? In this first part of a series on USB-C, [Andreas Spiess] takes us through the theory of USB-C and USB Power Delivery (PD), as well as data transfer with USB-C cables. Even ignoring the obvious conclusion that with USB-C USB should now actually be called the ‘Universal Parallel Bus’ on account of its two pairs of differential data lines, there’s quite a bit of theory and associated implementation details involved.

The Raspberry Pi 4B's wrong USB-C CC-pin configuration is a good teaching example.
The Raspberry Pi 4B’s wrong USB-C CC-pin configuration is a good teaching example.

Starting with the USB 2.0 ‘legacy mode’ and the very boring and predictable 5 V power delivery in this mode, [Andreas] shows why you may not get any power delivered to a device with USB-C connector. Most likely the Downstream Facing Peripheral (DFP, AKA not the host) lacks the required resistors on the CC (Configuration Channel) pins, which are both what the other USB-C end uses to determine the connector orientation, as well as what type of device is connected.

This is where early Raspberry Pi 4B users for example saw themselves caught by surprise when their boards didn’t power up except with some USB cables.

The saga continues through [Andreas]’s collection of USB-C cables, as he shows that many of them lack the TX/RX pairs, and that’s before trying to figure out which cables have the e-marker chip to allow for higher voltages and currents.

On the whole we’re still excited about what USB-C brings to the table, but the sheer complexity and number of variables make that there are a myriad of ways in which something cannot work as expected. Ergo Caveat Emptor.

Continue reading “Getting Started With USB-C And Common Pitfalls With Charging And Data Transfer”

3D Printed RC Kart Actually Made Entirely By Hand

If we told you somebody built a 3D printed go-kart, you’d expect to see a certain sequence of events. A bit of work in CAD, a printer montage, then some assembly. That’s not the case here. [3D Sanago] is an artist that works with 3D printing pens, creating 3D objects entirely by hand. It’s an impressive skill, all the more so when it’s used to build something functional like this gorgeous little go-kart.

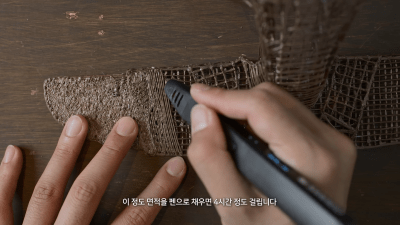
Just filling in the front wing of this build took approximately four hours. Thus, [3D Sanago] used foam boards to cover much of the chassis.
The build recreates the kart from the KartRider Rush+ game. The first step was to purchase a basic RC car frame to serve as the basis for the kart. [3D Sanago] then set about building a kart skeleton over the unpainted body of the basic RC car. It starts with a wireframe and individual flat panels that are eventually fused together into 3D trusses using the 3D pen.

The trusses are then mounted to the RC car chassis underneath with some wood plates serving as a supporting structure. [3D Sanago] has been known to surface his creations by tediously filling in the wireframes with the 3D pen, but not so this time. He took the easy way out of affixing sections of foam board to create the outer skin of the kart. He also demonstrates neat techniques like forming over a pen to create long plastic pipes and other tubular features. His acrylic-and-mousepad wheel and tire package is also pretty neat.

It’s as much craft as anything else, but it’s amazing to see what can be done when a human takes on the role of a 3D printer.  We’ve featured other great builds from [3D Sanago] before, like this awesome Pokemon-themed humidifier.

Continue reading “3D Printed RC Kart Actually Made Entirely By Hand”